Monday, July 13, 2015

Does Sony PS4 support MKV video format files via USB

Source: How to Play MKV Movies on PS4

Sony PlayStation 4 can be regarded as the most exciting game console with the configurations of 4K resolution, HDMI (1080p and 4K), Blu-ray drive, streaming function. And if you watched its E3 press conference pre-show in 16 Jun 2015, you probably heard the good news – Media Player for the PS4 will be available to download from PlayStation Store from that evening. And the media player can support MKV file with H.264/MPEG-4 AVC High Profile Level4.2 visual and MP3, AAC LC, AC-3 (Dolby Digital) audio. But for those MKV files which don’t meet the criterion, what can we do to play MKV movies on PS4? 

Thanks to the third-party MKV to PS4 Converter software, now we could convert MKV to PS4 playable format. As the best MKV to PS4 Converter, Pavtube Video Converter Ultimate is recommended here, which is professional on transcoding MKV files to PS4 with fast speed and best quality. What’s more, this software can deal with all most video formats, like MTS, MXF, MOV, H.265, etc besides MKV to PS4 compatible MP4, H.264, WMV or MPEG-2 files. It even helps to convert PS4 unsupported audio like FLAC, OGG, M4R, M4B, AIFF, DTS etc to PS4 supported MP3, WAV or WMA. (Read Review

Free download and install 


Other Download: 
– Pavtube old official address: http://www.pavtube.cn/blu-ray-video-converter-ultimate/ 
– Cnet Download: http://download.cnet.com/Pavtube-Video-Converter-Ultimate/3000-2194_4-75938564.html 

How to play MKV to PS4 with Pavtube MKV to PS4 Converter? 

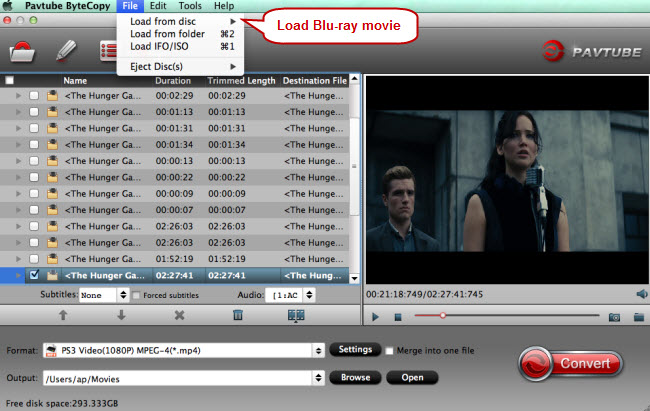
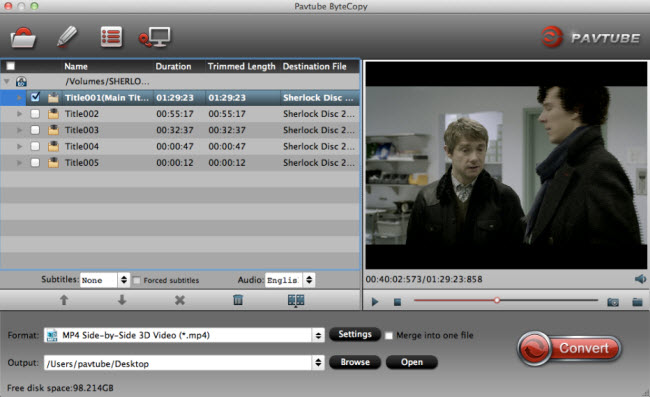
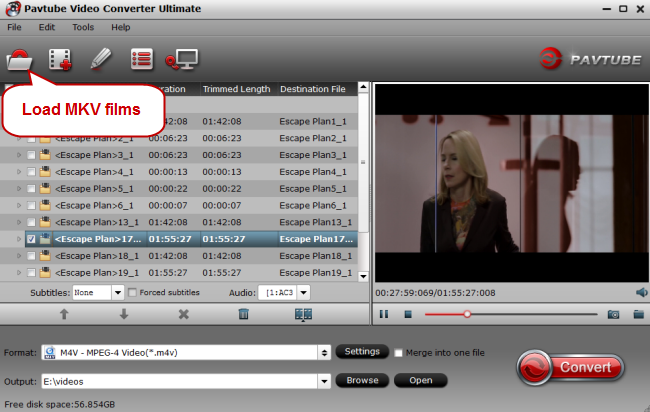
Step 1: Import MKV files 

Click “File” button on the top of the main interface to import the MKV videos to the program. You also can drag the files to the App directly. 

 
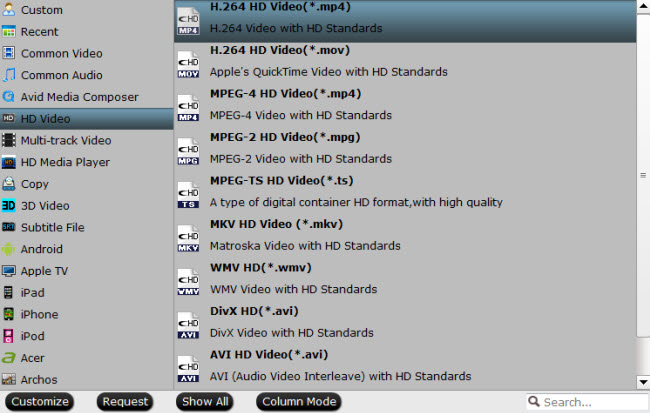
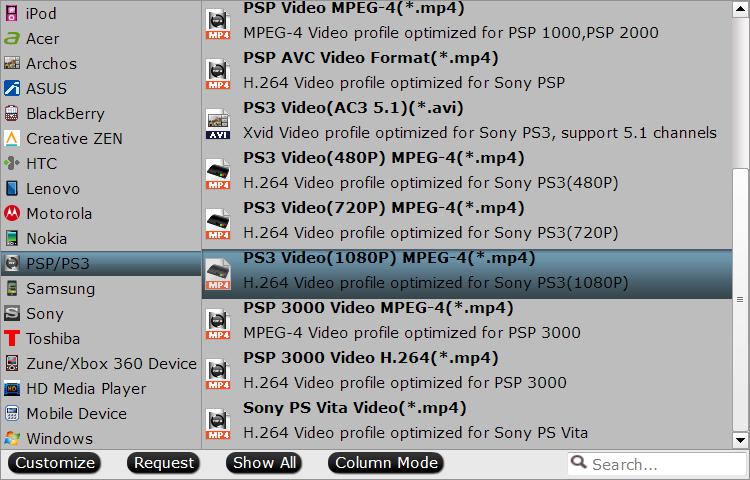
Step 2: Select compatible format 

From “Format” drop-down list, go to choose “PSP/PS3″ > “PS3 Video(1080P) MPEG-4 (*.mp4)” as the final output file format for playing on PS4. 


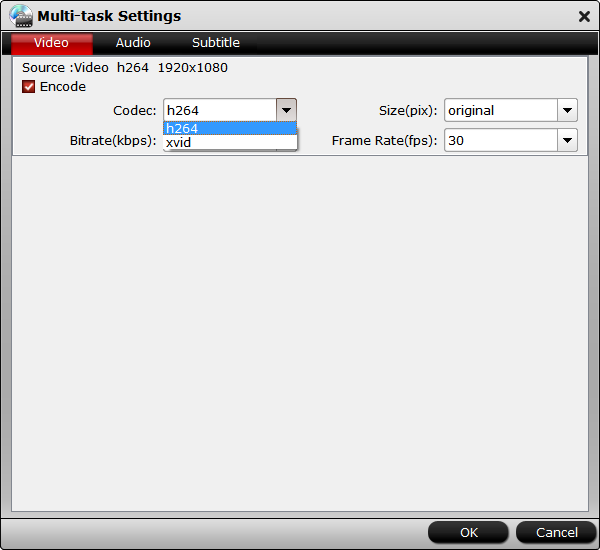
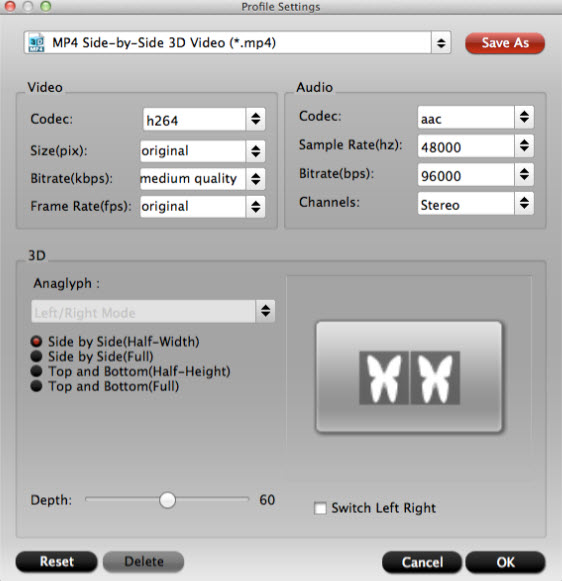
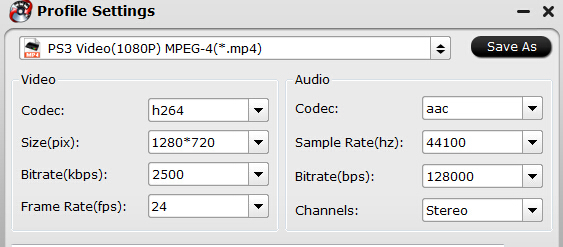
Tip: If you need, you can go to “Settings” to select the video parameters like Video&Audio Bitrate, Video Size, Frame rate, Audio Channels .etc to meet your personal demands. 


Step 3: Start MKV to PS4 conversion. 

When all the settings is done, go back to the main interface and carry out the conversion by hitting right-bottom convert button. When the MKV to PS4 conversion is finished, click the “Open” icon on the main interface to pop out the converted files. 

In addition, with Pavtube Video Converter Ultimate, you also could convert MKV to iTunes libraryApple TVWindows Media Player

How to play MKV movies on PS4 from a USB device? 

1. Connect the USB drive to PS4. Turn on your PS4, plug your USB device into the PS4 USB port. 
2. Go to the category (Music, Video, Photo, etc) on your PS4 home menu, select the USB device icon and then tap the “up triangular arrow” button. 
3. Highlight “Display All” and the press the “x” button. A list of all folders and playable content for that category will be displayed. 
4. To view or play a file, highlight the file and press the “x” icon.

Also learn how to stream movies to my PS4 via local networkFollowing above all steps, now you can enjoy all your MKV movies on your PS4. 

Related Article:

Friday, July 10, 2015

Solutions of Backup DVD to WD My Cloud for Streaming and Playing

Summary: Have you loss your head about backup DVD files to WD My Cloud for streaming to other portable device for watching? This tutorial will give you some useful ideas and helps.

Hot searchMKV Video on WD | H.265 Encoded 1080p Video on WD TV | 3D Blu-ray Movie on WD TV

With WD My Cloud, you can watching videos on your TV with your families at home. If you get WD media player APP installed on your PC, Mac,or other portable devices such as smart phone, tablet, xbox, ps4, etc. You can also watching movies and videos with your WD My Cloud in Wi-Fi environment. 

As for DVD lovers, can they backup DVD to WD My Cloud this way? Although, WD My Cloud supported many video formats such as AVI (Xvid, AVC, MPEG1/2/4), MPG/MPEG, VOB (unprotected or unencrypted), MKV (h.264, x.264, AVC, MPEG1/2/4, VC-1), TS/TP/M2T (MPEG1/2/4, AVC, VC-1) MP4/MOV (MPEG4, h.264), M2TS, WMV9. All I can say is, impossible directly. Most of the DVD disc are protected and encrypted. Moreover, WD Cloud has no ability of backup DVD since it’s original box lack of a DVD drive. Even if you have the external DVD drive, WD original box can not identify it yet. 

Have you loss your head at this moment? Just take it easy, Pavtube DVDAid for Windows ( Mac version ) could give you a helping hand to copy DVD to WD My Cloud! This powerful program can remove protection and strip off encryption of DVD connections easily. In addition, you can makes 1:1 copy of original DVD Disc without quality loss with all audio streams, subtitle tracks, extras, etc for saving DVD to WD My Could. Besides, it’s approval directly copy DVD main movie content and leave out extras, commentary, etc for backup DVD to WD My Cloud. Let’s get this powerful DVD backup program and start to backup DVD on WD Cloud by the steps below.


Other Download:
- Pavtube old official address: http://www.pavtube.cn/dvd_ripper/
- Cnet Download: http://download.cnet.com/Pavtube-DVDAid/3000-7970_4-76158510.html

How to Backup DVD to WD My Cloud for Streaming and Watching?

Step 1. Load DVD source.

First of all, connect DVD drive with your Mac and insert your DVD, then import DVD into the software after launching it. Click “Load files” icon to choose DVD source for importing.


Step 2. Choose output format.

By choosing Copy > Directly Copy, you are able to copy the selected movie file in its original format without quality loss. When directly copy a DVD movie, you will get .vob as output. It can stream to TV for watching directly.


Tips: you can also choose another format such as mp4 for IOS devices, android devices, xbox, ps4, etc.

Step 3. Start conversion.

Hitting the right-bottom convert and starts directly copy DVD conversion.

After the conversion, you can click “Open” output folder to popup output directory with the converted files. Then transfer this converted files to your external hard drive and connect with WD original box, select the files and confirm to stream it to WD Cloud, after all,you can watch it on other portable devices with WD media player log in.

More Guides:

Thursday, July 9, 2015

How to Watching DVD on Kindle Fire HD at 720p?

Summary: Kindle Fire HD enable you to shopping, download, browse, and read e-books, newspapers, magazines and other digital media via wireless networking. You cannot wait to transfer your favorite DVD on this 6-inch tablet for watching, right? Here we learn more about how to rip DVD video to Kindle Fire HD6.

Hot searchPlaying Blu-ray on Kindle Fire HDX | Disney DVD Movies to Kindle Fire HD | Recommended File Formats for Amazon Kindle Fire Tablets

Equipped with a most impressive looking 6-inch tablet screen, Amazon Kindle Fire HD has attracted a lot of fans since it was announced on tablet market. Kindle Fire HD is perfect for browsing, playing, reading, and shopping on-the-go. What’s more, it comes with some special feature like Exclusive Dolby audio and dual-driver stereo speakers. But how to transfer DVD to Kindle Fire HD6 is always a problem for those new customers. So let’s see the Kindle Fire HD supported file formats below:

Video: MP4, VP8

Audio: MP3, Non-DRM AAC (.m4a), MIDI, OGG, WAV

Obviously, DVD format video files are not compatible with this 6-inch Kindle Fire HD6. In addition, there is no DVD drive in Kindle Fire HD 6 to read DVD files.What should we do now? Take it easy, god never shuts one door but opens another, here we have figured out the easiest solutions to transfer DVD to Kindle Fire HD6 from PC. We introduce you a DVD to Kindle Fire Converter to make it easier--Pavtube DVDAid. It features great ability to handle the DVD to Kindle Fire HD6 for watching without neither crashing issues nor importing errors. Besides, this Kindle Fire Converter can upscale DVD video for playback on Kindle Fire HD 6 at 720p. Do you heart it? Follow steps below.


Other Download:
- Pavtube old official address: http://www.pavtube.cn/dvd_ripper/
- Cnet Download: http://download.cnet.com/Pavtube-DVDAid/3000-7970_4-76158510.html

How to watching DVD on Kindle Fire HD6 at 720p?

Step 1. Load DVD files.

Put DVD disc into your DVD drive. Then click "File", from its drop-down list, select "Load from disc" to import DVD files to the program.


Step 2. Choose the best output format specially for Kindle Fire HD6

This program has a high-light that it provides the special items for Android series, click the format bar to “Amazon Kindle Fire HD (*.mp4)” as the target video format.


Step 3.Settings profile.

To make your output videos more suitable with Kindle Fire HD tablet, please click “Settings” button, for a reference, make the video size as 1280*720, frame rate as 29.97 and bitrates as 3000.


Step 4. Starts DVD to Kindle Fire HD conversion

Clicking the “Convert” button on main interface and starts DVD to Kindle Fire HD conversion.

Finally, you can open output folder and transfer files to Kindle Fire HD tablet for watching.

More Guides:

Tuesday, July 7, 2015

How do I Backup Blu-ray to Plex Media Server for Watching

Summary: If you have large numbers of Blu-ray collections and have troubles to find the one you want in a short period of time. If you happen to have the Plex, backup Blu-ray to Plex would not be a trouble any more after the sample steps in this article. 

Hot searchBlu-ray full copy | Blu-ray to VLC | Blu-ray to Home Center | Blu-ray to M3U8

As we know Plex Media Server is the back-end media server component of Plex, which consists of closed-source code as well as some modified open-source code. Plex Media Server is used to host the content and plugins that are then streamed to Plex big screen apps (including Plex Home Theater) and Plex mobile apps, either on the same machine, the same local area network, or over the Internet. 

It must be the best choice to backup Blu-ray to Plex for a Blu-ray fans who get a large numbers of collections, so that they can enjoy almost the same quality of Blu-ray movie anytime and any anywhere, like sharing happiness with your family through Home Theater at weekends, killing times on your way to work on bus, seeing a clips of the latest movie with your colleagues after lunch time, etc. How wonderful it is! All you should do now is to backup your Blu-ray movies to Plex. Unfortunately, Plex can not read Blu-ray files till now. Due to most Blu-ray files are encrypted and not compatible with Plex Media Player, you’d better backup your Blu-ray movie to Plex by using another format that Plex supported. In personally, H.264 is a good select, it not only compatible with Plex, but also keep the movie quality within lowest loss.

Before you start backup your Blu-ray to Plex, you may need a Blu-ray to H.264 ripper first. Here I high recommend you a professional program Pavtube Bytecopy for Mac for you. (If you are a Windows user, Pavtube ByteCopy for Windows will satisfy you.) This Blu-ray to H.264 ripper is designed to backup Blu-ray Blu-ray fans which is a powerful program with the ability of ripping Blu-ray collections to H.264 format videos so that you can freely watch on Plex Media Server. Let’s do it follow the below steps.


Other Download:
- Pavtube old official address: http://www.pavtube.cn/bytecopy-mac/
- Cnet Download: http://download.cnet.com/Pavtube-ByteCopy/3000-7970_4-76177783.html

How Do I Backup Blu-ray to Plex Media Server for Watching?

Step 1. Load Blu-ray.

Put Blu-ray disc into your Blu-ray drive and then plug the Blu-ray drive into the computer through its USB cable. Then click "File", from its drop-down list, select "Load from disc" to import Blu-ray disc to the program.


Step 2. Choose H.264 format as output.

Clicking the Format bar, you can click “HD Video” >> “H.264 HD Video (*.mp4) as output format from the format list.


Step 3. Start converting Blu-ray to H.264 HD video

Click “Browse” to set the destination file to store the converted Blu-ray movie. And then point to the red button “Convert” in bottom right corner to realize Blu-ray to H.264 conversion.

Finished Bluray to H.264 conversion, you can save the converted Blu-ray movie in H.264 format on your Plex Media Server, and enjoy anytime and anywhere.

More Guides:

Monday, July 6, 2015

Best Solution of Extract SRT Subtitle from Blu-ray

Summary:It maybe the best thing that you have ever imagined for reviewing a favorite dialogue from a Blu-ray without audios and videos when you want to stay alone, especially for a Blu-fans. Sometimes they even have troubles with backup Blu-ray to their portable devices, let alone subtitles. Well, I’ll be glad to get you out of this difficult issues.

Hot searchExtract .srt subtitles from DVD | Top 5 Subtitle Download Sites | Add subtitles to DVD Movies

In order to extract subtitles from the Blu-ray Disc, the very two background knowledge you should take a quick look first. 

The Subrip format, are more commonly known as subtitles, which has a file extension of ".srt," is used for caption files that are read by video player programs such as Windows Media Player and Quicktime. These subtitles can be opened with special programs that are made to run them in conjunction with the movie you are watching. However, it is also possible to just open and edit the file with any text editor program such as Notepad or WordPad.

Blu-ray Disc usually encrypted that you can only play it without change any structure like video, audio track, subtitles.  

There is any way to extract subtitles from the Blu-ray Disc? Of course, as the saying goes, there are more solutions than problem. You just need a extract converter which has it’s professional name Pavtube ByteCopy for Mac (if you are a windows user, you can get windows version Pavtube ByteCopy for Windows, the following steps are all the same except program version) at first. The next things the program will give you the best solutions. Don’t be afraid of having no experience how to extract *.srt subtitles from Blu-ray, the below sample steps will give you a lot of favors.


Other Download:
- Pavtube old official address: http://www.pavtube.cn/bytecopy-mac/
- Cnet Download: http://download.cnet.com/Pavtube-ByteCopy/3000-7970_4-76177783.html

How to Extract Subtitles from Blu-ray Disc?

Step 1. Load Blu-ray source

Download the extract converter for Mac and lunch it, put Blu-ray disc into your Blu-ray drive and then plug the Blu-ray drive into the computer through its USB cable. Click "File", from its drop-down list, select "Load from disc" to import Blu-ray disc to the program.


Step 2. Select SRT subtitle.
Find the “Format” menu, and select “Subtitle File” from its drop-down list. There is a options of the box-“SRT Subtitle(*.srt)”


Step 3. Start extract.

Hit the big red “Convert” and let it start extracting *.srt subtitles. 

Wait for a moment, open your file destination (or click “Open output folder” to locate generated files), you will get all the subtitles in English, Italian, Spanish… Which is exactly the same as in your original disc. For this situation, you could could one or some of them you need.

More Guides:

Friday, July 3, 2015

How to play Blu-ray ISO on WD TV Live without quality loss

Overview:Many users decided to backup all their bluray iso for playing on WD TV Live. The Wd can see it and play it without a problem, the only thing is that when you want to change audio track you can't see which language you’re choosing! You have to switch all of them to find the right one (same thing for the subtitles). Here we give you the solutions to solve it and the sample steps to allow you handle it smoothly.

Hot search:Convert DVD to WD|Connect WD TV to Your Home Theater|Convert DVD to HD AVI on WD|Multi-track MKV watching on WDTV

The WD TV is a consumer device produced by Western Digital that plays videos, images, and music from USB drives. It can play high-definition video through an HDMI port, and standard video through composite video cables. 

With WD TV Live media player, can you play Blu-ray files on your TV? The answer is some kind of disappointed. WD TV can not play a Blu-ray ISO at all because of the format of Blu-ray doesn’t supported by WD TV Live media player. There is anther solution for playing Blu-ray on WD TV Live. Except Blu-ray ISO, WD TV can play most common video and audio formats .Below is the complete WD TV supported video format list.
  • AVI (Xvid, AVC, MPEG1/2/4)
  • MPG/MPEG
  • VOB
  • MKV (h.264, x.264, AVC, MPEG1/2/4, VC-1)
  • TS/TP/M2T (MPEG1/2/4
  • AVCVC-1)
  • MP4/MOV (MPEG4, h.264)
  • M2TS
  • WMV9
  • FLV (h.264)
You can convert your Blu-ray ISO to other format list above for watching on WD TV Live. In this case, a professional Blu-ray to WD TV Ripper is the key to assist you to rip your Blu-ray ISO to WD TV supported video formats. Pavtube Bytecopyis the best tool I’d like to recommend to you. It is a powerful program with the ability of backing up Blu-ray ISO collection to multi-track MKV without quality loss.It is a pity that you can't edit videos if choosing multi-track output formats currently. Do not hurry, this Blu-ray to WD TV converter allows you to lossless backup Blu-ray with whole structure or just make a main movie copy of Blu-ray ISO. This two choice could satisfy you with full edit function. For example, you can add *.srt or *.ass/*.ssa subtitle-files to the video as hard subtitles. Is it funny? Follow the step and get Blu-ray ISO convert to WD TV starts.


Other Download:
- Pavtube old official address: http://www.pavtube.cn/bytecopy/
- Cnet Download: http://download.cnet.com/Pavtube-ByteCopy/3000-7970_4-76158512.html

How to play Blu-ray ISO movies on WD TV Live?

Step 1. Load Blu-ray files.

Launch Bytecopy, then click “File” >> “Load from IFO/ISO” with double click the chapter then you can preview it in the preview window.


Step 2. Choose output format.

Click format bar choose “Multi-track Video” >> “Loss/encoded Multi-track MKV (*mkv)” as the output format.


Tips: the program uses lossless output, but if you prefer to encode the file, you can click Settings button and go to Video Tab under Multi-task Settings window to check Encode and specify video codec. You can choose what audio codec you’d like to encode with as well. 


Step 3. Starts conversion.

To hit the “Convert” button on main interface to get Blu-ray ISO to MKV conversion begins.

Now the Blu-ray ISO files are supported by WD TV, and steam them to your TV for free enjoyment.

Note: If you are using a trial version, there will be Pavtube logo watermark in the middle of output files. To get rid of the logo watermark and get better performance, please click here buy full version for Windows or full version for Mac.

More guides:

Thursday, July 2, 2015

Rip 3D Blu-ray to 3D SBS MP4 for 3D TV on Mac

There’s a 99% chance you can’t watch 3D Blu-ray movies on 3D TV, but a powerful 3D Blu-ray Ripper can change that, and here’s why. If you have a 3D TV and a bunch of 3D Blu-ray discs, you can find out what you need to get working by reading the article.
As we know, 3D movies have joined people's daily life for a couple of years. The number of 3D consumers is increasing constantly, and 3D videos are becoming the most sought-after things. Instead of going to the cinema, many people prefer to enjoy their 3D blu-ray movies on TV to spend their weekends. Maybe most 3D movie fans would ask the same question that how to make your 3D Blu-ray sources playable on your 3D TV? Just like the problem below from a 3D movie fans.
I'm trying to find out if I can rip my 3D blu-ray's to my HDD and still get 3D playback on them to my TV via my HDMI connection. If so, how exactly would I go about burning them (if there is a certain way), and is there any special software or anything I'll need to play the blu-ray's back through to do this? I am using Mac OS X 10.9 Mavericks."
As is know to all, SBS 3D MP4 videos can be best played on 3D TV. The only unsolved problem left is a converter to rip 3D Blu-ray to movies in side-by-side 3D MP4 for 3D TV on Mac. Pavtube ByteCopy for Mac is your best choice which can rip 3D Blu-ray to movies in 3D MP4 for various 3D TV on Apple TV as well as other 3D players like Stereoscopic Player and BenQ W1070 Projector. Besides, it can create 3D videos out of source 2D Blu-rays/DVDs to enable users watch movies in 3D on any 3D devices with ease. With it, you also can adjust bit-rate, frame rate, 3D mode and depth according to your own need. Just follow the steps and show you how to rip 3D Blu-ray to 3D MP4 for watching on 3D TV.


Other Download:
- Pavtube old official address: http://www.pavtube.cn/bytecopy-mac/
- Cnet Download: http://download.cnet.com/Pavtube-ByteCopy/3000-7970_4-76177783.html

How to rip 3D Blu-ray to 3D SBS MP4 for watching on 3D TV

Step 1. Import 3D Blu-ray sources video files

Insert your 3D Blu-ray to your Mac, run 3D Blu-ray to 3D TV Converter and click "Load" to import.3D Blu-ray sources video files. An internal or external Blu-ray drive is required to recognize your 3D Blu-ray disc.


Step 2. Choose compatible video format

Click the format bar to follow "3D Videos" and choose the 3D Side-by-Side MP4 format which is most compatible with 3D TV.


Step3. Set profile.

Click "Settings" to adjust bitrate, frame rate, 3D mode and depth according to your own need.


Step 4. Start converting 3D Blu-ray

Clicking the “Convert” button on main interface and get the 3D Blu-ray to 3D SBS MP4 for 3D TV conversion starts.

After conversion, you can click Open output folder to transfer it to your Apple TV or other devices for watching. Read more information about Tips and Guide for HD Video Streaming with Apple TV for help.

More Guides: