Monday, August 31, 2015

Upload Blu-ray to Dropbox for Sharing

Dropbox is a storage document that can synchronizes your files online and across computers. Any files,like movies, musics, images, etc, can be placed into Dropbox. Only if you have a Dropbox client portal on your computer, moblie phone and tablet that has an internet connection, you can access the stored files from Dropbox whenever and wherever. But as like uploading DVD to Dropbox, if you want to add Blu-ray to Dropbox for playing and organizing, it will have a little trouble.

Hot search: Blu-ray to Wireless HDD | Blu-ray to WD MyCloud | Blu-ray to NAS | Blu-ray to WD External HDD | 

That’s because although Dropbox can support many kinds of videos like 3GP, AVI, MOV, WMV, M4V, MKV, etc, it can’t put Blu-ray disc online for lacking of Blu-ray drive. So for uploading Blu-ray to Dropbox for sharing and playing, a Blu-ray Ripper is the key point. 

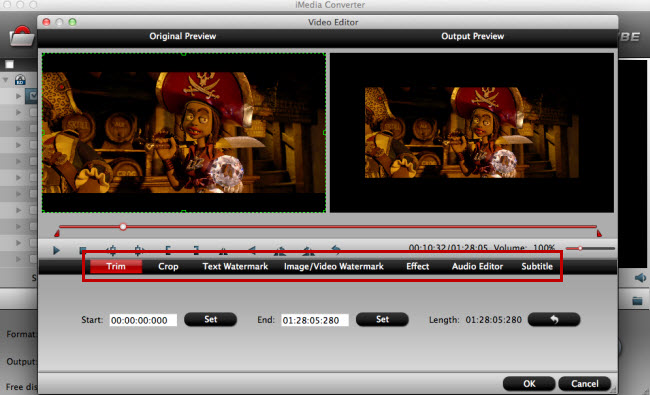
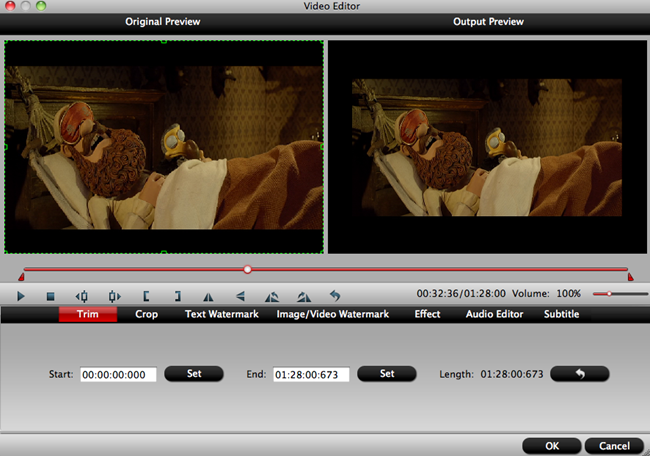
Pavtube BDMagic is a wise choice for you to rip Blu-ray to Dropbox with suitable format. This Blu-ray ripping tool can rip any encrypted Blu-ray and turn the Blu-ray movies to Dropbox in MP4, MOV, AVI, MKV, etc popular formats. For the video size limit of Dropbox site, the built-in editor also allows you to extract Blu-ray clips with the very part you want. Or, you can just choose to rip certain chapters of the Blu-ray as you like. (Review)

You can free download and install BDMagic on Windows computer: 
          

Other Download:
- Pavtube old official address: http://www.pavtube.cn/blu-ray-ripper/
- Cnet Download: http://download.cnet.com/Pavtube-BDMagic/3000-7970_4-75922877.html

How to add Blu-ray to Dropbox with suitable format?

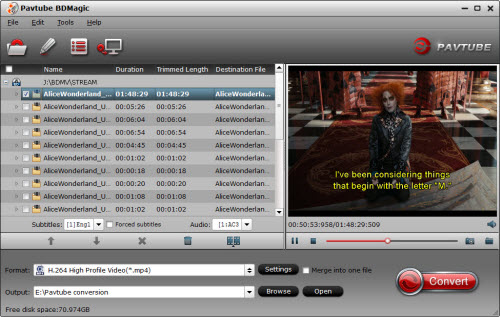
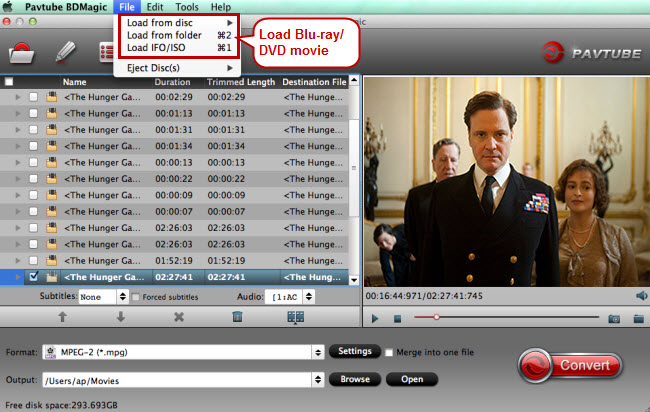
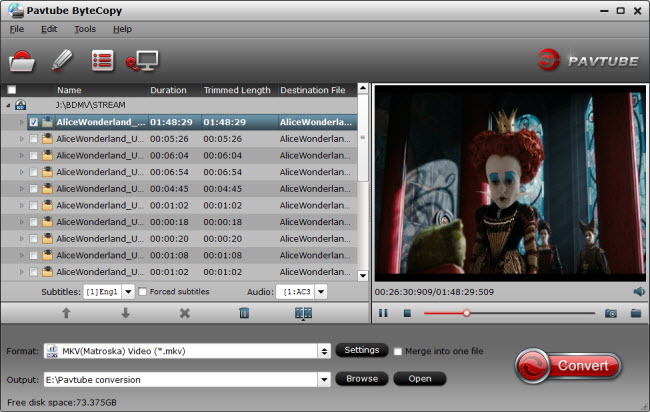
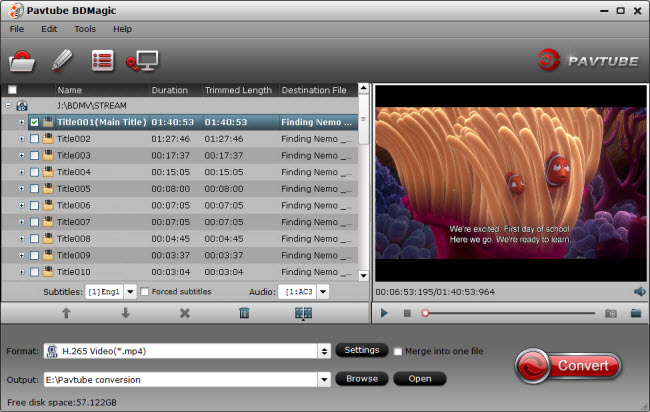
Step 1: Load Blu-ray movies to app

Run the Blu-ray to Dropbox software and click "BD/DVD disc" icon to load Blu-ray movies for converting. You can also import movies files from Blu-ray folder, ISO image files.


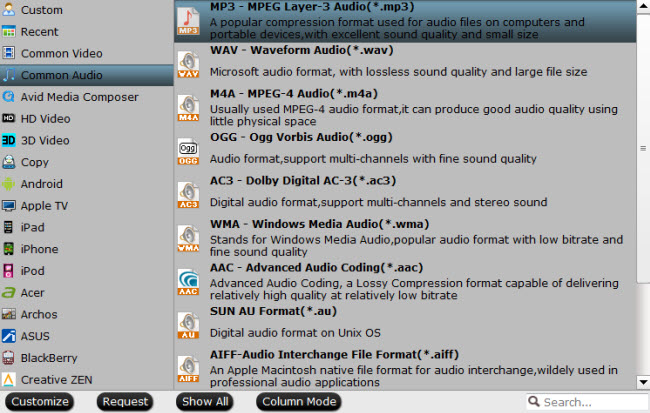
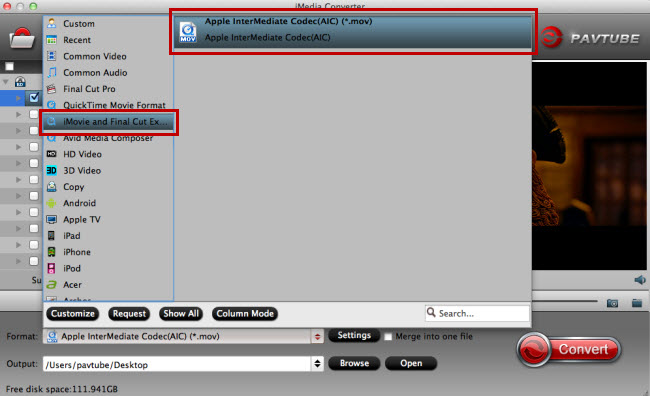
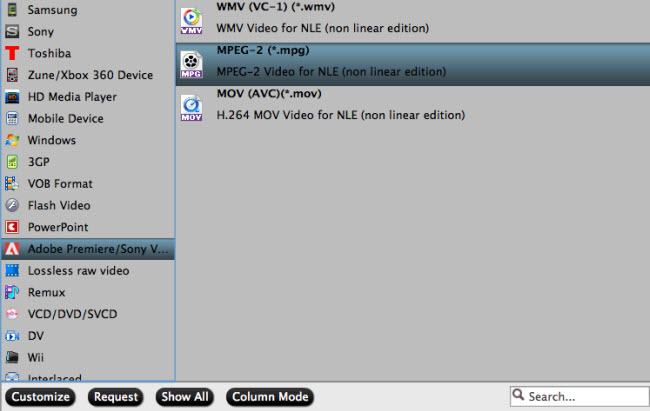
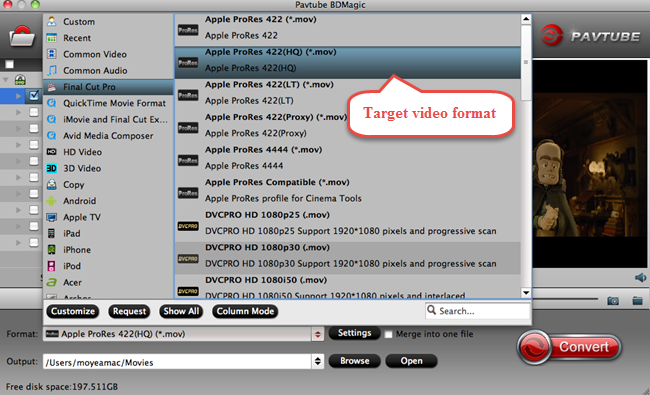
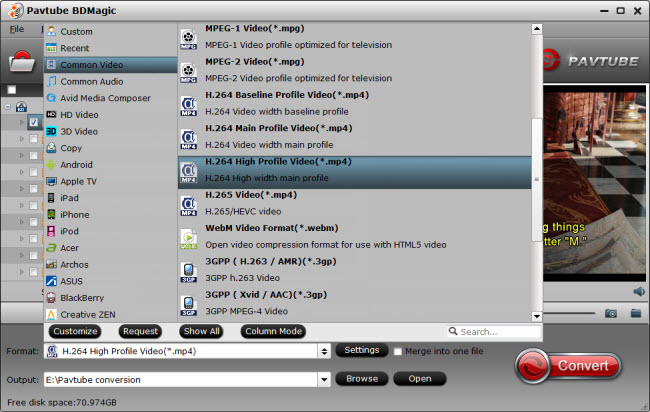
Step 2. Choose output format

Click "Format" and through the profile to select Dropbox highly compatible format like MP4, MOV from "Common Video" profile list. For those who wanna upload Blu-ray files to Dropbox and share on tablet or phones, you can choose a certain preset like iPad as target format. 


Tip: You can click settings button to customize the output parameters, such as resolution, bitrate, etc, you can also skip this step.

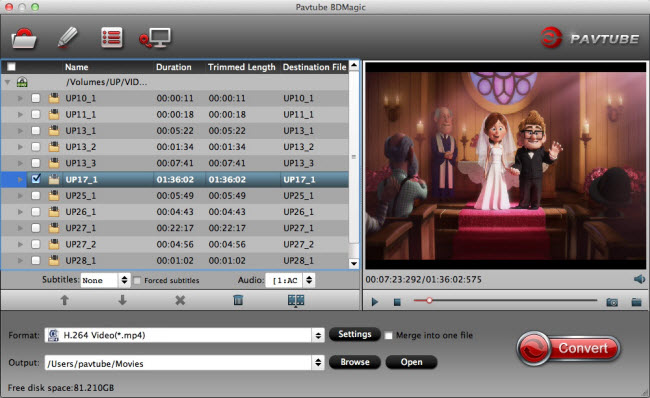
Step 3: Rip Blu-ray to Dropbox

After all settings, click "Convert" button to rip Blu-ray to Dropbox. When the process finishes, open the output folder to locate the generated file.

Upload ripped Blu-ray to Dropbox

1. Sign in to the Dropbox website.
2. Click the Upload button from the very top of the window. The upload button
3. A window will appear. Click the Choose File button and then select the file on your computer that you'd like to add to your Dropbox.
4. Choose as many files as you like, and then click the Start Upload button.
5. The window will disappear, your files will start uploading, and you'll be shown a progress indicator. That's it, you've added the converted Blu-ray files to your Dropbox!

Once you've added ripped Blu-ray files to Dropbox, now you'll make it available for viewing on other computers, Android, Apple devices anytime, anywhere just with the help of your Dropbox.

Related Articles:

Wednesday, August 26, 2015

How to Put Concerts Blu-ray Disc to iPad For Listening?

Yesterday, I received an e-mail from Quora to ask me how to put concert Blu-ray disc to iPad with only the song: “My sister in Conservatory of Music gave me a Concert Blu-ray disc recently. I want to extract the song from the Blu-ray disc to my iPad so that I can listen them with my momentum headphones. But I don’t know how to do. Do I need to use some software? ”

Of course you need a software. You need a Blu-ray audio extractor, which can bypass the Blu-ray encryption and extract the audio from Blu-ray disc to MP3 for iPad. For me, I like using Pavtube BDMagic to fulfill the task. I like using it to deal with all my affairs about Blu-ray. I have to say that it is really a professional Blu-ray ripper + Blu-ray Audio Extractor. It can easily extract the audio from your Blu-ray disc for iPad with the suitable format. It can output MP3, AAC, FLAC, MKA, OGG, WAV, etc audio and H.265/HEVC, H.264/MPEG-4, DivX, XviD, MKV, MP4, AVI, etc video with high quality. (Review)

Note: Mac users should use BDMagic for Mac

Free download and install BDMagic on Windows: 
          

Other Download:
- Pavtube old official address: http://www.pavtube.cn/blu-ray-ripper/
- Cnet Download: http://download.cnet.com/Pavtube-BDMagic/3000-7970_4-75922877.html

Step 1. Load concert Blu-ray disc

Run the Blu-ray to iPad ripper on computer and click “File” > “Load from disc” to load the concert Blu-ray disc to the app.


Step 2. Choose MP3 as output format

As iPad supports playing MP3 audio files, just click the format bar to follow “Common Audio” option and pick “MP3 - MPEG Layer-3 Audio(*.mp3)” as the output format.


Tip: if you need the certain clip of the Blu-ray audio, you can trim the footage in built-in video editing tool. Hit the pencil like icon “Edit” on the menu and open the video editor window. Here, you can find the trim function. 

Step 3. Rip Blu-ray disc to iPad

Click on the “Convert” button to start ripping concert Blu-ray disc to MP3 for playing songs on iPad. After the process, open the output folder to find the generated audio file.

Then you can transfer the Blu-ray audio to iPad. You should be able to enjoy the audio on iPad with your momentum headphones.

Related Articles:

Monday, August 24, 2015

Put Sony PXW-X70 Pro XDCAM MXF Video to iMovie for Editing

With high definition and delicate image, Sony PXW-X70 camcorder is popular among amateurish lovers and professional photographers. When taking videos, it no doubt is the best choice. But it still brings us some troubles, for example, when we want to put Sony PXW-X70 Video to iMovie to do some video processing:

“I several days ago took some exciting challenge videos with my Sony PXW-X70 XDCAM camcorder. But I was refused to edit my footage in iMovie. How does it go wrong? Appreciate if there’s a big favor”

Frankly speaking, do you ever meet the trouble just like above? And do you get the reason clearly? It is because the output video format of Sony PXW-X70 camcorder is MXF container format, which can’t be accepted by most media players or editing software. Thus, you maybe need the help of Pavtube iMedia Converter for Mac, which can perfectly turn Sony PXW-X70 MXF to iMovie supported formats, like MOV, AVCHD, DV, MPEG-2, etc. 

Free download and install it on Mac:
          

Other Download:
- Pavtube old official address: http://www.pavtube.cn/imedia-converter-mac/
- Cnet Download: http://download.cnet.com/Pavtube-iMedia-Converter/3000-2194_4-76177788.html

How to put Sony PXW-X70 Pro XDCAM MXF Video to iMovie for Editing?

Step 1: Load source MXF file to app

Click “Folder” icon and choose “Add audio/video” to load the Sony PXW-X70 MXF file to this MXF to iMovie software on Mac. 


Step 2: Choose iMoive supported video format

Click the format bar to follow “iMovie and Final Cut Pro…” and choose “Apple InterMediate Codec (AIC) (*.mov).” as the output format. This format is used with all HD workflows in editing software such as iMovie, Final Cut Express, and until Final Cut Pro version 5.


Step 3. Edit MXF file

If your video is too long and you just need a clip of it. You can click the pencil icon to go to the editing interface where you’re allowed to trim your favorite clips. You even can crop unwanted images, add watermarks, and insert subtitles, etc.


Step 4: Convert MXF video to AIC MOV

Go back to the main UI and click “Convert” to start conversion from MXF to the video format AIC MOV for iMovie. In the output folder, you can find the generated file. 

Now, you can run iMovie on your Mac. Then drag the converted Sony PXW-X70 them from the Finder to the even in the Libraries list in iMovie. Now, you can edit the video in iMovie. 

Hot search: DVD to Promiere Pro CC | DVD to FCP X | Blu-ray to FCP X | Blu-ray to Promiere Pro CC

Related Articles:

Friday, August 21, 2015

Import Blu-ray to Premiere Pro CC for Editing

As a professional video editing software, Premiere Pro CC is widely used by professionals and hobbyists for its powerful editing features. You can recreate and reproduce your personal videos by it to show your skills. But when your raw videos is Blu-ray movies, how to import and edit these Blu-ray movies on Premiere Pro CC? After all, you can’t deny that many wonderful and high definition videos exist in Blu-ray discs. 

Hot search: Blu-ray to FCP X | DVD to FCP X | DVD to Avid Media Composer | Blu-ray to Avid Media Composer | MXF to Edius Pro | 

Blu-ray give us better visual enjoyment but the movies mode is really hard to use for its complex protection technology in some non-linear video editing tools like Premiere Pro CC. Fortunately, there are always solutions to remedy the shortage. To import footage on Blu-ray into Premiere Pro CC, you’ll need to rip and convert Blu-ray to a more-editing friendly format like MPG or WMV at first. Here you can try Pavtube BDMagic for Mac, (See other options).

It can rip and backup Blu-ray to MPEG-2, WMV, MPG, MOV format on Mac, which can be easily recognized by Premiere Pro CC, with the original video quality. You can choose to rip one title or entire Blu-ray disc to MPEG-2 format video favored by Premiere Pro CC on Mac OS X El Capitan 10.11, Yosemite 10.10 and Maverick 10.9. It enables you to trim DVD video footage, merge several video clips, crop video black area before outputting. For importing commercial DVD to Premiere Pro CC, it is also a good choice. 

Now, you can download and install BDMagic for Mac freely and follow the next steps to rip Blu-ray to Premiere Pro CC.


Other Download:
- Pavtube old official address: http://www.pavtube.cn/blu-ray-ripper-mac/
- Cnet Download: http://download.cnet.com/Pavtube-BDMagic/3000-7970_4-76177782.html

How to import Blu-ray to Premiere Pro CC on Mac?

Step 1. Load Blu-ray movie

Run the Blu-ray to Premiere ripper for Mac, and click “File” to import Blu-ray movie to the app.


Step 2. Choose Premiere compatible format

Ripping Blu-ray clips to MPG, WMV or MOV - highly compatible with Adobe Premiere will be great. Here you can click the format bar to follow “Adobe Premiere/Sony V…” > “MPEG-2(*.mpg).” for Premiere Pro CC.


Step 3. Cut clips from Blu-ray movie (Optional)

To get the clips from Blu-ray video, open the “Video Editor” by clicking “Edit” and cut the wanted Blu-ray movie clips by tapping on “trim.” Other helpful editing functions are cut off black bars by cropping, adding watermarks, adjusting special effects.


Step 4. Rip Blu-ray to Premiere Pro CC

When back to the main interface, click “Convert” in bottom right screen to realize Blu-ray to Premiere Pro CC conversion for free importing and ingesting by Adobe Premiere Pro CC.

Now, you can import the ripped Blu-ray media file to Premiere Pro CC on Mac for your editing.

Related Articles:

Wednesday, August 19, 2015

Pavtube Windows Upgrade to 4.8.6.5 - Add TV, ProRes, H.265 MKV Profile

Pavtube Studio just announced all Pavtube Windows products, including BDMagicByteCopyDVDAidVideo Converter UltimateVideo ConverterMXF ConverterHD Video ConverterMTS Converter and MXF MultiMixer, are upgraded. PC users now can encode Blu-ray, DVD movies and all kinds of Common/HD/4K Videos to MOV with Apple ProRes codec, HEVC/H.265 MKV, and Sony/LG/Samsung/Panasonic TV formats with excellent video/audio quality and super speed. Registered users could download and install the latest version for solution to their issues.

See also:


What's new in this upgrade?

1. Add Apple Prores as output

PC users who are eager to create Apple ProRes video under Windows OS would love the new upgrade of Pavtube Windows programs because this has been realized in the new version. Pavtube adds Apple ProRes MOV in Format list for fluent video playback, video editing, and personal use you desire.

2. Support encoding to H.265/HEVC MKV

Another new element in the new Pavtube programs is that registered users now can save Blu-ray, DVD, and video sources to HEVC/H.265 MKV. HEVC provides better video quality in same file size compared to H.264. And Pavtube members can do that in the new upgrade with fast speed.

3. Compatible with Sony/LG/Samsung/Panasonic TVs.

Last but not least, Pavtube software is not compatible with Sony, LG, Samsung and Panasonic TVs. Pavtube adds these TVs under Format menu, without extra operations, you can easily create movies and videos for perfect playback on any of these TVs.

More information you need about the new upgrade and Pavtube products can be found on Pavtube official website.

Pavtube Software Upgrade Promotion on Facebook

http://bit.ly/1hmOn34

This upgrade, Pavtube Facebook provide up to 35% Off Blu-ray/DVD Ripper & various (HD) Video Converters, the best yet easy-to-use tools to convert your Blu-ray/DVD movies, Common/HD/4K Video files into H.265 MP4/MKV, Apple Prores, various TV profiles, M3U8, MP4, MOV, MKV, AVI, M4V, WMV, VOB, MPG, FLV, SWF, Divx, Xvid, AAC, MP3, WMA, WAV, M4A, AC3, FLAC and more onto smartphone, tablet, computer, media player, stream server, TV set, game console, VR headset, hard drive, etc. with multiple wanted audio/language/chapter markers!

Up to 35% OFF Discount can be shared here:

35% Off Pavtube BDMagic for Windows or Mac
35% Off Pavtube DVDAid for Windows or Mac

30% Off Pavtube Video Converter Ultimate for Windows or Mac
30% Off Pavtube Video Converter for Windows or Mac

20% Off Pavtube ByteCopy Windows or Mac
20% Off Pavtube MTS/M2TS Converter for Windows or Mac
20% Off Pavtube Multi-track MXF Converter for Windows or Mac

Just like us on page and you can get it with all other free software giveaways, useful guides, and lifelong discounts.

If you have any problem to buy or use Pavtube software, pls feel free to contact support@pavtube.com (for Windows user), macsupport@pavtube.com (for Mac user).


More Topics

How to Rip and Backup Blu-ray to FCP X?

People like creating and producing personal videos to put into YouTube for grabbing others’ eyes. When you need to edit videos on Mac, you may be used to use Final Cut Pro X, which is a revolutionary application for creating, editing, and producing the highest-quality video. But if your source material comes from some Blu-ray discs, you maybe at your wits end. For FCP X supports Apple ProRes, AVCHD, DV, H.264, etc but not including Blu-ray. What if must you use some clips of Blu-ray in Final Cut Pro X?

There is an alternate way to put Blu-ray into FCP X for your editing. That is to remove protection of Blu-ray and backup it to FCP X supported formats. Here the best solution is to use Pavtube BDMagic for Mac. It can effortlessly rip Blu-ray to FCP X compatible MOV video with a few clicks. It even can backup Video-TS folder, DVD, DVD ISO/IFO to FCP X for editing. In its output profile, it has Final Cut Pro column, where lists many optimized format for FCP X. 

Free download and install BDMagic on Mac:
          

Other Download:
- Pavtube old official address: http://www.pavtube.cn/blu-ray-ripper-mac/
- Cnet Download: http://download.cnet.com/Pavtube-BDMagic/3000-7970_4-76177782.html

How to change Blu-ray to FCP X supported format?

Step 1: Add Blu-ray movies to software

Run Blu-ray to FCP X Software on your Mac and load your Blu-ray movies by clicking the “File” icon. This programme automatically choose the main video content to rip but If you have several clips and want a whole video, tick all the clips and then mark “Merge into one file” underneath the preview window. Or you can just rip one title of the source movie by ticking only one chapter. 


Step 2: Select target video format

for choosing the optimized format for FCP X, you should click the format bar to navigate to “Final Cut Pro” and then”Apple ProRes 422 (HQ) (*.mov)”. (Learn Apple ProRes Codec Types)


Tip: If your video is overlong or you just want some certain fragment, you can use the built-in video editing tool to trim video footage.


Step 3:  Start Blu-ray to Final Cut Pro X conversion

After choosing the right and suitable video format for Final Cut Pro X, click the big red button on the right-bottom of the interface to start conversion from Blu-ray to Final Cut Pro X.

After conversion, run Final Cut Pro X on your Mac, and click “File” and “Import” to load the ripped video to Final Cut Pro X. Then you can edit your favorite movie and make a personal edition blockbuster.

Related Articles:

Monday, August 17, 2015

How to Add Videos and Blu-ray Movies to Kodi (XBMC) Movie Library?

Recently, I got a e-mail in which the sender asked me how to setup Movie Library in Kodi . So, I decided to go deeper in this subject by adding movies and Blu-ray to Kodi to composite your movie library in Kodi. With an endless range of remote controls, beautiful interface and powerful skinning engine, Kodi feels very natural to use from the couch and is the ideal solution for home theater. That’s the reason why people would like to add movies to Kodi for a movie library.


But considering Kodi is only supporting unencryption Blu-ray, so the above operation have to be devided into two parts: part one,add videos and unencryption Blu-ray movies to Kodi; part two, stick encryption Blu-ray to Kodi.
Now you can set up movie library in Kodi as below:

Part one: Add videos and unencryption Blu-ray movies to Kodi

Step 1: Download and install Kodi on your computer. After that, open Kodi.
Step 2: Select "Videos" in the home screen menu.


Step 3: Seclect Files, then select "Add Videos".


Step 4: Click on "Browse" button. From This requester you can select the location where your Movies are located on your system. You can also choose a network drive if your Movies are there, this tutorial will use the network drive option and we will select "Windows network (SMB)".


Step 5: In the next screen you should see the directories within your selected directory. If this is the right directory select "OK". If all is ok then select "OK" again. In the next screen is where we tell Kodi what our source directory contains, in this case its "(Movies)". When your happy with the settings select "OK".


Step 6: Next screen is refresh info for contents of selected directory, select "Yes". When you've selected ok you will be presented with this next screen, keep an eye on very top almost to the right as this updates the database with info about the films it finds. This item can take a long time depending on how many Movies you have in your collection.


Step 7: When finished, some of your movies library will be listed on the interface. 

Part two: Stick encryption Blu-ray into Kodi

For sticking encryption Blu-ray into Kodi, you can use Pavtube ByteCopy for Windows/for Mac to remove the copy protection from Blu-ray and backup Blu-ray to Kodi in a normal format like MP4, MKV, MOV, AVI, etc. On Windows, it can offer 6X fast Blu-ray ripping speed by H.264 with GPU acceleration

You can free download and install here:


Other Download:
- Pavtube old official address: http://www.pavtube.cn/bytecopy/
- Cnet Download: http://download.cnet.com/Pavtube-ByteCopy/3000-7970_4-76158512.html

Step 1: Install ByteCopy and Load Blu-ray.

Free download Pavtube ByteCopy, install and launch it. Insert Blu-ray into disc drive, click the "Load file(s)" icon to browse to disc drive and import Blu-ray into this app.


Step 2: Select video format and set profile.

Choose from "Format" menu for Kodi playable video. In order to get Kodi file, you are suggested to follow the path "HD Video" > "MP4 HD Video(*.mp4)" as output format.


Tip: Parameters including video codec, video file size, bitrate, frame rate, audio sample rate, audio channels, and more in Settings can be reset to get a satisfying video/audio enjoyment on Kodi. 

Step 3: Start to backup Blu-ray to Kodi

Click the big "Convert" to start the conversion. The conversion speed also depends on your computer configuration. My suggestion is not to play nor edit videos when it's converting. After conversion, click "Open" or "Open output folder" to quick locate converted files.

Once you have ripped your Blu-ray movie to the hard drive in MP4, it is time to add it to your Kodi movie library as the part one steps. After that, you just can freely enjoy all your Blu-ray movies on Kodi.

In addition: More features about Pavtube ByteCopy (Read comparison: ByteCopy vs DVDFab vs MakeMKV)
  • ByteCopy also exports H.265, M3U8, lossless MKV format for your need.
  • Enables you to rip backup the latest and region-locked Blu-ray/DVD to many other devices, like WD TV Live Plus, iPhone 6, Surface Pro 3, etc.
  • Unique feature to perfectly create a single .srt subtitle file with chosen subtitle track from original movie.
  • Free to choose wanted language and subtitle tracks from source Blu-ray and DVD movies for better movie enjoyment.
  • Various video editing functions are available in this app to assist you with creating personal movies with customized adjustments. It allows you to trim, crop, split, merge, insert subtitles, add video effects, adjust volume, etc.
Related Articles: