Optoma HD25e Projector is the first new home cinema projector we've tested from once-prolific manufacturer Optoma since the HD83 we reviewed in June 2012. This projector offers active 3D playback with one pair of glasses supplied. And it supports to play videos via USB HDD. So if you have many 3D Blu-ray, you can consider to rip and backup these 3D Blu-ray to HDD for viewing on Optoma HD25e Projector. This need a Blu-ray ripper to achieve 3D Blu-ray to Optoma HD25e Projector conversion. Pavtube BDMagic for Mac is such a tool for Mac users(including El Capitan, Mavericks, Mountain Lion, Lion, etc).With it you can easily convert 3D Blu-ray movies to HDD for Optoma HD25e Projector in MKV, AVI, WMV, MOV, MP4, etc HD media formats with 3D(Red-Blue, Red-Green two modes) effect; of course, you can also rip Blu-ray 3D to normal 2D for more widely use. Plus, the original Blu-ray 3D in 1080p can be output just in the same definition, or compressed to 720p video; the choice is yours. Download the excellent 3D Blu-ray Ripper now and start the 3D Blu-ray movie conversion.
 Other Download:- Pavtube old official address: http://www.pavtube.cn/blu-ray-ripper-mac/- Cnet Download: http://download.cnet.com/Pavtube-BDMagic/3000-7970_4-76177782.htmlHow to Rip 3D Blu-ray to HDD for Optoma HD25e Projector Playback?Step 1. Insert your Blu-ray disc into your BD drive, run the best Mac 3D Blu-ray Converter and click “BD/DVD disc” icon to load movie from Blu-ray source (Disc, folder, ISO).
 Step 2. From the “Format” drop-down list, you are suggested to follow the path “3D Video > MP4 Side-by-Side 3D Video (*.mp4)” for ripping Blu-ray to side-by-side 3D MP4 video.
 Tip: If you like, you can click “Settings” which is next to “Format”, free change your target video size, bitrate, frame rate and 3D depth. If you want to get best video quality, pls switch them to “original”.Step 3: Click the convert button under the preview window, and the 3D Blu-ray ripper for Mac will start the conversion from 3D Blu-ray movies to HDD for Optoma HD25e Projector. Now, transfer your ripped 3D Blu-ray to HDD and insert your HDD to Optoma HD25e Projector. Then you can enjoy 3D movies with Optoma HD25e Projector.Related Articles:
A Chromebook is a laptop running Chrome OS as its operating system. The devices are designed to be used primarily while connected to the Internet, with most applications and data residing "in the cloud". By connecting to the Google Drive, Chromebook allows you to store all of your videos, music and pictures. However, currently Chrome OS doesn't support the video codecs for DVD Discs. If you wanna play DVD on Chromebook offline at travels, the easy and possible way is to convert DVD to Chromebook compatible video files.
 Pavtube DVDAid is a top-ranked DVD Ripper on the market that you can use to rip and convert any commercial and region-locked DVD to any video format. For transferring and watching DVD movies on Chromebook, you can rip DVD to H.264 MP4 with this best DVD Ripper. In addition, you also can convert MKV, AVI, MTS, MXF video to Chromebook supported video format.(review)
If you are Mac user, you can free download Pavtube DVDAid for Mac.
Pavtube DVDAid is a top-ranked DVD Ripper on the market that you can use to rip and convert any commercial and region-locked DVD to any video format. For transferring and watching DVD movies on Chromebook, you can rip DVD to H.264 MP4 with this best DVD Ripper. In addition, you also can convert MKV, AVI, MTS, MXF video to Chromebook supported video format.(review)
If you are Mac user, you can free download Pavtube DVDAid for Mac.
Free download and install:

 Other Download:
- Pavtube old official address: http://www.pavtube.cn/dvd_ripper/
- Cnet Download: http://download.cnet.com/Pavtube-DVDAid/3000-7970_4-76158510.html
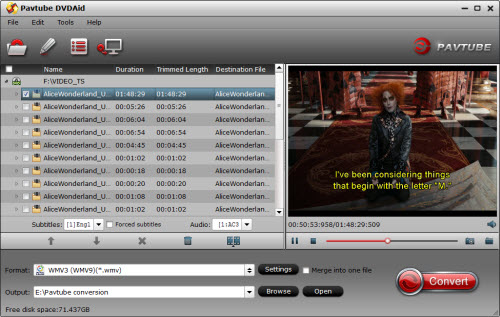
How to rip DVD for watching on Chromebook offline at Travels?
Step1: Load DVD movie
Click “Load from disc” button to browse to disc drive and import DVD into this app. The program checks the title of main movie automatically, and you can simply choose language of audio and subtitles for output and check in preview window.
Other Download:
- Pavtube old official address: http://www.pavtube.cn/dvd_ripper/
- Cnet Download: http://download.cnet.com/Pavtube-DVDAid/3000-7970_4-76158510.html
How to rip DVD for watching on Chromebook offline at Travels?
Step1: Load DVD movie
Click “Load from disc” button to browse to disc drive and import DVD into this app. The program checks the title of main movie automatically, and you can simply choose language of audio and subtitles for output and check in preview window.
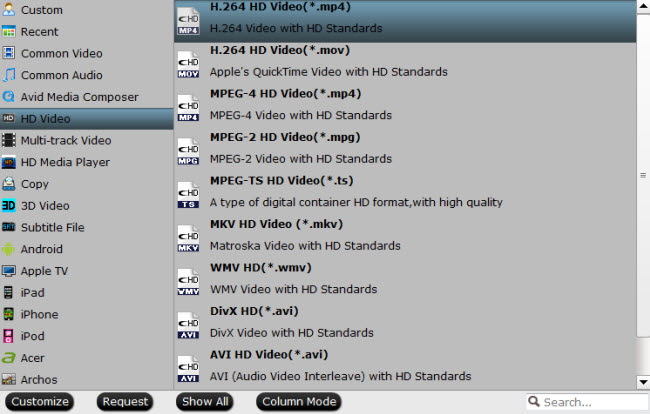
 Step 2. Choose the right output format
For ripping DVD to Chromebook , click “Format” bar to choose HD Video, then select H.264 HD Video(*.mp4) as the target format.
Step 2. Choose the right output format
For ripping DVD to Chromebook , click “Format” bar to choose HD Video, then select H.264 HD Video(*.mp4) as the target format.
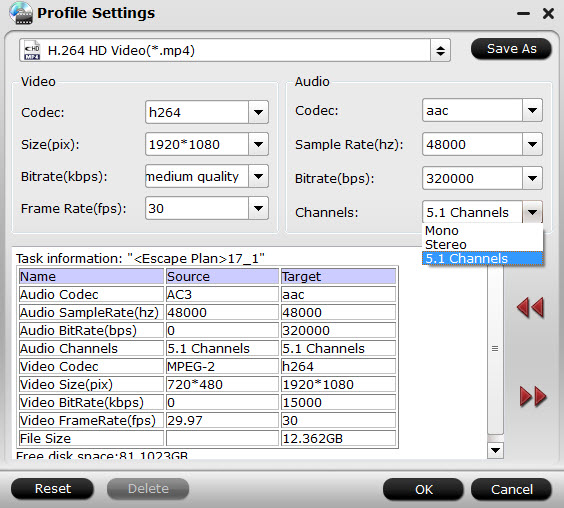
 Tip: In profile settings, you are allowed to adjust video and audio codec, size, etc for better video quality. You also can set to preserve 5.1 channels when copying DVD to Chromebook.
 Step 3: Start to rip DVD to Chromebook.
Back to DVD Ripper main UI, hit on the “Convert” icon and start ripping DVD to Chromebook. .When the conversion completes, open output folder and find the ripped movie there.
Hot search: Rip DVD with Forced Subtitle | Fix DVD Can’t Play on PC | DVD to Synology DS416 | DVD to Sony Xperia Z5
Generally speaking, it will take you half an hour to rip a common movie DVD to MP4 formats. Of course the ripping speed also depends on the selected output video format, related speed options setting, your computer configuration and the movie running time. After successful ripping, you can transfer the ripped movie video to Chromebook with USB flash disk and then play watch movie on Chromebook at leisure time.
Related Software:
BDMagic for Windwos/Mac - The best Blu-ray solution to rip and backup any commercial and region-locked Blu-ray to H.265, M3U8, MP4, MKV, AVI, FLV, etc.
ByteCopy for Windows/Mac - It can rip Blu-ray/DVD to lossless MKV keeping multi-track subtile/audio and all chapter markers.
Pavtube Video Converter for Windows/Mac - Function of converting Blu-ray/DVD, 4K/SD/HD video in any format to nearly all popular video format you have ever seen.
Related Articles:
Step 3: Start to rip DVD to Chromebook.
Back to DVD Ripper main UI, hit on the “Convert” icon and start ripping DVD to Chromebook. .When the conversion completes, open output folder and find the ripped movie there.
Hot search: Rip DVD with Forced Subtitle | Fix DVD Can’t Play on PC | DVD to Synology DS416 | DVD to Sony Xperia Z5
Generally speaking, it will take you half an hour to rip a common movie DVD to MP4 formats. Of course the ripping speed also depends on the selected output video format, related speed options setting, your computer configuration and the movie running time. After successful ripping, you can transfer the ripped movie video to Chromebook with USB flash disk and then play watch movie on Chromebook at leisure time.
Related Software:
BDMagic for Windwos/Mac - The best Blu-ray solution to rip and backup any commercial and region-locked Blu-ray to H.265, M3U8, MP4, MKV, AVI, FLV, etc.
ByteCopy for Windows/Mac - It can rip Blu-ray/DVD to lossless MKV keeping multi-track subtile/audio and all chapter markers.
Pavtube Video Converter for Windows/Mac - Function of converting Blu-ray/DVD, 4K/SD/HD video in any format to nearly all popular video format you have ever seen.
Related Articles:
An ISO image file is a type of disc image file used to replicate the contents of an optical disc, such as a Blu-ray and DVD, which contains every piece of information of the original disc. Generally, it is unnecessary to open ISO files and view their contents, because an ISO file can be written to a DVD disc to read. But knowing about how to open ISO files will allow you to troubleshoot any problems with the disc image or locate specific data within the image. Next, the article will show you how to open an ISO file on PC/Mac and two ways to play ISO on your computer.  Part 1: How to open an ISO file on Mac?For Mac users, it is easy to mount an ISO file on Mac simply by double-clicking the ISO image file, and it will go through the auto-mounter app within OS X putting it on your desktop.If this doesn’t work, you could make use of Mac computer’s built-in Disk Utility and a more advanced option of using the command line. The Disk Utility is located in the /Applications/Utilities/ directory. After you have launched Disk Utility, navigate from the Disk Utility menu down to "Open Image File" and select your ISO file. The ISO should now appear mounted on the Mac OS desktop. This works for other disk image files too (dmg, img, etc).
 Part 2: How to open an ISO file on PC?For Windows users, if you want to view a data ISO image file on PC, you could also make use of some unarchive apps like WinRAR to open ISO image file on PC. With WinRAR and apps like this, you could easily view the inner content of ISO image file, no mounting, burning or backup required. The detailed steps on how to open ISO image file with WinRAR on PC are listed below:Download and install WinRAR utility. During installation, make sure you tick the ISO option during setting the "Associate WinRAR with".
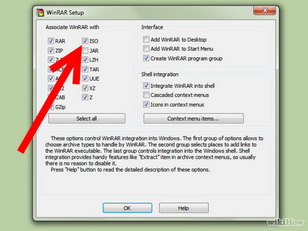 Locate the ISO image file you want to open. It would appear in WinRAR form with .iso extension.
 Double click the ISO image file to open it. You could then view all the content in the ISO image file.
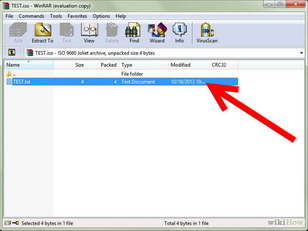 Important Note: This way although can make you open ISO file on PC, it may cause the ISO image to be unusable when mapping it to a CD/DVD. If you need to use a certain file inside the image, make a copy of it rather than moving it out of the image.Part 3: Play ISO File on Mac and PC with ISO PlayerIf you want to play an ISO file on PC/Mac, you can ask help for a 3rd-party ISO player. Free ISO Player software is such a software that can allow people to open, extract and play the ISO content in the files. Apart from this, users can even burn the ISO files and convert them to CDs and DVDs. Therefore, it can be termed as a comprehensive tool that is quite handy. Part 4: Play ISO File by Converting ISO to MP4Comparing to the above three ways, this method not only can make you open an ISO file on PC/Mac, but also allows you play ISO with your Windows Media Player or QuickTime on computer. But this still needs the help of the third party software - ISO Converter.To converting Blu-ray/DVD ISO to MP4 files, Pavtube BDMagic and Pavtube BDMagic for Mac can do the job for you. Numerous popular audio formats from Blu-ray, DVD, ISO image, IFO files, BDMV Folder are supported. It offers easy and effective solutions to convert ISO files from Blu-ray/DVD to H.265, MP4, M3U8, MOV, M4V, WMV, etc; you can even choose which segments to extract. Furthermore, you can preview the video with the built-in player and even take a snapshot of a certain scene. (Review)Free download and install Pavtube BDMagic: Other Download:- Pavtube old official address: http://www.pavtube.cn/blu-ray-ripper/- Cnet Download: http://download.cnet.com/Pavtube-BDMagic/3000-7970_4-75922877.htmlFree download and install Pavtube BDMagic for Mac: Other Download:- Pavtube old official address: http://www.pavtube.cn/blu-ray-ripper-mac/- Cnet Download: http://download.cnet.com/Pavtube-BDMagic/3000-7970_4-76177782.htmlNote: The following guide is based on Windows version.How to convert ISO to MP4 for Playing?Step 1. Load Blu-ray/DVD ISO fileRun Blu-ray/DVD ISO Image converter on computer. Click “File” on upper-left corner to follow “Load from IFO/ISO.” It is unnecessary for you to run a virtual drive to mount ISO Image for this Blu-ray/DVD ISO converter will help you analyze ISO Image automatically.
 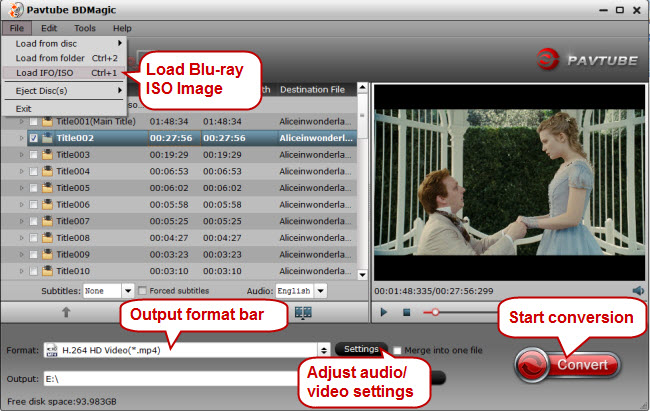 Step 2. Choose H.264 MP4Click the format bar to follow “HD Video” > “H.264 HD Video (*.mp4)”. This Blu-ray/DVD ISO Image converter provides rich output audio/video formats suitable for different place, and you’ll find no difficulty playing Blu-ray ISO on the device you own.
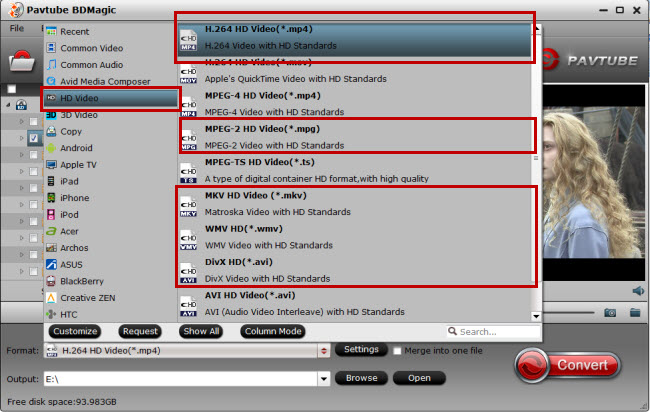 Tip: Click “Settings” near the format bar to go to “Profile Settings” interface where you’re allowed to change parameters like bitrate, frame rate, sample rate, and audio channels according to your requirements.Step 4. Convert Blu-ray/DVD ISO to H.264 When finishing the above three steps, just one click the button “Convert” which is quite obvious on bottom-right corner to start conversion from Blu-ray/DVD ISO Image to H.264 MP4.The latter way of playing ISO give you more liberate to watch ISO on PC/Mac with any media player. Since nearly all players can support MP4 video. It even can allow you to transfer the converted ISO image to your portable devices to watch. Related Software:DVDAid for Windows/Mac - Capacity of ripping copy-protected and homemade DVD to iPhone 6S, iPad, Surface Pro, Synology NAS, Seagate Wireless Plus, etc with suitable format.ByteCopy for Windows/Mac - It can rip Blu-ray/DVD to lossless MKV keeping multi-track subtile/audio and all chapter markers.Pavtube Video COnverter for Windows/Mac - Function of converting Blu-ray/DVD, 4K/SD/HD video in any format to nearly all popular video format you have ever seen.Source site: http://2d-3d-movie-tips.blogspot.com/2015/11/play-iso-on-pc-mac.htmlRelated Articles:
Thanksgiving Day is coming. Some of you are probably planning the Thanksgiving menus for your family while some are ready for selecting the best Thanksgiving present for their parents. With great blessing and best wishes, Pavtube Studio also prepared a big gift for their consumer - Thanksgiving Promotion 2015 to celebrate Thanksgiving Day with our friends. Focusing on product quality and customer needs, Pavtube offers up to 40% discount for hot products to reward our customers. Thanksgiving Day always comes with movies. I believe you must have prepared some Thanksgiving movies for enjoy with your family after dinner. With this wish, how can you bear the incompatibility issue when playing Thanksgiving Blu-ray/DVD movies on your HD TV, iPad, 4K Projector, etc. To avoid the embarrassing situation, you’d better rip the Blu-ray/DVD movies to your multimedia players with most compatible format and specs by usingPavtube BDMgic for Windows / MacPavtube DVDAid for Windows / MacPavtube ByteCopy for Windows / MacWhen enjoying the Thanksgiving movies and having the Thanksgiving dinner together, how can you not record the scene to remember the warm time? After you record the happy time, you maybe want to edit the shooting in iMovie, FCP, Premiere Pro CC, etc before you sent it to your other family members or share it on Facebook. While putting the shoot into video editing program, you probably need the help of Pavtube Video Converter Ultimate and iMedia Converter for Mac, which can convert your HD/4K shoot to H.265 MKV/MP4, HD MP4, QuickTime, MOV, ProRes, AIC, DNxHD, MPEG-2, WMV, H.264, MPEG-4, etc. for your FCP X, iMovie, Premiere Pro CC, Sony Vegas Pro 13, Windows Media Player, VLC, Youtube, etc. On Windows 10/8.1/8/7/XP and Mac OS X 10.11 El Capitan, 10.10 Yosemite, 10.9 Mavericks, 10.8 Mountain Lion, 10.7, 10.6, 10.5.Pavtube Video/BD/DVD software can convert Blu-ray/DVD, 4K/SD/HD video in any format to H.265 MP4/MKV, M3U8, MP4, MOV, MKV, AVI, M4V, etc. Especially, ByteCopy can rip Blu-ray/DVD to lossless MKV keeping multi-track subtitle/audio and all chapter markers. What’s more, Pavtube adds optimized preset profile for main digital products, like TV series, iPad, iPhone, Samsung, Sony, PS3/PSP, Xbox One/360, Android Tablet/Phone, Surface, etc.All of the products can be get now at up to 40% off discount. Below is the list:40% OFF Pavtube DVDAid for Windows/MacOriginal price: $35Now: $21Reasons to choose Pavtube DVDAid 2. 30% OFF Pavtube BDMagic for Windows/MacOriginal price: $49Now: $34.3Reasons to choose Pavtube BDMagic 3. 20% OFF Pavtube ByteCopy for Windows/Mac Original price: $42Now: $33.6Reasons to choose Pavtube ByteCopy 4. 20% OFF Pavtube Video Converter Ultimate for Windows/MacOriginal price: $65Now: $52 You won’t get a Blu-ray/DVD Software at such low price in normal days. So if you have a plan to purchase a BD/DVD/Video Converter in the near future, why not push the schedule forward and get it in Pavtube Thanksgiving Promotion activity.Additional: To help you make a wise choice, I did a deep review and comparison between the four backup tools. You can check out the differences and then choose the favorite to create high quality Blu-ray/DVD/ISO/4K/HD Video and Movie backups: Pavtube Softwares Comparison: ByteCopy vs BDMagic vs DVDAid vs Video Converter UltimateSource: http://i-loveshare.com/pavtube-thanksgiving-coupon/Related Guides1. Pavtube DVDAid for Windows/Mac Guides
2. Pavtube BDMagic for Windows/Mac Guides
3. Pavtube ByteCopy for Windows/Mac Guides
4. Pavtube Video Converter Ultimate for Windows/Mac Guides
That’s All!PS. Have more questions about how to download, buy and use our Blu-ray/DVD Ripper, various Video Converter programs, please feel free to contact us>> or leave a message on our Official Facebook.
Thanksgiving Day always comes with movies. I believe you must have prepared some Thanksgiving movies for enjoy with your family after dinner. With this wish, how can you bear the incompatibility issue when playing Thanksgiving Blu-ray/DVD movies on your HD TV, iPad, 4K Projector, etc. To avoid the embarrassing situation, you’d better rip the Blu-ray/DVD movies to your multimedia players with most compatible format and specs by usingPavtube BDMgic for Windows / MacPavtube DVDAid for Windows / MacPavtube ByteCopy for Windows / MacWhen enjoying the Thanksgiving movies and having the Thanksgiving dinner together, how can you not record the scene to remember the warm time? After you record the happy time, you maybe want to edit the shooting in iMovie, FCP, Premiere Pro CC, etc before you sent it to your other family members or share it on Facebook. While putting the shoot into video editing program, you probably need the help of Pavtube Video Converter Ultimate and iMedia Converter for Mac, which can convert your HD/4K shoot to H.265 MKV/MP4, HD MP4, QuickTime, MOV, ProRes, AIC, DNxHD, MPEG-2, WMV, H.264, MPEG-4, etc. for your FCP X, iMovie, Premiere Pro CC, Sony Vegas Pro 13, Windows Media Player, VLC, Youtube, etc. On Windows 10/8.1/8/7/XP and Mac OS X 10.11 El Capitan, 10.10 Yosemite, 10.9 Mavericks, 10.8 Mountain Lion, 10.7, 10.6, 10.5.Pavtube Video/BD/DVD software can convert Blu-ray/DVD, 4K/SD/HD video in any format to H.265 MP4/MKV, M3U8, MP4, MOV, MKV, AVI, M4V, etc. Especially, ByteCopy can rip Blu-ray/DVD to lossless MKV keeping multi-track subtitle/audio and all chapter markers. What’s more, Pavtube adds optimized preset profile for main digital products, like TV series, iPad, iPhone, Samsung, Sony, PS3/PSP, Xbox One/360, Android Tablet/Phone, Surface, etc.All of the products can be get now at up to 40% off discount. Below is the list:40% OFF Pavtube DVDAid for Windows/MacOriginal price: $35Now: $21Reasons to choose Pavtube DVDAid 2. 30% OFF Pavtube BDMagic for Windows/MacOriginal price: $49Now: $34.3Reasons to choose Pavtube BDMagic 3. 20% OFF Pavtube ByteCopy for Windows/Mac Original price: $42Now: $33.6Reasons to choose Pavtube ByteCopy 4. 20% OFF Pavtube Video Converter Ultimate for Windows/MacOriginal price: $65Now: $52 You won’t get a Blu-ray/DVD Software at such low price in normal days. So if you have a plan to purchase a BD/DVD/Video Converter in the near future, why not push the schedule forward and get it in Pavtube Thanksgiving Promotion activity.Additional: To help you make a wise choice, I did a deep review and comparison between the four backup tools. You can check out the differences and then choose the favorite to create high quality Blu-ray/DVD/ISO/4K/HD Video and Movie backups: Pavtube Softwares Comparison: ByteCopy vs BDMagic vs DVDAid vs Video Converter UltimateSource: http://i-loveshare.com/pavtube-thanksgiving-coupon/Related Guides1. Pavtube DVDAid for Windows/Mac Guides
2. Pavtube BDMagic for Windows/Mac Guides
3. Pavtube ByteCopy for Windows/Mac Guides
4. Pavtube Video Converter Ultimate for Windows/Mac Guides
That’s All!PS. Have more questions about how to download, buy and use our Blu-ray/DVD Ripper, various Video Converter programs, please feel free to contact us>> or leave a message on our Official Facebook.
MKV is a common format containing multi-track subtitle/audio that the video producer like to use. But sometimes the format can’t be supported by our device So in this case, we need to convert MKV to another format:“My PVR will happily play avi wrapper with xvid and ac3 inside. I tried to convert .mkv aac files with freemake and the resultant file will not play on my PVR. Presumably I have to start with the characteristics of the files that play and this is in the picture. How do I make sure that my converted files have the same settings?”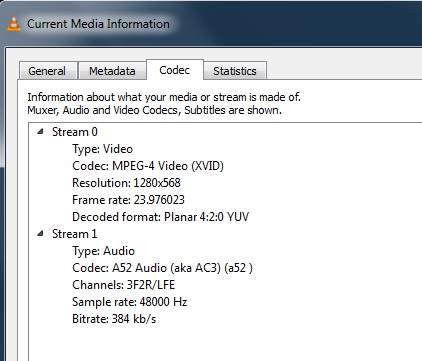 It happened to I met a nice MKV converter several days ago that I used it to convert my MKV file to MP4. And I saw that it has AVI format output. I think I can share my experience here to help the guy. The software I used is Pavtube Video Converter Ultimate(Review). This app is an all-in-one solution to video conversion including MKV to AVI, MP4, MOV, etc and H.265, MP4, AVI, etc to MKV. I said it is an all-in-one solution because it also can rip Blu-ray//DVD to MKV, AVI, MP4, H.265, M3U8, etc. If you are a Mac user, you should use Pavtube iMedia Converter for Mac. This program has updated to support MacOS X El Capitan, Yosemite 10.10/10.9 and Mavericks 10.9. Free download and install Other Download:- Pavtube old official address: http://www.pavtube.cn/blu-ray-video-converter-ultimate/- Cnet Download: http://download.cnet.com/Pavtube-Video-Converter-Ultimate/3000-2194_4-75938564.htmlHow to Convert MKV AAC to AVI File with XviD Video and AC3 audio?Step 1: Add source videoOpen the program, click “File” menu, from its drop-down option, select “Add Video/Audio” to add your MKV AAC file to the program.
 Step 2: Choose output file format.From “Format” bar drop-down list, choose “HD Video” > “DivX HD (*.avi)” as output file format.
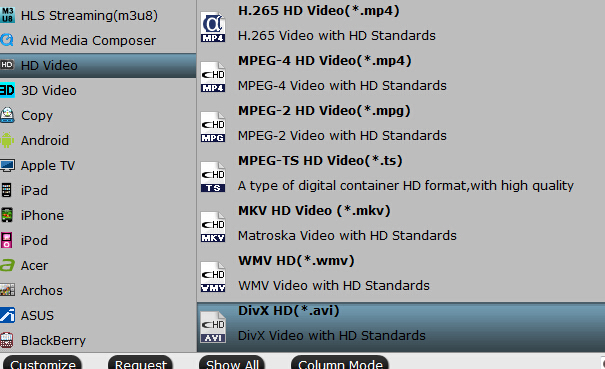 Step 3: Set video parameterClick on “Settings” to open settings window. Here you can adjust the video settings. According to the picture above and the target need, you can input “1280*568” in size box,, and choose 23.976 in frame rate box. Then do your audio settings in the right list.Note: AC3 and AVI is not a good combination. If the number of AC3 frames pr. chunk is not supported by the decoder, audio will not play. You must consider to either convert audio to MP3 and keep AVI as container, or to keep audio as AC3 and change container to MP4. Here, I adjust the audio codec as MP3.
 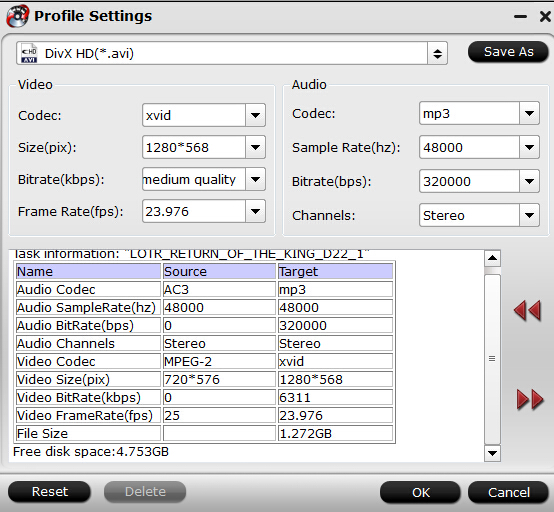 Step 4: Start MKV to AVI conversionWhen you finish the settings above, click the big “Convert” button to start converting MKV to AVI format. The conversion will be done in a few minutes, which depends on the loaded movie size and the configuration of your PC. Look, the step is very easy. This software is easy-to-use just like this. I love it and I think you will love it, too. Related Software:Video Converter - Convert almost all HD/SD audio/video formats to another. HD Video Converter - Handle HD digital camcorder footages such as AVCHD (MTS, M2TS), MXF, MOV, etc and convert Tivo and DVR recordings to MP4/DivX/MKV AVI/MPEG/WMV, etcRelated Articles:
MKV is an open standard free container format which can hold an unlimited number of video, audio, picture or subtitle tracks in one file. It offers a richer media experience than any other current format but a limited playback. Especially, the new Mac system, 10.11 El Capitan, makes MKV playback on Mac harder since some MKV players and MKC converters for Mac maybe break down for the compatibility issue. Here, we tested some MKV players and MKV converters for Mac OS X El Capitan and give you top 5 ways to play MKV file on Mac El Capitan.  Method 1: Play MKV files on Mac El Capitan with VLC 2No matter what media playback issue you encounter on Mac, I suggest you to try VLC firstly. This application will almost play any video or music file in addition to MKV files. There has been am upgrade to the software with a recent release of VLC 2, and even if you don’t plan on using it to play .mkv movies, it’s a worthwhile app to have on any Mac. Overall it’s a great app and is recommend as one of the best MKV players currently available.Method 2: Play MKV on Mac El Capitan with Elmedia PlayerElmedia Player which plays MKV and almost any video or audioformat on Mac. Elmedia Player presents lots of options to enjoyviewing videos: audio equalizer, video tuner, playback speedadjustment, etc. In addition to playing local files it offers unique“Open URL” option which allows watching YouTube videos online fromthe app directly.Method 3: Play MKV files on Mac El Capitan with QuickTime + PerianPerian is a free-source QuickTime addon, which lets QuickTime extend support to a large number of file formats, such as MKV, AVI, DIVX, FLV, GVI, VP6, and more. So if you find your QuickTime player can't play MKV files in Mac, you can install the plug-in to add extra support for playing MKV in QuickTime.Method 4: Play MKV files on Mac El Capitan with MPlayerXMPlayerX is not as popular at VLC, but it’s still a highly recommend application that will play MKV audio and video files on a Mac. MPlayerX plays MKV files on Mac like Quicktime with it’s black minimalist theme. This MKV player has a great overall performance and is highly recommend for those who enjoy watching high quality content on their Macs. You can download this app for free from the Mac App Store.Method 5: Play MKV files on Mac El Capitan by Converting MKV filesComparing with the former four method, I do suggest you this way. Because it not only can solve the MKV failure playback on Mac El Capitan, but also can make you play your plenty of MKV files on more players like the iPhone 6S, iPad Mini 4 or Surface Pro 4. Here, I'll recommend you Pavtube BDMagic for Mac (review, which enables you to convert an MKV to any popular video format for various players, devices and applications. Free download and install: Other Download:- Pavtube old official address: http://www.pavtube.cn/blu-ray-ripper/- Cnet Download: http://download.cnet.com/Pavtube-BDMagic/3000-7970_4-75922877.htmlHow to convert MKV on Mac OS X El Capitan?Step 1: Add MKV file by clicking “File” on the interface. It supports batch conversion so you can import many MKV files at a time.Step 2: Choose the format you want in the “Format” drop-down list like MP4, AVI, MOV, M4V, 3GP, H.265, M3U8, etc, anyone you want. Step 3: Simply hit Convert at the lower-right corner of its interface.
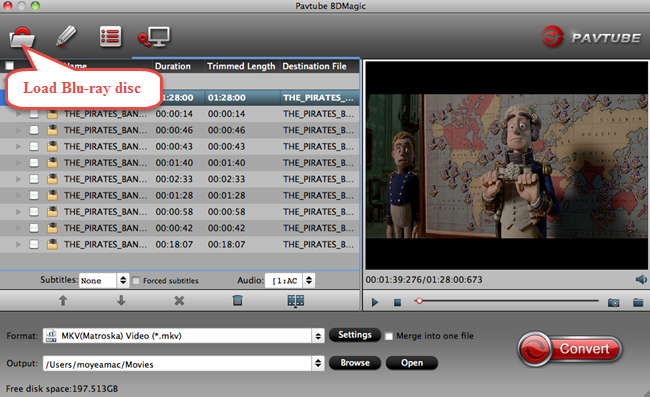 Which is the best? That’s up for debate. For general versatility, VLC is a must-have app for all computer users, MplayerX is really giving it a run for it's money, but for overall converting MKV to Mac El Capitan compatible video is the ultimate solution to solve all MKV playback problems on Mac OS X El Capitan. Try out a few and see which fits your needs.Related Articles:
Synology, a worldwide leader in storage solutions, introduced significant enhancements to Synology's family of personal storage devices - Synology DS416. This is the successor to the DS414 with upgraded hardware. If you are planning to backing up DVD collection to personal cloud storage for sharing, Synology DS416 is a nice choice. Here, let’s focus on the way of backing up DVD to Synology DS416. We all know that we rip DVD to Synology DS416 or other personal cloud storage not only for storing movies but for viewing these DVD movies on our multimedia players more conveniently, like watching DVD on TV, iPad, PS4 via cloud storage. So when we are about to rip DVD to Synology DS416, we need to remove the DVD encryption and change the original format to a wide compatible format, like MP4 which nearly can be accepted by all media players.To reach the goal, you can use Pavtube ByteCopy to help you. It is capable of ripping any new released and region-locked DVD to Synology DS416 in MP4, AVI, MKV, etc for sharing. It also enables you to copy DVD movies into lossless mkv format with chapter markers, all subtitle/audio tracks preserved. If you are a Mac user, Mac verson is here. And you can get the lowest price at our Facebook.Free download and install: Other Download:- Pavtube old official address: http://www.pavtube.cn/bytecopy/- Cnet Download: http://download.cnet.com/Pavtube-ByteCopy/3000-7970_4-76158512.htmlHow to rip DVD to Synology DS416?Step 1: Add DVD moviesInsert your DVD disc into your DVD driver and run the best DVD to Synology DS4416 Converter and click “BD/DVD disc” icon to load movie from DVD source. Set your wanted subtitles and audio track from the drop-down box of “Subtitles” and “Audio” tab.
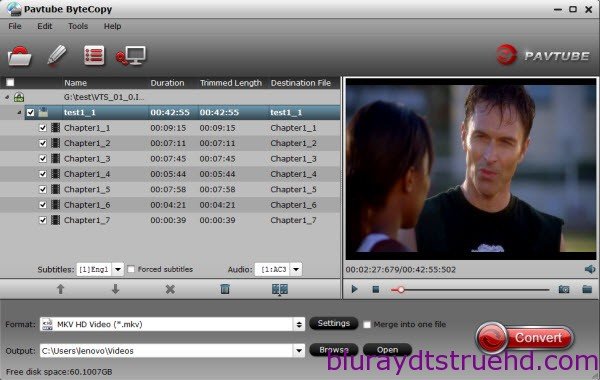 Step 2: Choose right output formatClick the “Format” option, and choose HD Video > MKV HD Video (*.mkv) as output format. If you want to keeping orginal multiple audio tracks, subtitles and chapter markers from DVD, “Multi-track Video > Lossless/encoded Multi-track MKV (*.mkv)” is recommended for you.
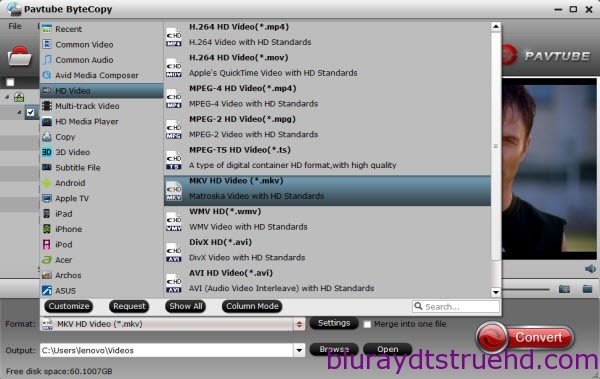 Tip: If you want to store more DVD movies on Synology DS416, you can adjust video bitrate to reduce the video size. Just click“Settings” to change the video parameters and you can preview the output video size at the below chart. Keep in mind the file size and video quality is based more on bitrate than resolution which means bitrate higher results in big file size, and lower visible quality loss, and vice versa.Learn also: Store Purchased Movies to Seagate Wireless Plus
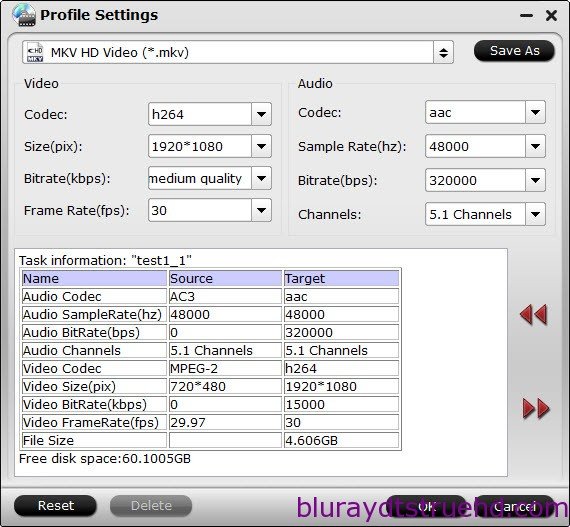 Step 3: Start ripping DVD to Synology DS416Click the big red“Convert” button under the preview window, and the DVD to Synology DiskStation Ripper will start the conversion from DVD movies to MKV. When you put ripped DVD to Synology DS416, you can watch these DVD movies on many devices via Synology, like Apple TV, PS4, LG HD TV, iPad. If you don’t know how to set up the connection between your Synology NAS and your DLNA/UPnP-compliant DMAs, here is a detailed guide. And if your DLNA/UPnP-enabled device is an Apple TV, here is a more simple tutorial on setting up Synology NAS with Apple TV. Related Articles: