Having tons of Blu-ray discs on the shelf, do you get headache and want to get rid of them. Backing up Blu-ray movies to Synology NAS is a good choice for you, which allows you watch Blu-ray movies on TV without a heavy external Blu-ray player and without getting off sofa. So, this article will show you the way to backup Blu-ray in lossless multi-track MKV to Synology NAS for TV.Advantages of Using Lossless Multi-track MKV for Blu-ray Backup?1. Have a complete movie in a single file, including many audio, video and subtitles streams.The MKV format is capable of holding unlimited number of video, audio and subtitle tracks, along with any metadata. Practically this means it is possible to put an entire movie with multiple sound and subtitle tracks and movie thumbnail into single MKV file. Menus and chapter structure can be preserved as well. When copying Blu-ray movie to MKV, you can have everything into an MKV file, just like in a Blu-ray Disc.2. Lossless video and audio quality can be retained.MKV is a container format that supports various codecs, including H.264, VC-1, AC3, DTS, etc. The compatibility of MKV format makes it possible to keep original video or audio compression format (video codec) when copying Blu-ray movie to MKV files. By directly package video and audio contents into MKV container without en-decoding, lossless video quality is retained and processing time is reduced greatly.3. Backup movie in your own way.Not any container format can be more flexible than MKV. The MKV format allows for operations to single streams only. You can remove undesired audio tracks and subtitles from MKV; extract the video stream for compression and remux (re-pack) it into MKV file; add soft subtitles and external subtitles, and more.Learn more: Best MKV Joiner to Join Multiple MKV Files into One with Excellent QualityHow to Backup Blu-ray in Lossless Multi-track MKV to Synology NAS for TV?To finish the conversion, you gonna need a Blu-ray ripping tool > Top 5 Blu-ray ripper. Here I suggest you to use Pavtube ByteCopy, the best Blu-ray to Lossless Multi-track MKV solution. It is a powerful program with the ability of backing up Blu-ray collection to lossless multi-track MKV with multiple audio/subtitle tracks and no quality loss. Besides ripping Blu-ray movies to lossless multi-track MKV for streaming to TV via Synology NAS, you can also rip Blu-ray to a more compatible multi-track MP4 for almost all devices playback.With advanced output profile parameters setting function, you can flexibly tweak output video codec, size, bitrate, frame rate, audio codec, sample rate, bit rate, channels, etc to get the best output video playback effect on TV. In addition, you can also do some simple video editing work with our programs such as video trimming, cropping, splitting, merging, effect customizing, watermark inserting, subtitle adding, etc.Free download and install:
 Other Download:- Pavtube old official address: http://www.pavtube.cn/bytecopy/- Cnet Download: http://download.cnet.com/Pavtube-ByteCopy/3000-7970_4-76158512.htmlSteps to Backup Blu-ray in Lossless Multi-track MKV to Synology NAS for TVStep 1. Load Blu-ray moviesRun the program on your computer, import your Blu-ray disc by clicking "File" and "Load from disc".
 Step 2: Set output formatClick the format bar to follow "Multi-track Video" and "Lossless/encoded Multi-track MKV (*.mkv)" to have the best Blu-ray playback on TV. If you want your converted Blu-ray movies to be compatible for all devices, choose Multi-track MP4 (*.mp4).
 Step 3: Adjust multi-task settings.Click "Settings" on the main interface to open "Multi-task Settings" window, all audio and subtitle tracks from the source files are checked and to be saved in the output MKV container by default, if there are some audio tracks or subtitle streams you don't like, uncheck and remove them under the "Audio" and "Subtitle" tab.
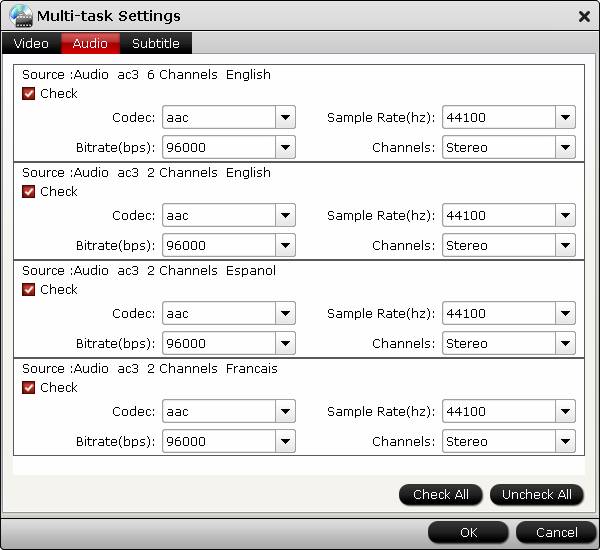 Step 4: Start to convertSwitch back to the main interface, click the big button "Convert" on bottom-right corner to start conversion. When the process is over, you can find the converted files by clicking the "Open output folder" on the main interface of the program. Now, backup the converted Blu-ray movies in lossless multi-track MKV format to Synology NAS for TV playback.Related Articles:
Latest QNAP NAS has a Plex built in, which is a very popular video streaming platform. In this case, uploading media to QNAP NAS for streaming via Plex is a good choice to watch movies. However, many people have problem on watching media via Plex from QNAP NAS.“I have some DVD Disc, DVD ISO, DVD VIDEO_TS files, I want to store them onto my QNAP TS-251 NAS so that I can watch these DVD disc, DVD ISO, DVD VIDEO_TS files on Plex through my TiVo. Is there any simple ways for me?”Although, QNAP NAS supports large range of video formats, Plex only supports some common formats. Apparently, DVD Disc, DVD ISO, DVD VIDEO_TS files are not in the list. So, in order to play DVD Disc, DVD ISO, DVD VIDEO_TS files on Plex with a QNAP NAS, you have to convert DVD Disc, DVD ISO, DVD VIDEO_TS files to Plex supported video format.Here, I recommend you to use Pavtube Video Converter Ultimate, which can convert almost all video formats, including DVD Disc, DVD ISO and DVD VIDEO_TS, to Plex most compatible H.264/ MP4 format. Besides, you are allowed to adjust output aspect ratio, such as 16:10, 16:9, 5:4, 4:3 and 2:1 and to batch convert your videos to save your much time. Moreover, you can select one of the language subtitles you want to show in the movie.More highlights:* Support NVIDIA CUDA and ATI Stream (AMD APP) acceleration technologies.* It can even rip Blu-ray disc, Blu-ray folder, Blu-ray ISO etc.* Cut off unwanted video parts and just preserve segment out of a complete movie.* Remove black edges and unwanted area of image in original movie with simple operation.* Separate one single file into multiple clips according to quantity, duration and output size* Combine several videos and output as a complete movie with natural transition.* Support adding .srt /.ass/.ssa subtitles into movies.* Supported OS: Windows XP/2003/Vista/Windows 7/Windows 8/Windows 8.1/Windows 10Pavtube iMedia Converter for Mac is provided for Mac user, which supports Mac OS X 10.11 El Capitan, 10.10 Yosemite, 10.9 Mavericks, 10.8 Mountain Lion, 10.7 Lion, Snow Leopard10.6, Leopard 10.5Free download and install Other Download:- Pavtube old official address: http://www.pavtube.cn/blu-ray-video-converter-ultimate/- Cnet Download: http://download.cnet.com/Pavtube-Video-Converter-Ultimate/3000-2194_4-75938564.htmlSteps to Play DVD Disc, DVD ISO, DVD VIDEO_TS on Plex with a QNAP NASStep 1. Load DVD Disc, DVD ISO or DVD VIDEO_TSDownload the best video Converter, install and launch it on your PC. You can directly drag and drop the files to the app.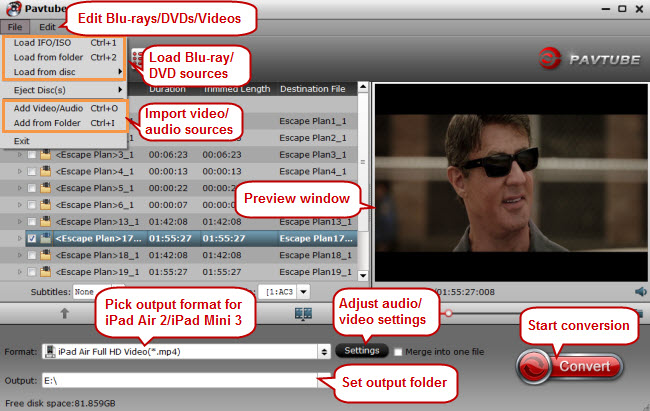 Step 2: Set output formatClick “Format”, and follow “HD Video” > “H.264 HD Video (*.mp4).” as the best output video format for Plex.
 Tips: 1. Click “Settings” on the interface and you can adjust the parameters including size, bitrate, frame rate, etc. to get a high quality of output files or a smaller files size.Keep in mind the file size and video quality is based more on bitrate than resolution which means bitrate higher results in big file size, and lower visible quality loss, and vice versa. You can preview the size at the below chart.
 2. Open "Video Editor" window, click "Crop" tab to remove black edges and unwanted area of images. Click the
  icon on the right-bottom to swtich to the advanced mode, then you can choose the output aspect ratio such as 16:10, 16:9, 5:4, 4:3 and 2:1 from the drop-down list of "Display Aspect Ration".
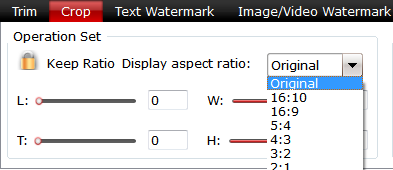 3. Click the "Subtitle" tab in "Video Editor" window, check "Enable", then you will be able to add external SRT/ASS/SSA subtitle files to the video as hard subtitles.(Difference between soft subtitles and hard subtitles)
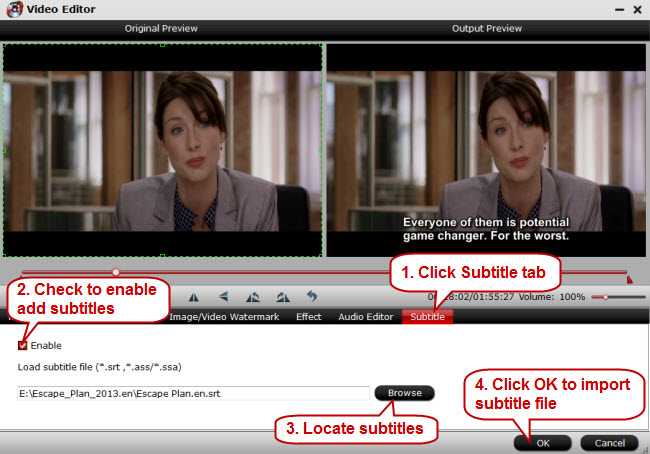 Step 3: Start to convertHit "Convert" on bottom-right corner to start conversion. When the process is over, you can find the converted files by clicking the "Open output folder". Now, you are free to enjoy DVD Disc, DVD ISO, DVD VIDEO_TS on Plex from QNAP NAS. How to Add Movies to Plex?1. Download and install Plex. Click on the Computer download. Yes, you can also download it to your network-attached storage device if you have one. For this how-to, we're focusing on the desktop app. Once you've grabbed it, install it - there aren't any complicated settings you have to fuss with. Click the Launch button when you're done.2. Create a Plex account. You don't have to have one if you don't want - just click the "Don't want an account" link at the somewhat-bottom of the screen, and you'll be transported to Plex's actual configuration screen. We recommend you go for it, though; it makes remote streaming much, much easier. Once you're done, Plex will transport you to the primary configuration screen. Agree to the EULA. You can create one just by entering a username, email address, and other information.3. Click the "Already have an account" link to supply your credentials, or create one now.4. Name thyself. All you have to do in the next screen is giving your desktop computer a name. By default, it'll use whatever name you've already assigned your desktop PC via Windows. If you're good with that, click Next.5. Create your media library by clicking on the Add Section button. Plex will ask you what you're trying to add - movies, TV shows, music, photos or home movies. It's ok if you have multiple types of media in a given folder, but it's pretty easy to use Windows' standard conventions for storing things (the prebuilt Videos, Pictures, and Music folders that likely already exist on PC).Once you've selected what you want to add, give the section a name (like "Movies") and click the Add Folder button to do just that. While Plex scans your media, you can add more folders if you so desire. Once you're all done, click the big orange Next button to go on.6. Add Channels, or other third-party sites that you can tap into using a Plex-friendly app, by selecting them on the next screen. Click Install on the pop-up window for each channel to slap it into your Plex server. On the final screen, click Done to jump into the full Plex display.7. You can edit Plex's default settings by clicking on the wrench and screwdriver icon in the window's upper-right. By default, you shouldn't have to play with anything, but you'll be able to use the Settings menu's myPlex section to see whether your computer can be found from outside your internal network (in other words, is your port forwarding working). You can also tell Plex how much it should scan the various folders you imported via the Library section. If you want Plex to auto-update every time you drop a new video in your Movies folder, that's where you'll find that option.8. Finally, under the Plex/Web section (on the top), you can use the Player section on the sidebar to set the quality of your local and remote streams. If your network can support it, go big!Related Articles:
Watching movies on 4G Harrier Tab in car, in train or in plane would be a good choice. With an 8-inch screen, 2GB of RAM and 16GB of onboard storage, 4G Harrier Tab is a good choice for you to put movies onto it for canceling your leisure time during traveling. And for anyone who wants to put DVD onto 4G Harrier Tab, a few steps preparation would help you make it. Now, learn the full guide on playing DVD movies to 4G Harrier Tab within clicks.Play DVD movies on 4G Harrier Tab would be a little troublesome, as 4G Harrier Tab does not support DVD videos. So, you have to rip DVD to 4G Harrier Tab supported video format before putting the DVD movies onto 4G Harrier Tab. Here, I suggest you to use Pavtube DVDAid to do the job.It is the best choice for you, which can help you finish DVD conversion bypassing DVD copy protection. And it enables you to convert DVD disc, DVD folder, DVD ISO etc to 4G Harrier Tab most compatible H.264/MP4 video format to have the best DVD playback. Besides, it allows you to batch convert your videos to save your much time. Moreover, you can select the language subtitle you want to show, if there are several language subtitles in your DVD movie.If you're using a Mac, please turn to Pavtube DVDAid for Mac, which has updated to support the newest Mac OS X El Capitan. Now download the right program and follow the steps below to get your work done.Free download and install: Other Download:- Pavtube old official address: http://www.pavtube.cn/dvd_ripper/- Cnet Download: http://download.cnet.com/Pavtube-DVDAid/3000-7970_4-76158510.htmlSteps to Play DVD movies on 4G Harrier TabStep 1. Load DVD discInsert your DVD disc into a DVD drive, run the program on your computer, on the main interface click "File" > "Load from disc" to import the DVD disc to the program.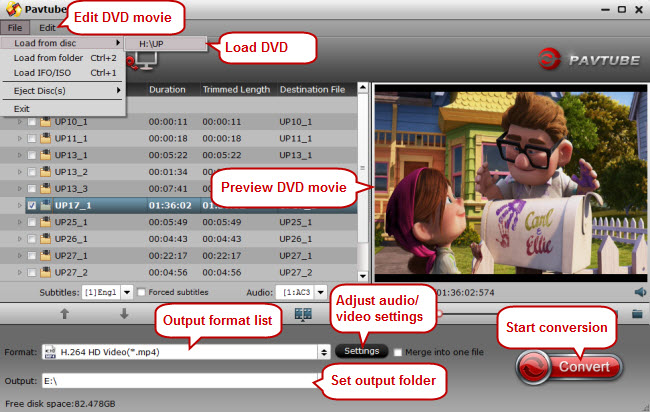 Tip: Select subtitle and audio track on the drop-down box of “Subtitles/Audio” for output, and check the playback on the right side of preview window.Step 2: Set output formatClick the format bar to follow “HD Video” > “H.264 Video (*.mp4)” to enjoy high quality DVD movies on 4G Harrier Tab.
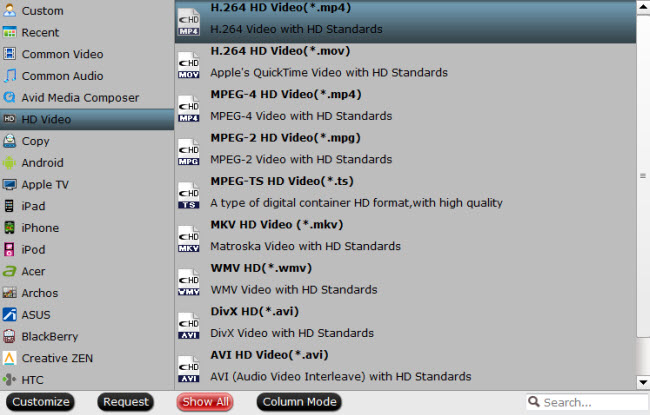 Tip: Click “Settings” on the interface and you can adjust the parameters including size, bitrate, frame rate, etc. to get a high quality of output files or a smaller files size.Keep in mind the file size and video quality is based more on bitrate than resolution which means bitrate higher results in big file size, and lower visible quality loss, and vice versa. You can preview the size at the below chart.Editor note: 1. Open "Video Editor" window and switch to the "Trim" tab, you can drag the slider bars to include the segment you want to remain, click the left square bracket to set start point, and click the right square bracket to set end point when previewing the video or directly input specific values to "Start" and "End" box.
 2. Open "Video Editor" window, switch to and click "Crop" tab, click the icon on the right-bottom to swtich to the advanced mode, then you can choose the output aspect ratio such as 16:10, 16:9, 5:4, 4:3 and 2:1 from the drop-down list of "Display Aspect Ration".Step 3: Start to convertClick the big button "Convert" on bottom-right corner to start conversion. When the process is over, you can find the converted files by clicking the "Open output folder".Now, transfer the converted DVD movies to 4G Harrier Tab via USB port, then you can freely play DVD movies on 4G Harrier Tab during traveling. If you want to watch a large number of DVD movies in the couch or in the bed, you can transfer the converted DVD movies to WD My Cloud Mirror firstly, then watching DVD movies on 4G Harrier Tab via My Cloud Mioor.Related Articles:
Is the hutch beneath your living-room TV filled with DVD discs? Is it difficult for you to copy your DVD movies to phone/tablet/laptop for watching in the couch, in the bed and in the kitchen? Wonder know a way to manage your DVD collections in a digital format and copy them onto your portable devices for watching anywhere and anytime? Follow the page to make a digital copy of DVD to WD My Cloud Mirror.
What Can WD My Cloud Mirror Do for You?
It lets you easily share files around the household and across the web, as well as stream media to—and backup data from—your mobile devices. WD supports Windows, the Mac, iOS, Android, and even Windows Phone with an older app.
Beyond that, the Mirror will stream media to any local device (smart TV, Wi-Fi speaker, Sonos system, and so on) that recognizes a DLNA or iTunes server, store PC backups, host a blog, and other cool stuff that online services rarely offer.
How to Make a Digital Copy of DVD to WD My Cloud Mirror?
To make a digital copy of DVD to WD My Cloud Mirror, you will need a DVD ripper to help you do the job. Here, I suggest you to use Pavtube BDMagic. It is an all-inclusive tool for handling DVD discs. The ability to decrypt DVD disc with copy protections, region code, Disney code, CSS, RCE, Sony ArccOS, UOPs etc has made it the strongest ever to rip DVD. Besides, this DVD Ripper could help you rip DVD disc or convert DVD movies to all mainstream devices supported video format, e.g. rip DVD to MacBook Air, DVD to Galaxy TabPro S, DVD to Laptop, DVD to iPad Pro etc.
Free download and install:
Other Download:
- Pavtube old official address: http://www.pavtube.cn/blu-ray-ripper/
- Cnet Download: http://download.cnet.com/Pavtube-BDMagic/3000-7970_4-75922877.html
Additional features of Pavtube BDMagic:
* DVD Ripper + DVD copier.
* Support NVIDIA CUDA and ATI Stream (AMD APP) acceleration technologies.
* Convert/rip/shrink/copy the latest releases of DVD movies.
* It can even rip Blu-ray disc, Blu-ray folder, Blu-ray ISO etc.
* Cut off unwanted video parts and just preserve segment out of a complete movie.
* Remove black edges and unwanted area of image in original movie with simple operation.
* Adjust output aspect ratio, such as 16:10, 16:9, 5:4, 4:3 and 2:1.
* Allows you to batch convert your videos to save your much time.
* Supported OS: Windows XP/2003/Vista/Windows 7/Windows 8/Windows 8.1/Windows 10
Mac version: Pavtube BDMagic for Mac. The program has updated to support the newest Mac OS X El Capitan.
Steps to Make a Digital Copy of DVD to WD My Cloud Mirror
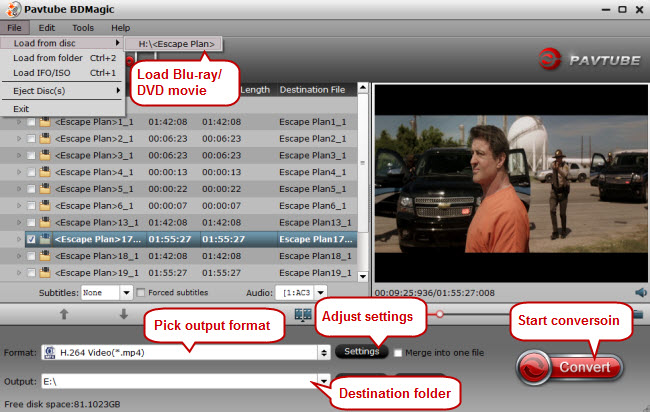
Step 1. Load DVD disc
Insert your DVD disc into a DVD drive, run the program on your computer, on the main interface click "File" > "Load from disc" to import the DVD disc to the program. You can also directly drag and drop the files to the app.
 Step 2: Set output format
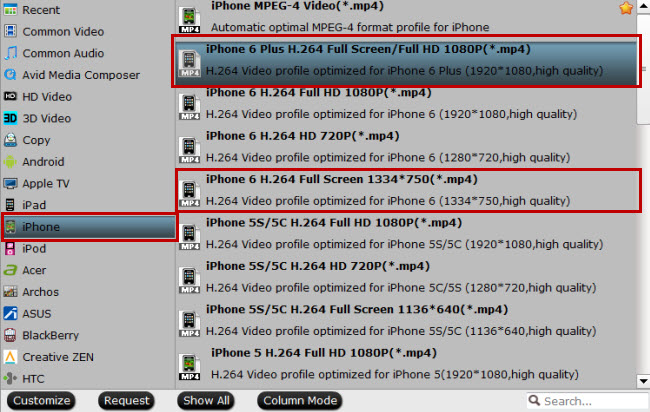
The program provides you optimized preset format for all mainstream devices. Click "Format" bar, and just choose your devices optimized preset video format. For example:
1. For iPhone 6/Plus and 6S/Plus to play:
Step 2: Set output format
The program provides you optimized preset format for all mainstream devices. Click "Format" bar, and just choose your devices optimized preset video format. For example:
1. For iPhone 6/Plus and 6S/Plus to play:
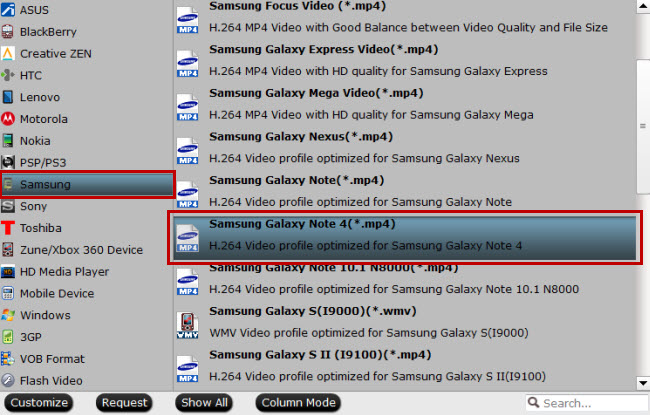
 2. For Samsung Galaxy Note 4/5 to play:
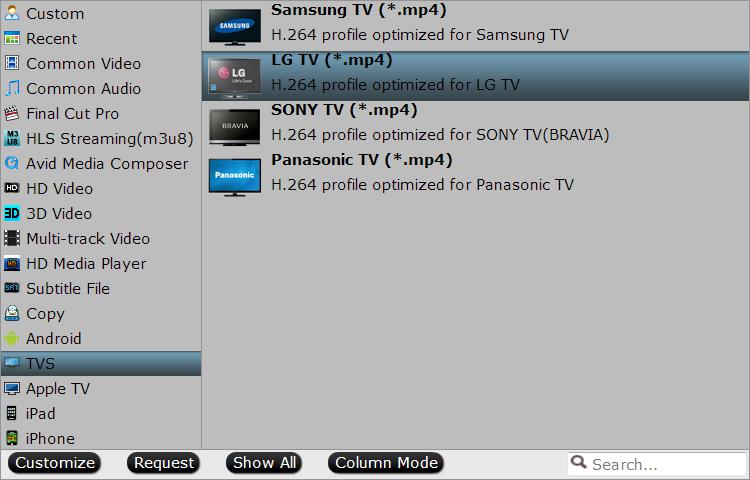
 3. For LG TV to play:
 4. For all devices to play:
 Step 3: Start to convert
Switch back to the main interface, click the big button "Convert" on bottom-right corner to start conversion. When the process is over, you can find the converted files by clicking the "Open output folder" on the main interface of the program.
Now, transfer the converted DVD movies to WD My Cloud Mirror to enjoy on phone, tablet or TV etc.
Related Articles:
Step 3: Start to convert
Switch back to the main interface, click the big button "Convert" on bottom-right corner to start conversion. When the process is over, you can find the converted files by clicking the "Open output folder" on the main interface of the program.
Now, transfer the converted DVD movies to WD My Cloud Mirror to enjoy on phone, tablet or TV etc.
Related Articles:
KMPlayer is many people’s favorite multimedia player for the Windows platform. It’s completely free, supports playing a large number of formats including VCD, DVD, AVI, MKV, OGG, OGM, 3GP, MPEG-1/2/4, WMV, RealMedia, FLV and QuickTime. However, it can not play Blu-ray disc directly even though it can play DVD. So, I will talk about why KMP can not play Blu-ray discs and how to rip Blu-ray disc to watch in KMPlayer on computer.Note: If you are an experienced or a new user to KMP and wanna know more about it, you can visit this new KMPMedia home page.Hot search: Import DVD to Windows Media Player for playingWhy KMPlayer Can not Play Blu-ray Discs?The KMPlayer can't recognize the structure of Blu-ray. Compared with DVD, Blu-ray discs have a different structure. KMPlayer can play DVD just because there are third-party navigators that are able to read the structure of DVD.Even if it could handle the structure of Blu-ray discs, you wouldn't be able to play Blu-ray disc you bought, because all of them are copy-protected.How to Rip Blu-ray Disc to Watch in KMPlayer on Computer?Since KMPlayer does not support Blu-ray disc, then as long as you rip Blu-ray discs to KMPlayer supported video format, it would be easy for KMP to play Blu-ray movies. Here, I suggest you to use Pavtube BDMagic, a professional and easy-to-use Blu-ray ripping tool, which can easily rip Blu-ray disc to watch in KMPlayer on computer. What can Pavtube BDMagic Do for You?* Remove all kinds of Blu-ray discs copy-protection, region code, Disney protection, Sony protection, Marvel protection etc.* Rip Blu-ray to KMPlayer compatible format: MP4, MKV, AVI, OGG, OGM, 3GP, WMV, FLV etc.* Cut off unwanted video parts and just preserve segment out of a complete Blu-ray movie; remove black edges and unwanted area of the image in original movie with simple operation.* Separate one single file into multiple clips according to quantity, duration, and output size; combine several videos and output as a complete movie with natural transition.* Attach external subtitle file, add subtitles into your Blu-ray movie and save as personal creation for enjoyment.* Support Windows 2003/XP/Vista/Windows 7/Windows 8/Windows 8.1, and the latest Windows 10Pavtube BDMagic for Mac is provided for Mac user. The program has updated to support the newest Mac OS X El CapitanFree download and install: Other Download:- Pavtube old official address: http://www.pavtube.cn/blu-ray-ripper/- Cnet Download: http://download.cnet.com/Pavtube-BDMagic/3000-7970_4-75922877.htmlNote: The videos BDMagic “Free Trial” version outputs has a little watermark in the middle. If you want a better video effect without watermark, please buy it.Steps to Rip Blu-ray Disc to Watch in KMPlayer on ComputerStep 1. Load Blu-ray DiscDownload the best Blu-ray ripper, install and launch it on your PC. Then click the "File" > "Load from disc" icon to load source Blu-ray files to the program.Tip 1: If there are several language subtitles in your Blu-ray movies, you can select the language subtitle you want to show in your movie by “Subtitle”. Tip 2: On the main interface, check  option to combine all your separate Blu-ray clips into one single file.Step 2: Set output formatClick “Format” drop-down list and choose “HD video> H.264 HD Video (*.mp4)”, it’s the most widely used format which will be supported by your KMPlayer.Tip 3: If the source movie has black area and you want crop it. You can click “Edit” and video editor interface will appear. Inside it, you can crop the black area, trim footage and add watermark.
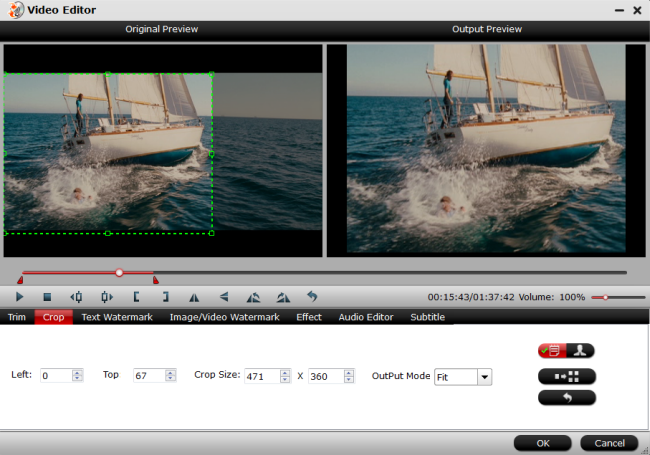 Tip 4: Click the "Subtitle" tab in "Video Editor" window, check "Enable", then you will be able to add external SRT/ASS/SSA subtitle files to the video as hard subtitles.(Difference between soft subtitles and hard subtitles)Step 3: Start to convertSwitch back to the main interface, click the big button "Convert" on bottom-right corner to start conversion. When the process is over, you can find the converted files by clicking the "Open output folder" on the main interface of the program. Now, you can freely enjoy the converted Blu-ray movies on KMPlayer on computer. What’s more, the converted Blu-ray video can also be played on Windows Media Player, VLC, Asus O!Play Mini V2. Just enjoy the movies!Related Articles:
As Internet lines become faster and servers more affordable, online cloud storage is not a sweet concept any more but a modern service you can really count on when backing up your hundreds of Blu-ray and DVD movies. So, this article will show how to backup hundreds of Blu-ray and DVD movies to cloud storage.Part One: Best Cloud Storage in 2016 to Store Blu-ray and DVD MoviesOnline storage is an integral part of life now, but with so many available it's hard to decide which one to use. So, firstly I want to recommend you the top 3 cloud storage for you to choose.1. JustCloudJustCloud use a small desktop application where customers can backup all of their files onto the cloud. They also have free apps for iPhone, iPad, Android, Blackberry, Kindle and Windows so you can backup and access files from any device. If you have rare family photos which you would not want to be accidentally deleted or a music library which took you years to collect and organize, then you should definitely think about getting the services of JustCloud.2. ZipCloudZipCloud is just one of the many online backup services providers available on the Internet today. When you take advantage of their service, you will have a simple, safe and secure way of backing up your data. The founders of ZipCloud are Dan Richards and Brooke Bryan. Since the company’s inception, they have consistently been included among the top ten lists of the best online backup sites. Read on to find out more about the features, security, support and overall rating of ZipCloud as an online backup site.3. SugarSyncSugarSync has their headquarters based in San Mateo, California and they currently have millions of subscribers around the world. The thrust of their campaign is to allow you to use a service which helps you “sync your life”. By simply downloading the software on your computer and mobile devices, you can gain access to everything that the cloud has to offer.Part Two: How to Backup Hundreds of Blu-ray and DVD Movies to Cloud StorageSo, after knowing which cloud storage to choose, the next important thing you should know is how to backup hundreds of Blu-ray and DVD movies to cloud storage.Here, I suggest you to use Pavtube BDMagic to rip and convert Blu-ray and DVD to regular video formats for storage on Cloud Storage, like MP4, MOV, MKV, FLV, WMV, AVI format etc. Considering the limited space of normal cloud storage, the program allows you to lower converted video size by adjusting video parameters. Also considering to the final usage of your converted Blu-ray and DVD movies, the app provides optimized video presets formats for mainstream devices to let your get videos with the best settings to fit your device. Furthermore, the built-in video editor allows you to easily get desired video part and effects. (Review)For Mac user, you can turn to Pavtube BDMagic for Mac for downloading. The program has updated to support the newest Mac OS X El Capitan.Free download and install: Other Download:- Pavtube old official address: http://www.pavtube.cn/blu-ray-ripper/- Cnet Download: http://download.cnet.com/Pavtube-BDMagic/3000-7970_4-75922877.htmlSteps to Backup Hundreds of Blu-ray and DVD Movies to Cloud StorageStep 1. Load DVD/Blu-ray moviesClick “File” to load your Blu-ray/DVD movie to this program. It will automatically choose the main content to convert. If there are several language subtitles in your Blu-ray/DVD movies, you can select the language subtitle you want to show in your movie by “Subtitle”.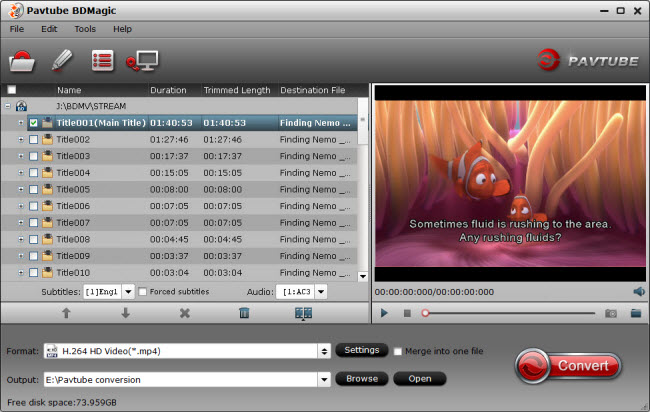 Step 2: Set output formatIn drop-down format list, you can choose the optimized preset format for your final device. If you have not decided the final usage of your converted video, you can choose “HD Video” > “H.264 HD Video(*.mp4)” as output format for playing on laptops, tablets, mobile phones etc.
 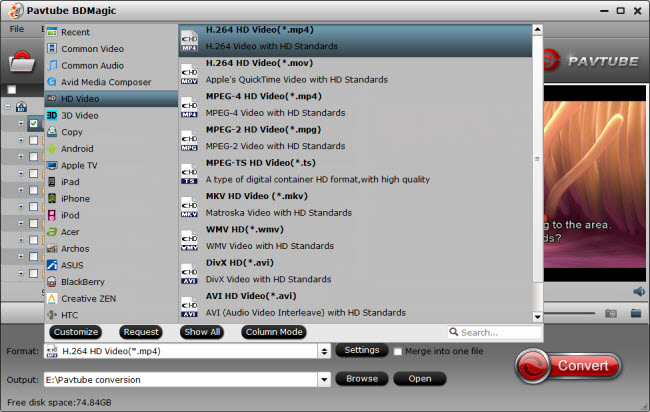 Tips:1. If you just want to digital your Blu-ray/DVD for more convenient organization and management, you also can choose tofull disc copy Blu-ray/DVD or main title copy.2. Click “Settings” on the interface and you can adjust the parameters including size, bitrate, frame rate, etc. to get a high quality of output files or a smaller files size. Keep in mind the file size and video quality is based more on bitrate than resolution which means bitrate higher results in big file size, and lower visible quality loss, and vice versa. You can preview the size at the below chart.Step 3: Start to convertAfter all settings done, hit on the “Convert” button and Blu-ray/DVD to cloud storage conversion will start. After the conversion completes, open output folder and you will find the converted movies.Now, you can backup your hundred of converted Blu-ray and DVD movies to cloud storage now. In addition to Cloud Storage, you can also backup Blu-ray and DVD to Media Player, iTunes library or External Hard Drive/Thumb Drive etc.Related Articles:
Do you have the situation that a whole MKV movie you downloaded from Internet was split into several separate files, named pl.mkv.001, pl.mkv.002, etc. In fact it is common to see, and obviously it makes the files easier to transport. However, it may trouble you a lot when you want to play the whole movie smoothly.In this case, join multiple MKV files into one is necessary. Here I recommend you a best MKV Joiner for Mac, This software offers different solutions for users who want to join multiple MKV files on different demands. (Windows user can turn toPavtube Video Converter Ultimate to download the right app, and can follow the below steps.)Solution one: Merge MKV videos without re-encodingThe software can keep MKV files format for people who are desired to join multiple MKV files without changing the source file format.Solution two: Combine MKV clips with re-encodingFor people who want to join multiple MKV files into one complete video meanwhile converting the joined MKV file to MP4, so as to upload it to Facebook/Youtube/Vimeo for sharing. The software allows to convert MKV to MP4, MOV, AVI, H.265, H.264, M3U8 etc over 200+ formats to upload to community or transfer to portable devices.Solution three: Join MKV files while edit MKV in other waysFor people who want to edit MKV video or set video parameters, the software also allows they to trim and crop video, insert subtitles and adjust video bitrate, size etc.Free download and install
 Other Download:- Pavtube old official address: http://www.pavtube.cn/imedia-converter-mac/- Cnet Download: http://download.cnet.com/Pavtube-iMedia-Converter/3000-2194_4-76177788.htmlSteps to Join Multiple MKV Files into One with Excellent Quality on MacStep 1. Import Multiple MKV Files and adjust the video file order.Launch and start the program on your computer, click "File" > "Add Video/Audio" or "Add from Folder" to import Multiple MKV Files to the program. Click the "Move up" or "Move down" arrow under the video file displaying window to adjust your source video file order according to your own needs.
 Step 2: Choose output file format/Set output video (optional).1. Choose output file format
From the "Format" bar, select your desired output file format from "Format" drop-down options on your own need. The app provides you optimized format for mainstream devices. You can also keep your MKV format as your want.2. Set output video:
Click “Settings” on the interface and you can adjust the parameters including size, bitrate, frame rate, etc. to get a high quality of output files or a smaller files size. Click “Edit” on the interface and video editor interface will appear. Inside it, you can crop the black area, trim footage etc.Step 3: Merge several videos into one.On the main interface, check option to combine all your separate video clips into one single file.Step 4: Start separate video clips joining process.Press the right-bottom "Convert" button, a window will pop out with the conversion progress.When the conversion is completed, you can find your complete movie or video by clicking "Open output folder" with all merged files into one. Now, you can enjoy the whole movie/video smoothly.Related Articles: