Thursday, October 15, 2015

Keep Watch iTunes movies via Apple TV 4 Forever

Among all the popular media streamers, Apple TV is the big winner by dominating the largest market. One of the most important reasons why people choose Apple TV to stream media content to TV is that they can easily access iTunes store, the biggest online media store in the world. If you are new to iTunes and Apple TV, the below guides will help you get iTunes movie purchases or rentals to watch on your Apple TV.
Now let's get started from purchasing and renting iTunes movies on Apple TV 4.
Step 1. Select movies from Apple TV. Firstly, log into the iTunes Store from the main Apple TV menu. Then select Movies > Top Movies, Genius, Genres and Search to find a movie you would like to purchase or rent.
Step 2. Buy or rent movies from Apple TV. When you've decided on a selection you want, choose Buy or Rent from the onscreen menu to purchase or rent the movie you selected.
Step 3. Confirm movie purchasing or renting. After clicking the Buy or Rent button, a confirmation message will appear. Click OK to continue. Then a prompt will tell you where you can find your purchased or rented movies. You can click OK to continue.
Unfortunately, Apple has not made playing of rented movies that easy. Of course, you can rent a movie directly from the iTunes Store on Apple TV. However, movies rented on your Apple TV are not transferable to any other device and can only be viewed on your Apple TV. And for iTunes rentals, it's also inconvenient due to rental expiration and viewing limits. And for iTunes rentals, it’s also inconvenient due to rental expiration and viewing limits. How to watch iTunes rentals on Apple TV? Is it possible to keep iTunes rentals forever?
For you who don't like the time limit on iTunes movies you rented via Apple TV, we are providing you an ultimate solution to get rid of the 24-hour time lock on iTunes movie rentals for good. You can use the third-party iTunes DRM removal tool, like Pavtube ChewTune to get it done. Pavtube ChewTune is a smart and powerful iTunes DRM remover as well as M4V converter developed to remove DRM lock from iTunes movie rentals and purchases while converting the protected M4V videos to DRM-free MP4 with original quality preserved.
      
Keep Watch iTunes movies via Apple TV 4 Forever
Step 1. Load iTunes Rental Movie
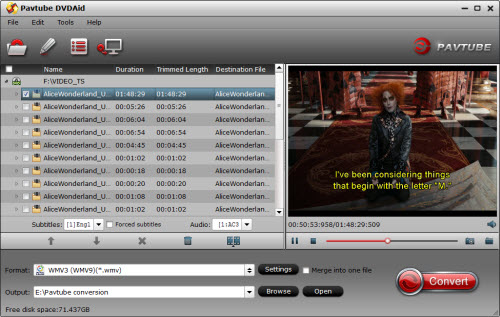
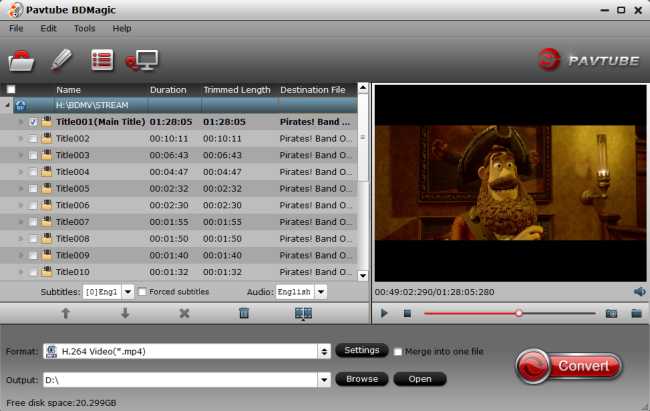
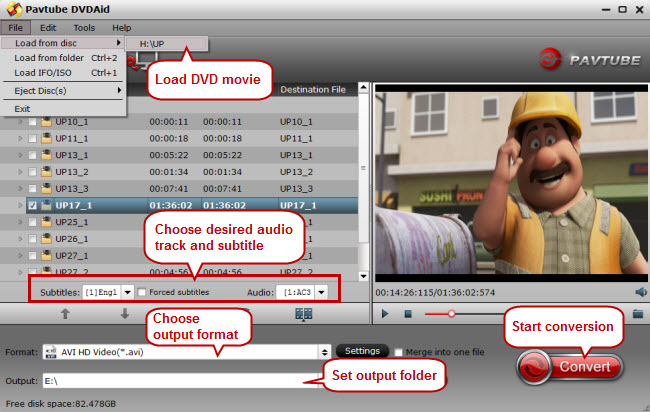
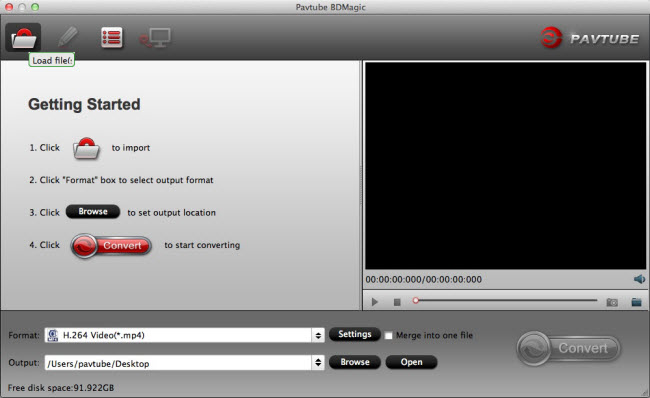
Add video to this iTunes DRM remover and converter. Drag and drop your iTunes rentals to it directly, or you can click "File" to load videos as showed blow.
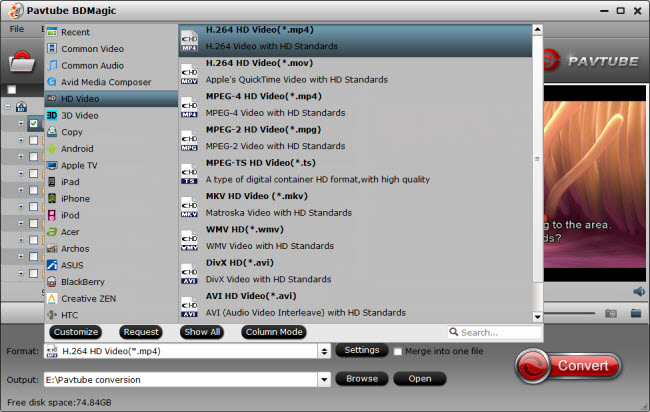
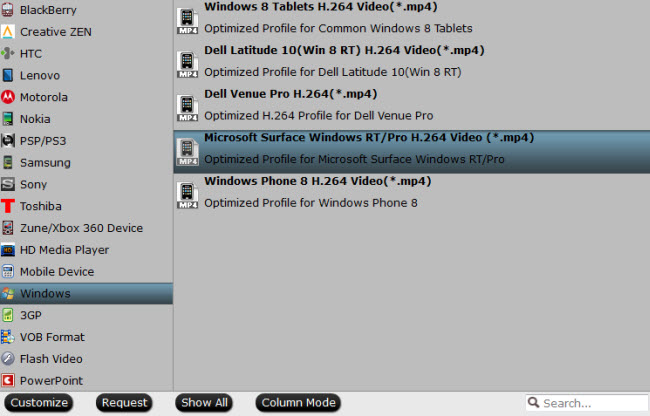
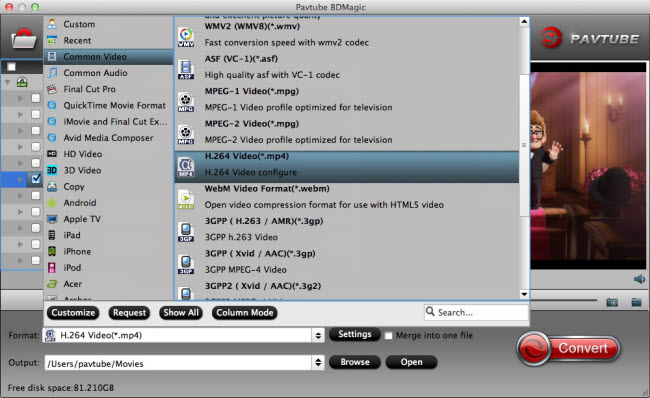
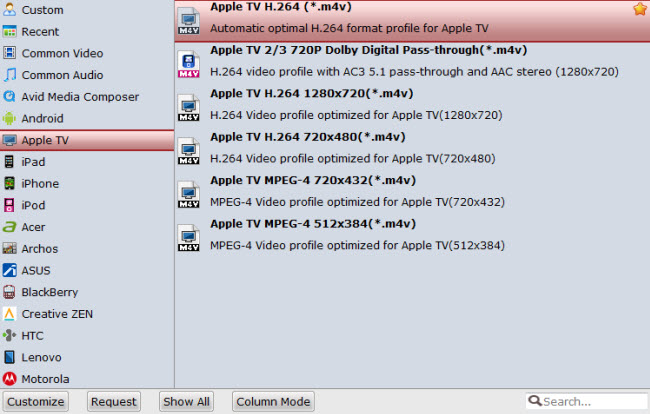
Step 2. Select Output Format
Click "Format" bar to choose an output format for Apple TV.
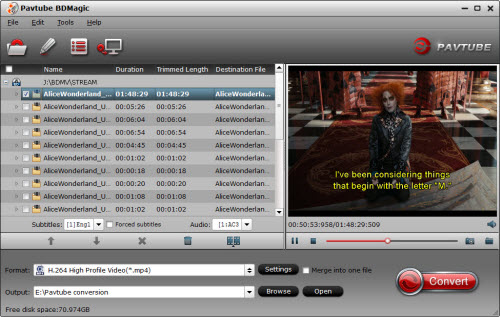
Step 3. Start Converting iTunes Rentals to Apple TV
Click the round icon "Convert" in the bottom right corner on the software's interface to start the conversion. And you can find the converted DRM-free iTunes video immediately by clicking "Open".
Step 4. Play iTunes Rentals in Apple TV
Launch iTunes on your PC to import the converted non-DRM files to iTunes library. Then click File > Home Sharing > Turn On Home Sharing. Enter the Apple ID and password for the iTunes Store and click Turn on Home Sharing.
After you turn on Home Sharing, Apple TV will automatically find iTunes libraries on your home network and are use the account name you entered. The shared libraries will appear in Computers on the main menu of Apple TV
Read More:

Tuesday, October 13, 2015

How to rip DVD or ISO to Sony Xperia Z5 for watching

Summary: If you have some DVD ISO/IFO movies, you may want to rip them to your Sony Xperia Z5 so that you can play the movies with the video quality reserved. This article will give you the simple guide.
Announced in September 2015 and expected to hit the shops this week, the Xperia Z5 is Sony’s new flagship Smartphone. Featuring a 5.2-inch 1920 x 1080-pixel (428 ppi density) LCD screen, the Z5 runs the latest version of the Android OS (Lollipop v5.1.1) and packs plenty of features for the Smartphone photography enthusiast.

Internal memory storage of 32Gb is supplemented by expandable Micro SD storage up to 200GB, allowing you to store plenty of high-resolution photos and videos on Sony Xperia Z5.

Sony Xperia Z5 has very good experience at calling, texting, web browsing, social networking, game playing, music listening, picture taking, picture browsing, online video watching, video recording and playback. How about watching DVD movies on Sony Xperia Z5 anytime and anywhere? However, there is a question is that Sony Xperia Z5 doesn't have a DVD drive, in this case, we need a 3rd party tool to convert DVD files format to Sony Xperia Z5 supported file format first. 

Here the video format supported by Sony Xperia Z5 listed:

Audio playback: AAC, AMR-NB, AMR-WB, FLAC, MIDI, MP3, PCM, Vorbis, WMA
Video Playback: 3GPP, MP4, M4V, MKV, AVI, XVID, WEBM

For the commercial DVD ISO/IFO movies, Pavtube BDMagic is highly recommended. It provides an ultimate solution to copy both homemade and commercial DVD ISO/IFO movies to Sony Xperia Z5 supported MP4 movies (.mp4 is the best video format for Sony Xperia Z5, even for the most Android phone ). Besides DVD ISO/IFO, it also has the ability to convert Blu-ray, 4K, AVI, H.265, M3U8, MXF, FLV, etc to Sony Xperia Z5 supported formats for playback. If you are a Mac user, turn to Pavtube BDMagic for Mac. For more ? Just keep move on and take the guides below:


Other Download:
- Pavtube old official address: http://www.pavtube.cn/blu-ray-ripper/
- Cnet Download: http://download.cnet.com/Pavtube-BDMagic/3000-7970_4-75922877.html


Other Download:
- Pavtube old official address: http://www.pavtube.cn/blu-ray-ripper-mac/
- Cnet Download: http://download.cnet.com/Pavtube-BDMagic/3000-7970_4-76177782.html

How to Watch DVD to Amazon Kindle Fire Kids Edition with 7” Display?

Step 1. Load DVD Files.

Free download the program and install with the instructions followed, and import your files with three items, for example, ‘Load from Disc’, ‘Load from folder’ or ‘Load from ISO/IFO’.


Step 2. Select output profile format.

Click "Format" bar, from its drop-down option, select "H.264 High Profile(*.mp4)" as the output format for watching on Galaxy Tab S2 Nook.


Tips:To customize the video size and adjust the audio channels? Don’t forget to get into the ‘Settings’ interface before you click the ‘Convert’ to start your work. For example, video size as 1280*800, frame rate as 29.97 and bitrates as 3000? All you can set as your personal ideas here:

Step 3. Start Conversion.

Click the "Convert" button on program interface to start ripping DVD to MP4 for Sony Xperia Z5. After it finished, open output file destination, locate the created MP4 video and you could watch it on your Sony Xperia Z5 on the go

Read More:


Tuesday, October 6, 2015

How to Play MKV, AVI, VOB, FLV, Tivo, WMV Format Video on Amazon Fire HD 10/8

Summary: You have got many kinds of videos and want to play on your Amazon Fire HD 10/8, while the video does not supported by Amazon. Are you annoyed about this? Don’t worry, this article will give you a helping hand. 

Hot SearchDVD to Fire Kids Edition | “The Croods Blu-ray” to Kindle | Blu-ray on Kindle Fire HD

Amazon has also updated its Fire, Fire HD 8 and HD 10 , 8-inch and 10-inch tablet with HD resolution (1280 x 800 pixels, 400 nits) and quad MediaTek-core 1.5GHz. The smallest model will be available with storage of 8GB and 16GB , while the 10-inch will be equipped with 16GB or 32GB of interior space. Both will support microSD cards up to 128GB. We also report on board 1GB of RAM, IPS display with good viewing angles and Fire OS 5 operating system based on Android 5.1 and with a revamped user interface. Amazon does not provide data on the battery, but should provide at least 8 hours of battery life.

So, for watching the MKV, AVI, VOB, FLV, Tivo, WMV format video on Amazon Fire HD 10/8, we should know the format Amazon Fire HD 10/8 supported.

Amazon has listed the supported file formats clearly. Please check directly below:

Audio formats supported by Kindle Fire tablets: AAC, MP3, MIDI, OGG, WAV

Video formats supported by Kindle Fire tablets: MP4, VP8, 3GP, WebM, M4V, 3G2

According to the format supported by Amazon Fire HD 10/8, we know that all the MKV, AVI, VOB, FLV, Tivo, WMV format video are not in the list above. In other words, we couldn’t play the MKV, AVI, VOB, FLV, Tivo, WMV on Amazon Fire HD 10/8 directly. There you should get a helping hand from a video converter--Pavtube Video Converter. This program allows you to convert video types such as SD videos, HD footages from camcorders and TiVo/DVR recordings to almost any audio/video format for free entertainment on mobile devices, HD media players, as well as free access to video editing software.

You can also realize your movie director dream with the built-in video editor. Make your personal video by trimming, cropping, adding text/image/video images, inserting SRT/ASS/SSA subtitle into source video, etc.

What is worth mentioning, batch conversion and GPU acceleration can largely save your energy and time.

If you are a Mac user, the Mac version is also available here for you--Pavtube Video Converter for Mac


Other Download:
- Pavtube old official address: http://www.pavtube.com/video_converter/
- Amazon Download: http://download.cnet.com/Pavtube-Video-Converter/3000-2194_4-75734821.html
- Cnet Download: http://download.cnet.com/Pavtube-Video-Converter/3000-2194_4-75734821.html


Other Download:
- Pavtube old official address: http://www.pavtube.com/video-converter-mac/
- Amazon Store Download: http://www.amazon.com/Pavtube-Video-Converter-Mac-Download/dp/B00QIBK0TQ
- Cnet Download: http://download.cnet.com/Pavtube-Video-Converter/3000-2194_4-76179460.html

[size=4]How to Play MKV, AVI, VOB, FLV, Tivo, WMV Format Video on Amazon Fire HD 10/8 


Step 1. Load Files. 

Free download the program and install with the instructions followed, and import your files with click ‘Load from folder’. 


Step 2. Select output profile format. 

No worries about looking for the output formats for Kindle Fire HD Kids Edition here, go to the ‘Format’ list for the item ‘Android’ >> Amazon Kindle Fire HD (*.mp4)’ as the best format. It can be watched smoothly on this tablet. 


Step 3. Set Profile. 

To customize the video size and adjust the audio channels? Don’t forget to get into the ‘Settings’ interface before you click the ‘Convert’ to start your work. For example, video size as 1280*800, frame rate as 29.97 and bitrates as 3000? All you can set as your personal ideas here: 


Step 4. Start Conversion. 

Click the "Convert" button on program interface to start the MKV, AVI, VOB, FLV, Tivo, WMV format video to MP4 for Amazon Fire HD 10/8. After it finished, open output file destination, locate the created MP4 video and you could watch it on your Amazon Fire HD 10/8. 

Read More


Monday, September 28, 2015

Playing Blu-ray ISO IMAGE on Galaxy Tab S2 Nook Smoothly

Summary: A thing to Galaxy Tab S2 is that the wonderful display--The Super AMOLED 2048 x 1536 (OXGA) display delivers deep contrast, rich colors, and crisp details to maximize your reading and entertainment experience. This article gives you some tips about how to watching Blu-ray ISO image files on Galaxy Tab S2’ wonderful display.

Hot SearchBlu-ray Movies on Apple TV 4 | Blu-Ray Movies on Kodi | Watch 3D Blu-ray on Google Cardboard

The 2015 Nook tablet is based on the Galaxy Tab S2, a recently launched Samsung’s new flagship tablet, and a replacement for Galaxy Tab S. Samsung Galaxy Tab S2 Nook has an internal memory of 32 GB, with a possibility to add 128 GB via a microSD card. The display gives a deeper contrast, richer colors, and crispier details to maximize the reading experience and enjoy watching movies to the fullest. Just like earlier Nook tablets offered in cooperation with Samsung, the Nook S2 is using Android operating system, but it’s layered with a Nook interface to improve content discovery and reading experience.

As for Blu-ray fans, or other people who have favoriate Blu-ray collections, how to transfer Blu-ray to Galaxy Tab S2 and watch Blu-ray movies or image files on the go? There’s a very powerful and professional Blu-ray to Galaxy Tab Converter I would recommended to you--Pavtube BDMagic,If you are a Mac user, Pavtube BDMagic for Macalso available here, it can remove the Blu-ray DRM protection easily and rip it into Galaxy Tab S2 Nook in it’s supported h.264 format. We recommend h.264 here for it can keep the original video quality and smaller in size.

Now, download the Blu-ray to Galaxy Tab Converter and follow the guide below to start conversion.


Other Download:
- Pavtube old official address: http://www.pavtube.cn/blu-ray-ripper/
- Cnet Download: http://download.cnet.com/Pavtube-BDMagic/3000-7970_4-75922877.html


Other Download:
- Pavtube old official address: http://www.pavtube.cn/blu-ray-ripper-mac/
- Cnet Download: http://download.cnet.com/Pavtube-BDMagic/3000-7970_4-76177782.html

Playing Blu-ray ISO IMAGE on Galaxy Tab S2 Nook Smoothly

Step 1. Load Blu-ray files.

Connect your Blu-ray drive with computer and insert your Blu-ray into your Blu-ray driver, and add your Blu-ray disc via "Load" button to the app. Launch the program and add videos in the following two ways:
1> Click Add button to choose video files from your hard drive for converting.
2> Directly drag the movies you want to convert to the left item bar.


Step 2. Select output profile format.

Click "Format" bar, from its drop-down option, select "H.264 High Profile(*.mp4)" as the output format for watching on Galaxy Tab S2 Nook.


Tip: If you are still not satisfied with the defaulted profile settings, you can click "Settings" to change the video encoder, resolution, frame rate, etc. as you wish.

Step 3. Start conversion.

Click “Convert” button and start Blu-ray videos to Galaxy Tab S2 Nook compatible MP4 format video conversion. After conversion, you can get the converted files by clicking “Open” button. Now you can enjoying Blu-ray videos by Galaxy Tab S2 Nook).

Read More:

Friday, September 25, 2015

How to Remove Disney DRM Copy Protection and Backup Disney DVD Movie to Surface Pro 4

Summary: The things you wanna do maybe backup and playback your Disney DVD collection with the forthcoming Surface Pro 4. This article will show you the guide steps how to remove copy protection of Disney DVD and playback on Surface Pro 4.

Hot SearchBlu-ray to Surface | AVI (DivX, XviD) Video Files on Surface | DVD Surface Hub Tablet

Microsoft is planning to release the Surface Pro 4 in next 6 weeks. It is also a good news for Disney fans to enjoy movies on Surface Pro 4. There are many reasons for you to rip and copy a Disney DVD you own:

1.DVD movies published by Disney studio are almost classic, which every DVD collector are by no means willing to see their DVDs are scratched, damaged or lost. Thus copying the Disney DVDs for safekeeping beforehand are much more preferred.

2.Having your Disney DVD movies ripped on your have drive means you can conveniently play Disney DVD movies on mobile devices such as iPhone, iPad, Android, and many more that don't have an optical drive.

3. Many DVD discs published by Disney cost ranging from $9.99 up to $27.99 each. Backing up these Disney DVDs you've paid good money for is a great idea to enrich your movie library.

Here is a professional DVD ripper for Surface (including Surface Pro4/Pro3/Pro2/3/2)--Pavtube DVDAid. It is specially designed for users to backup and rip DVD from physical discs (remove copy protection automatic when you load the DVD files into the ripper)to computer hard drive or portable devices including Surface 2/Pro 2 for movie watching. In addition, you are allowed to trim, crop, add watermarks and effect, attach external subtitles to source media before ripping your DVDs. If you are a Mac user, please turn to Pavtube DVDAid for Mac.


Other Download:
- Pavtube old official address: http://www.pavtube.cn/dvd_ripper/
- Cnet Download: http://download.cnet.com/Pavtube-DVDAid/3000-7970_4-76158510.html

How to Remove Disney DRM Copy Protection and Backup Disney DVD Movie to Surface Pro 4

Step 1: Load Disney DVD movie

Click on the button “Load disc” to import source disc from your disc drive to the app.


Step 2: Choose best profile for Surface 2/Pro 2

Select the optimized profile from “Format” menu for output. You are suggested to choose “Windows” > “Microsoft Surface Windows RT/Pro H.264 Video (*.mp4)” as output format for your Surface Pro 4.


Tip: If you cannot find the suitable profile for your device or you would like to adjust profile presets to get the optimized profile for extracting DVD movies, enter “Settings” tab and set Codec, Size, Bitrate, Framerate, etc to get better video and audio playback.

Step 3: Start DVD to Surface 2/Pro 2 conversion

Hit the big button “Convert” on program UI to start DVD to Surface Pro 4 conversion and when the conversion is done, click the “Open” icon to get the ripped MP4 file. Now you are ready to move DVD movies to Surface Pro 4.

Step 4: Transfer DVD to Surface Pro 4

1. Copy files onto a USB flash drive or memory card on your other computer.
2. Insert the USB flash drive or memory card into Surface.
3. Tap or click the notification that appears in the upper-right corner of the screen.
4. Tap or click Open folder to view files.
5. Select the files or folders you want to add to Surface, tap or click Home, and then tap or click Copy to.
6. Select a location. For example, choose Documents if the flash drive or memory card contains documents.

More methods to move videos, pictures and files to Microsoft Surface are available at Synchronizing Media Contents to Your Microsoft Surface.

Read More:

Wednesday, September 23, 2015

iPhone 6S Plus vs Samsung Galaxy S6 Edge Plus: How to playback 4k videos on them?

Summary: Smartphones are big these days, in every sense of the word. Apple used to make dinky little iPhones, and now turns out the hulking, palm-stretching likes of the new iPhone 6s Plus. A few weeks prior, Samsung figures some people want a bigger edition of the already quite big Galaxy S6 Edge, releasing its own + size edition.

Hot Search: Play 4k Movie with Xbox One | Edit 4K Movie with FCP X | Watching 4K Mocie on Home Theater

Screen

The 5.5-inch screen of the iPhone 6s Plus uses LCD technology rather than AMOLED, with a resolution of 1920 x 1080. Apart from its 401ppi Retina display, it has 3D Touch, where you can take a look at what's inside an app.

Meanwhile, the Samsung Galaxy S6 Edge+ features a 5.7-inch AMOLED screen with a resolution of 2560 x 1440 and 518ppi. It has a curved side which when flicked, opens a side panel with shortcuts to apps and contacts, according to Stuff TV.

Power

Apple claimed that the iPhone 6S Plus will run the new A9 and M9 co-processors, which is a massive 70 percent faster than the A8 in CPU speeds and 90 percent faster in GPU speeds. Samsung features the latest Exynos 8-core processor with 4GB of RAM that helps maximize multitasking potential. Both devices use a ton of power which would work well even for the most demanding mobile tasks, Digital Trends reported.

Design

When it comes to the design, the iPhone 6S Plus is just a larger version of the iPhone using a high-strength 7000 alloy aluminum and a thicker glass. The Galaxy 6S Edge Plus has a curved edge which according to reviews is uncomfortable to hold. In terms of weight, Galaxy is lighter at 0.34lbs while the iPhone weighs 0.42 lbs.

Camera

Since most users love to take pictures, it is important to look into the camera features. The iPhone supports 4K recording from its rear camera, 12-megapixel iSight camera, and 5-megapixel design front camera. With its new 3D technology, one can record GIFs on "Live Photos" and it has a new high-resolution panorama.

The Samsung Galaxy S6 Edge Plus use a 16-megapixel sensor with OIS and 4K video. You can also do live YouTube broadcasting at 1080p from anywhere with just a single tap. Shaky photos can be avoided with its OIS feature.

Price

The Apple iPhone 6S Plus will cost $750 off-contract with 16GB of storage. Under Apple Care insurance-upgrade deal, one can avail of the phone for $32 per month. Meanwhile, the price of the Samsung’s Galaxy S6 Edge Plus starts at around $780 retail for 32GB of storage.

Check local carriers for the pricing since they have their own plans for both the devices.

Here we already know detail information about iPhone 6S Plus and Samsung Galaxy S6 Edge Plus, did you doubt the newest 4k videos playable on them? In fact, although the both of them can be support 4K recording, not all the formats 4k video are supported by iPhone 6S Plus and Samsung Galaxy S6 Edge Plus. But it doesn’t matter, all kinds of 4k videos can be converted into iPhone 6S Plus and Samsung Galaxy S6 Edge Plus supported h.264 4k format.

To solve the video format problem, you can use a program to downscale your 4K resolution video to 1080p, then you will have no problem to stream 4K/HD video movie on Windows 10. Here, you can have a try at Pavtube Video Converter Ultimate, which enables you to set the output profile parameters as 1920 * 1080. The program also enables you to decode 4K/HD Video to Windows 10 other compatible formats to transfer to your iPad, iPhone, iPod, Android phone, tablets and game consoles. If you are running on Mac, Pavtube iMedia Converter for Mac is also available. Let’s see how it work!


iPhone 6S Plus vs Samsung Galaxy S6 Edge Plus: How to playback 4k videos on them?

Step 1: Add 4K/HD videos.

Import 4K/HD videos to the program by clicking "File">"Add Video/Audio" from "File" drop-down list.


Step 2: Choose output profile format.

To ensure a better quality when streaming HD or 4K video on iPhone 6S Plus and Samsung Galaxy S6 Edge Plus, you'd better choose "H.264 HD Video(*mp4)", a perfect format to stream HD content as your output file format.


Step 3: Get conversion.

Hit the right-bottom convert button to start the conversion process. And the whole conversion will take a few minutes.

When the conversion is over, feel free to watch 4K HD video on iPhone 6S Plus and Samsung Galaxy S6 Edge Plus or transfer to enjoy on your any other portable devices. 

Read More:

Friday, September 18, 2015

How to Play Blu-ray Movies on Apple TV 4?

Summary: Got a hobby of enjoying Blu-ray (BD) movies on Apple TV 4? In following article, several pieces of suggestions there we can take to play BD movies on Apple TV 4.

Hot searchFormat for Apple TV | Keep iTunes Rentals on Apple TV | Play Torrents Movies on Apple TV

With the release of new Apple TV 4 on Sept 16, it gives you anytime access to endless entertainment. Thousands of videos and TV shows can be shown on your wide screen TV. What a delightful thing if Blu-ray movies can be played on Apple TV 4. 

It is a tiny digital media player which allows you to enjoy a whole world of movies, TV shows, sports, music, and more. So far, the latest version of Apple TV is the forth generation, in up to 1080p HD. The device also plays content from any Mac OS X, iOS device or Windows with AirPlay or iTunes.

Apple TV is compatible with the following video formats:

  • H.264 video up to 1080p, 30 frames per second, High or Main Profile level 4.0 or lower, Baseline Profile level 3.0 or lower with AAC-LC audio up to 160 Kbps per channel, 48kHz, stereo audio in .m4v, .mp4, and .mov file formats
  • MPEG-4 video up to 2.5 Mbps, 640 by 480 pixels, 30 frames per second, Simple Profile with AAC-LC audio up to 160 Kbps, 48kHz, stereo audio in .m4v, .mp4, and .mov file formats
  • Motion JPEG (M-JPEG) up to 35 Mbps, 1280 by 720 pixels, 30 frames per second, audio in ulaw, PCM stereo audio in .avi file format

Still there is an irritating issue, ISO files are not read by Apple TV 4. To get the work done, you can get Pavtube BDMagic for Mac which is easy to use and produces excellent results. With this powerful Apple Video Converter, you can convert ISO and even other formats to Apple TV 4 supported one. There is no need to worry about how to play Blu-ray movies on Apple TV 4 anymore.


Other Download:
- Pavtube old official address: http://www.pavtube.cn/blu-ray-ripper-mac/
- Cnet Download: http://download.cnet.com/Pavtube-BDMagic/3000-7970_4-76177782.html

Just download it and follow the step-by-step guide to stream Blu-ray movies to Apple TV 4.

How to Play Blu-ray Movies on Apple TV 4?

Step 1. Load ISO files.

Put Blu-ray disc into Blu-ray drive and connect it with your PC and then click "File", from its drop-down list, select "Load from disc" to import ISO files to the program.


Step 2. Select output profile format.

Click "Format" bar, from its drop-down option, select “Apple TV>>Apple TV H.264 MP4” as the output format for streaming to Apple TV 4.


Step 3. Start conversion

Click “Convert” button and start ISO videos to Apple TV 4 compatible H.264 format video conversion. After conversion, you can get the converted files by clicking “Open” button. Now you can enjoying Blu-ray movies by streaming to your Apple TV 4.

Stream Blu-ray movies to Apple TV via AirPlay or iTunes


Via AirPlay
: Firstly, to use AirPlay, you need to prepare one of the following devices: iPhone 4 (or later), iPad, iPad mini, or iPod touch (4th generation or later). Add the converted Blu-ray movies to iTunes and sync to your iOS device.
Secondly, be sure iOS device and Apple TV are in the same Wi-Fi network; start play the video on your device, and then swipe up from the bottom of your device screen to access Control Center and tap AirPlay; finally, tap the name of the device you want to AirPlay to.

Via iTunes: Firstly, add the converted Blu-ray videos to iTunes. Then, go to iTunes > Preferences, choose Apple TV, and make sure "Look for Apple TVs" is selected.
Secondly, on your Apple TV, choose Settings > Computers > "Connect to iTunes," and note the passcode displayed; in iTunes, select the Apple TV (below Devices), and enter the passcode.
Thirdly, click the Summary button and select one of "Automatic Sync" and "Custom Sync".
Now, all content are streamed to Apple TV for enjoyment.


More Guides:
How to Play MKV, Xvid, Divx, FLV, VOB Videos on Apple TV 3?
Work Panasonic HD MTS Files with iPad or Apple TV Well
How to Stream 1080p/720p MKV Movies to Apple TV with Dolby Digital 5.1?
Fastest Backup Blu-ray to BDMV folder Losslessly on Macbook retina
Share Tips on How to Enjoy HD MKV Movies on Apple TV/2/3