To backup Blu-ray movies for NAS, Pavtube BDMagic is highly recommended (). The program allows you to transform Blu-ray movies to NAS friendly audio and video formats with best settings for NAS streaming, like H.265/HEVC, MKV, MP4, MOV, DivX, AVI, MP3, FLAC, etc. Here we suggest you choose the NAS best compatible format MKV and MP4, as far as we know, MP4, MKV are commonly supported formats for computer, Apple TV, iOS devices, Cyclone Micro Player, Roku player, WDTV, PS4, PS3, 4K HD TV, etc. via streaming videos from NAS.
What’s more, it can also enable you to rip Blu-ray/DVD/ISO for directly playback on Android, iOS, Windows based devices; directly copy Blu-ray without extras, save 100% intact M2TS/VOB main movie from your Blu-ray without any quality loss; Or 1:1 full disc copy, copy the entire disc in original file structure with all subtitle tracks and audio streams preserved. And it's easy to use and very stable.
Tips:
- If you are using Mac, you can also use the BDMagic for Mac, here is the steps.
- If you want to rip Blu-ray and DVD to multi-track MKV/MP4/AVI/MOV, pls refer the guide.


Other Download:
- Pavtube old official address: http://www.pavtube.cn/blu-ray-ripper/
- Cnet Download: http://download.cnet.com/Pavtube-BDMagic/3000-7970_4-75922877.html
How to Backup Blu-ray to NAS in MKV/MP4 format for streaming?
Step 1. Load Blu-ray disc to the program.
Put Blu-ray disc into your Blu-ray drive and then plug the Blu-ray drive into the computer through its USB cable. Then click "File", from its drop-down list, select "Load from disc" to import Blu-ray disc to the program.
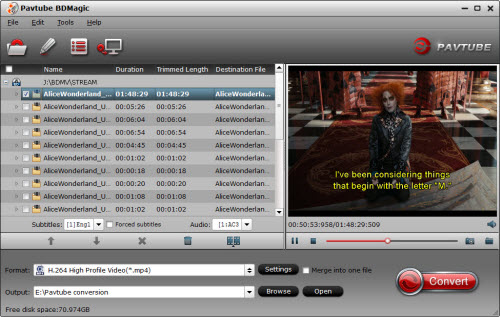
Step 2. Choose output format for portable devices
Clicking the Format bar, you can choose output format from the format list for other portable devices. For example, choose *.m4v for viewing on Apple TV.

One special function that makes Pavtube BDMagic stands out is you can easily select your needed tracks, subtitles.
Step 3. Select desired subtitles track and audio streams
Check the movie titles you want to rip. Click the drop-down list of Subtitles, then all the subtitles info in the Blu-ray will be shown clearly, so you can select your needed language as your subtitles freely.
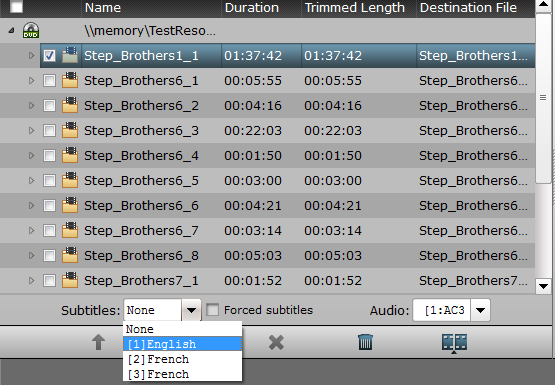
What's more, Pavtube BDMagic also offers an option called Forced subtitles, which enables you to see subtitles only when actors are speaking a different language. For instance, if you specify English (your mother tongue) as your subtitles, and meanwhile tick off “Forced subtitles” option, then when actors are speaking English, no subtitles will show up, but when they are talking with each other in French, the English subtitles will appear accompanying with the French.
To select your desired audio track, just click the pull down menu of “Audio”, and then the popup drop-down list will give you the detailed information of all audio tracks, including audio codec and language.

Step 4. Start Blu-ray to NAS backing up
Clicking the “Convert” button on main interface, you can go to Conversion window to get Blu-ray for NAS conversion starts.
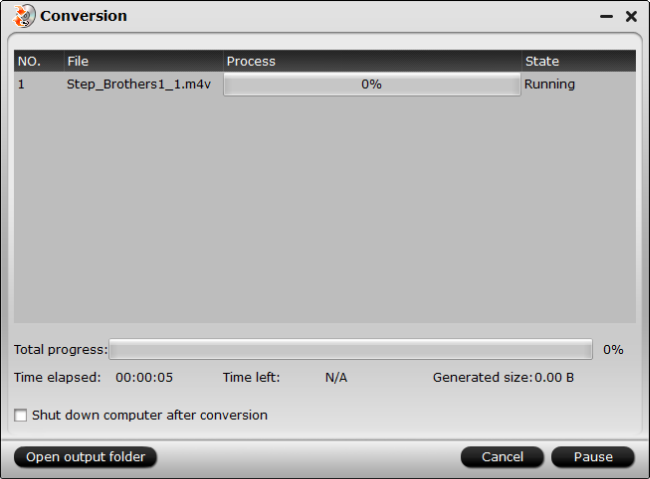
You can find conversion information on the window, such as Time elapsed, Time left, Generated size, and Estimated size.
After the conversion, you can stream the ripped Blu-ray movies to NAS for streaming to media players such as HDTV, iPad, PS3, etc., then you can get Blu-ray enjoyment anywhere and anytime you like. Learn >> How to Add movies to DLNA server for watching.
More Guides
- Copy DVD to WDTV-live box for streaming on TV via HDMS
- Enable 3D Movies playback on Oculus Rift Developers Kit Dk2
- Convert Blu-ray to TrueHD 7.1 audio by Directly Copy
- Backup and Stream Blu-ray to Synology DiskStation DS215j 6TB
- Use Gear VR to watch 3D Blu-ray movies on Galaxy Note 4
- Play iTunes movies on Oculus Rift DK2 in Oculus Cinema
No comments:
Post a Comment