“I have some DVD Disc, DVD ISO, DVD VIDEO_TS files, I want to store them onto my QNAP TS-251 NAS so that I can watch these DVD disc, DVD ISO, DVD VIDEO_TS files on Plex through my TiVo. Is there any simple ways for me?”
Although, QNAP NAS supports large range of video formats, Plex only supports some common formats. Apparently, DVD Disc, DVD ISO, DVD VIDEO_TS files are not in the list. So, in order to play DVD Disc, DVD ISO, DVD VIDEO_TS files on Plex with a QNAP NAS, you have to convert DVD Disc, DVD ISO, DVD VIDEO_TS files to Plex supported video format.
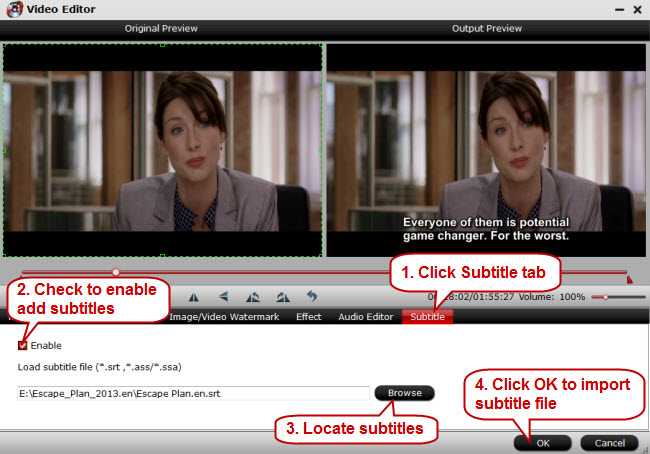
Here, I recommend you to use Pavtube Video Converter Ultimate, which can convert almost all video formats, including DVD Disc, DVD ISO and DVD VIDEO_TS, to Plex most compatible H.264/ MP4 format. Besides, you are allowed to adjust output aspect ratio, such as 16:10, 16:9, 5:4, 4:3 and 2:1 and to batch convert your videos to save your much time. Moreover, you can select one of the language subtitles you want to show in the movie.
More highlights:
* Support NVIDIA CUDA and ATI Stream (AMD APP) acceleration technologies.
* It can even rip Blu-ray disc, Blu-ray folder, Blu-ray ISO etc.
* Cut off unwanted video parts and just preserve segment out of a complete movie.
* Remove black edges and unwanted area of image in original movie with simple operation.
* Separate one single file into multiple clips according to quantity, duration and output size
* Combine several videos and output as a complete movie with natural transition.
* Support adding .srt /.ass/.ssa subtitles into movies.
* Supported OS: Windows XP/2003/Vista/Windows 7/Windows 8/Windows 8.1/Windows 10
Pavtube iMedia Converter for Mac is provided for Mac user, which supports Mac OS X 10.11 El Capitan, 10.10 Yosemite, 10.9 Mavericks, 10.8 Mountain Lion, 10.7 Lion, Snow Leopard10.6, Leopard 10.5
Free download and install


Other Download:
- Pavtube old official address: http://www.pavtube.cn/blu-ray-video-converter-ultimate/
- Cnet Download: http://download.cnet.com/Pavtube-Video-Converter-Ultimate/3000-2194_4-75938564.html
Steps to Play DVD Disc, DVD ISO, DVD VIDEO_TS on Plex with a QNAP NAS
Step 1. Load DVD Disc, DVD ISO or DVD VIDEO_TS
Download the best video Converter, install and launch it on your PC. You can directly drag and drop the files to the app.
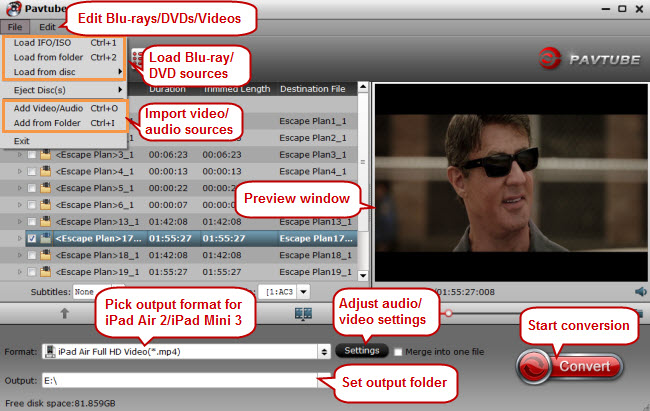
Step 2: Set output format
Click “Format”, and follow “HD Video” > “H.264 HD Video (*.mp4).” as the best output video format for Plex.

Tips:
1. Click “Settings” on the interface and you can adjust the parameters including size, bitrate, frame rate, etc. to get a high quality of output files or a smaller files size.
Keep in mind the file size and video quality is based more on bitrate than resolution which means bitrate higher results in big file size, and lower visible quality loss, and vice versa. You can preview the size at the below chart.

2. Open "Video Editor" window, click "Crop" tab to remove black edges and unwanted area of images. Click the
 icon on the right-bottom to swtich to the advanced mode, then you can choose the output aspect ratio such as 16:10, 16:9, 5:4, 4:3 and 2:1 from the drop-down list of "Display Aspect Ration".
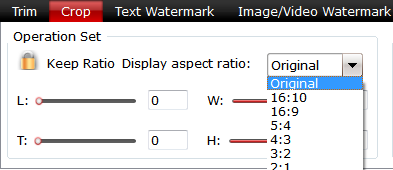
3. Click the "Subtitle" tab in "Video Editor" window, check "Enable", then you will be able to add external SRT/ASS/SSA subtitle files to the video as hard subtitles.(Difference between soft subtitles and hard subtitles)
Step 3: Start to convert
Hit "Convert" on bottom-right corner to start conversion. When the process is over, you can find the converted files by clicking the "Open output folder".
Now, you are free to enjoy DVD Disc, DVD ISO, DVD VIDEO_TS on Plex from QNAP NAS.
How to Add Movies to Plex?
1. Download and install Plex. Click on the Computer download. Yes, you can also download it to your network-attached storage device if you have one. For this how-to, we're focusing on the desktop app. Once you've grabbed it, install it - there aren't any complicated settings you have to fuss with. Click the Launch button when you're done.
2. Create a Plex account. You don't have to have one if you don't want - just click the "Don't want an account" link at the somewhat-bottom of the screen, and you'll be transported to Plex's actual configuration screen. We recommend you go for it, though; it makes remote streaming much, much easier. Once you're done, Plex will transport you to the primary configuration screen. Agree to the EULA. You can create one just by entering a username, email address, and other information.
3. Click the "Already have an account" link to supply your credentials, or create one now.
4. Name thyself. All you have to do in the next screen is giving your desktop computer a name. By default, it'll use whatever name you've already assigned your desktop PC via Windows. If you're good with that, click Next.
5. Create your media library by clicking on the Add Section button. Plex will ask you what you're trying to add - movies, TV shows, music, photos or home movies. It's ok if you have multiple types of media in a given folder, but it's pretty easy to use Windows' standard conventions for storing things (the prebuilt Videos, Pictures, and Music folders that likely already exist on PC).
Once you've selected what you want to add, give the section a name (like "Movies") and click the Add Folder button to do just that. While Plex scans your media, you can add more folders if you so desire. Once you're all done, click the big orange Next button to go on.
6. Add Channels, or other third-party sites that you can tap into using a Plex-friendly app, by selecting them on the next screen. Click Install on the pop-up window for each channel to slap it into your Plex server. On the final screen, click Done to jump into the full Plex display.
7. You can edit Plex's default settings by clicking on the wrench and screwdriver icon in the window's upper-right. By default, you shouldn't have to play with anything, but you'll be able to use the Settings menu's myPlex section to see whether your computer can be found from outside your internal network (in other words, is your port forwarding working). You can also tell Plex how much it should scan the various folders you imported via the Library section. If you want Plex to auto-update every time you drop a new video in your Movies folder, that's where you'll find that option.
8. Finally, under the Plex/Web section (on the top), you can use the Player section on the sidebar to set the quality of your local and remote streams. If your network can support it, go big!
Related Articles:
No comments:
Post a Comment