Showing posts with label Mac. Show all posts

Monday, May 1, 2017

Convert PAL to NTSC or NTSC to PAL on Mac

What is PAL and NTSC?

PAL and NTSC are the two most common used standard broadcast formats. PAL stands for Phase Alternating Line. NTSC stands for National Television Standards Committee. PAL adopts a frame rate of 25 fps and 720x576 aspect ratio, and is widespread in most of Europe, Australia and large parts of Africa and Asia. For NTSC, a frame rate of 30 fps at an aspect ratio of 720x480, is used in North America, Japan and South Korea.


Why need convert PAL to NTSC or NTSC to PAL?

After knowing about PAL and NTSC, let us talk about why need convert PAL to NTSC or NTSC to PAL. If you have a camcorder purchased in Australia, you will be unable to play the videos shot by the cam on your home player in United Kingdom or other countries using PAL, you will get black screen or other playback problems. This principle also applies to DVD as well. A PAL DVD will not play on most DVD players in North/South America. The solution is to find a converter to change NSTC to PAL or change PAL to NTSC with several options.


Best Video Converter for Converting PAL to NTSC or NTSC to PAL


Here I highly recommend Pavtube iMedia Converter for Mac to all the users. This program not only convert video from NTSC to PAL, but also convert NTSC DVD to PAL DVD. It also supports various video conversion between 250+ formats. Besides, you can also convert any SD/HD/4K video to format such as mp4 so that you can add video to iPod, iPad, iPhone, Android phones, TV, Game consoles, or upload video to Facebook, YouTube etc. Moreover, it includes a built-in video editor, which enables you to split, merge, trim, crop, add watermark, adjust video effect, edit audio and insert subtitles. Windows user van get Pavtube Video Converter Ultimate.


Free download the excellent video covnerter ultimate for Mac


Full guide to Convert PAL to NTSC or NTSC to PAL on Mac (macOS Sierra included)

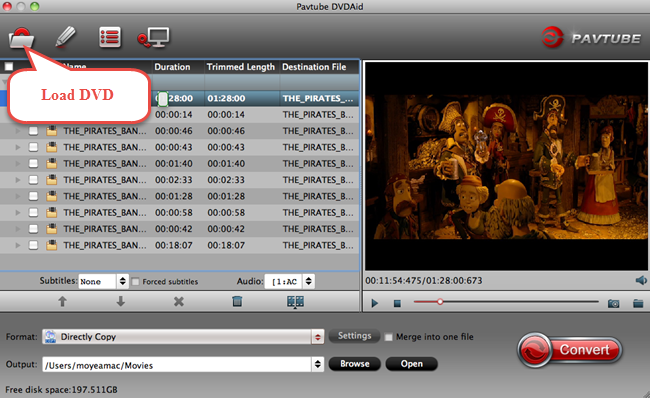
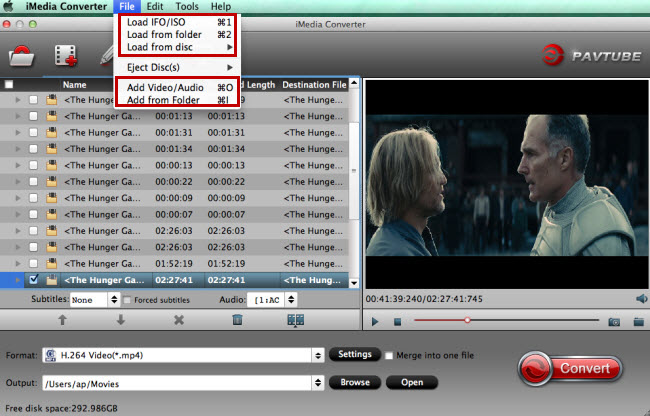
Step 1: Add source video files


Launch the application on your computer, click "Load from disc" option to import DVD from optical DVD drive to the program.


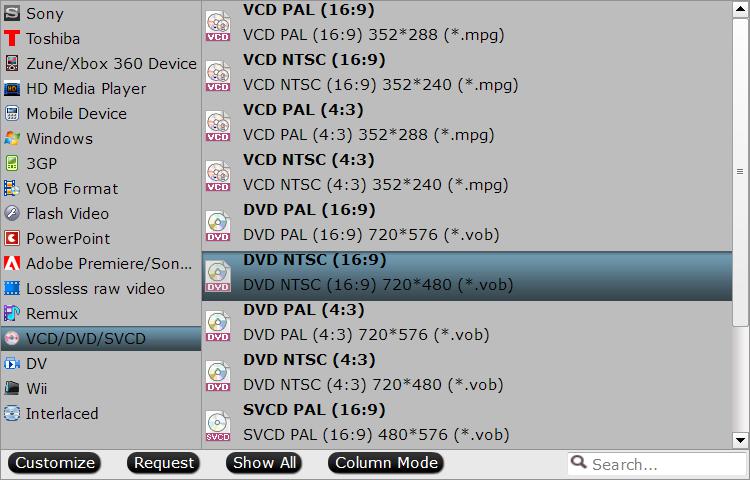
Step 2: Select output file format


Go to "Format" drop-down list, if you want to convert PAL DVD to NTSC DVD, you can choose to output "VCD/DVD/SVCD" > "DVD NTSC (16:9)", if you want to convert NTSC DVD to PAL DVD, choose to output "VCD/DVD/SVCD" > "DVD PAL (16:9)".


Choose output file format


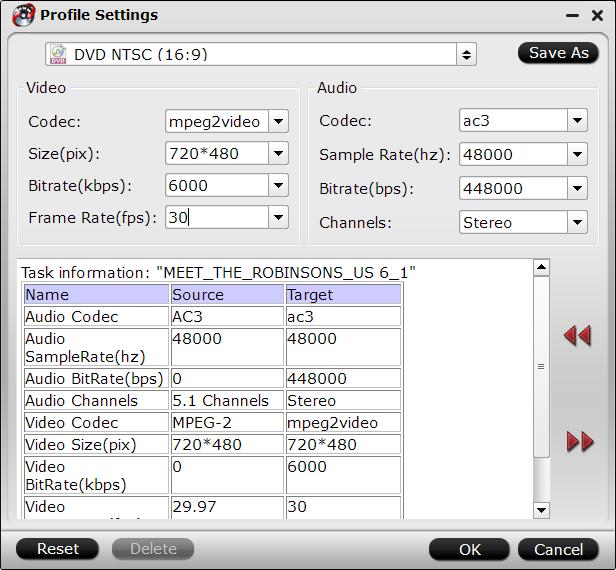
Step 3: Change output video resolution and frame rate.


Click "Settings" icon on the main interface to open "Profile Settings" window, when you choose to output NTSC DVD, set the output file size as "720x 480" and the frame rate as 30, if you choose to output PAL DVD, adjust the output file size as "720x576" and the frame rate as 25.


Adjust output file size and frame rate


Step 4: Start the onversion


After all the settings is completed, you can carry out the whole conversion process by hitting the right-bottom "Convert" button. Have a try.

Read More:

Convert MPEG4-AVC/H.264 AVCHD on Mac | Transcode  AVCHD 3D MTS on Mac

Transfer Sony camera recordings to iPad on Mac | Burn Canon MOV to DVD on Mac

Convert Sony AVCHD video to MP4 on Windows/Mac | Convert MKV to VOB on Mac

Convert and burn AVCHD to DVD on Mac | Import MediaPortal recorded TS files to FCP X

Canon HF M500 AVCHD workflow on Mac | Burn Final Cut Pro projects to DVD on Mac

Convert MTS/M2TS to VOB for DVD authoring/burning on Mac | Import AVCHD to Final Cut Pro 7

Monday, January 16, 2017

Rip and copy DVD to VLC on Mac OS X

How to rip and copy DVD to VLC on Mac OS X is an everlasting and hot issue in all relevant digital copy, video conversion forums and bulletins. Backing up DVD to VLC means that you can enjoy your favorite DVD videos on computer conveniently and can protect your physical DVD disc from scratching. That’s why many people choose to transfer DVD to VLC on Mac OS X. Here, this article will show you two methods to play DVD on VLC: Method one, rip DVD with VLC on Mac OS X; Method two, copy DVD to VLC with VLC Alternative on Mac OS X.

Method one: How to rip DVD with VLC Media Player on Mac OS X El Capitan?

VLC is not just a media player. It allows you to rip your DVD as well. Here we will show you how to rip DVD movies with VLC. (Note : This tutorial is written for VLC 0.9.6 and up).
Step 1: Start up VLC on Mac and load up DVD video. Under “Media”, click on “Convert/Save”

Step 2: When Open Media window appears, click DVD tab and browse the Disc device to make sure the field is pointing to the optical drive. Then navigate to “Convert/Save’


Step 3: Next the Convert screen opens where you can select a location for the ripped file.


Step 4: Give the file a name and a supported extension. For this example we ripped Lord of the Rings and gave it a MOV extension. If you don’t label it with a supported file extension it will default to .ps (Program Stream) file.


Step 5: When all settings are done, the Convert screen will look something like this where we have the source drive and destination file with appropriate extension.


Finally, You should be able to play the converted file with other media players assuming you have the right codec.


Using VLC to rip DVD on Mac OS X takes too much time. And you will notice the converted movie in lower quality compared to the original. Also, VLC does not support the DVD with internal encryption so that it can’t recognize protected DVD well and fail to extract movies from DVD successfully. In this case, you have to turn your eyes to VLC Alternative to solve the problem.

Method two: How to copy DVD to VLC with VLC Alternative on Mac OS X El Capitan?

Pavtube DVDAid for Mac is recommended as VLC Altenative, which can 1:1 backup DVD protected without lossless quality. It enables you to rip DVD to VLC on Mac OS X El Capitan in H.265, M3U8,VOB, MP4, MKV, MOV, AVI, DivX, etc, at fast speed. Not like VLC, it continuously upgrades with new decryption technology for new released DVD. And it can support the newest Mac OS X system, like El Capitan, Yosemite 10.10/10.9.

Free Download and Install DVD Ripper for Mac OS X El Capitan


How to rip DVD to VOB for VLC on Mac OS X El Capitan


Step 1. Import DVD to the app

Run Pavtube DVDAid on your Mac, and load your DVD disc by clicking the “File” icon and this process only takes you a few seconds.


Step 2. Copy DVD main movie

Click the format bar to follow “Copy” and “Directly copy”. Directly copy allows you to copy the main movie from your DVD disc without extras. If you want your converted DVD supported by more devices, take a try with other popular video formats suitable for your device. Please kindly note that Pavtube trial version only supports 6-time directly copy.
dvdaid for mac vob format

Step 3.Start DVD to VOB conversion

Click the red button “Convert” on the main interface to start conversion from DVD to VLC on Mac OS X El Capitan. It will pop up a conversion window indicating the conversion progress from DVD to VOB.
Both of the two method can achieve the process of DVD to VLC on Mac OS X El Capitan. Nevertheless, the latter method obviously is easier than the former one. and it has much faster DVD ripping speed than DVD ripping with VLC. What’s the most important, ripping DVD to VLC on Mac OS X El Capitan with VLC Alternative can reserve the original video quality. Now, you can smoothly enjoy DVD on VLC.
In addition: With Pavtube ByteCopy for Mac, you can backup DVD to multi-track MKV for VLC on Mac OS X El Capitan with subtitles and audio tracks well preserved.

Source:http://2d-3d-movie-tips.blogspot.com/2015/10/rip-dvd-to-vlc-on-el-capitan.html

Monday, December 12, 2016

Convert Video_TS Folder to MP4 with subtitles on Mac

Summary:This article will introduce what is VIDEO_TS folder and tells you how to convert a VIDEO_TS folder to MP4 for playing with subtitles on Mac OS X. 
 What's Video_TS folder? 

Video_TS folder contains three kinds of formats, IFO, BUP and VOB. IFO is information file, which is the main factor to operate video playback. With IFO files you can forward or backward the video at will. If IFO files are damaged or can’t be read, don’t worry. BUP is the backup of IFO and they have the totally same function. But if you happen to lose them all, you will have big trouble in controlling video play, so be careful. VOB means video objects, which is the container of video files. No need to say how important it is. 


How to play Vidoe_TS folder? 

Video_TS files are one of the main folders in a DVD's contents. Yeah, you can view the Video_TS files on your computer and DVD players. However, if you want to put your movies on portable MP4 players like iPhone, iPad, PSP, Xbox 360, Android tablets, etc., you will need to convert Video_TS to MP4 first. This article will shows you an easy way to convert Video_TS files to MP4 with subtitles for more convenient playing and sharing. 

Convert Video_TS to MP4 with subtitles 

To convert Video_TS to MP4 with subtitles, what you need is a third-party program that can accomplish the task. Here ByteCopy for Mac is highly recommended as the best DVD Video_TS to MP4 converter. With it, you can easily and quickly convert Video_TS files to MP4 videos while keeping the subtitles. And it can convert Video_TS folder to multiple video formats including MP4, AVI, FLV, WMV, MKV, MOV, WEBM, etc. and it also can turn 2D movies to 3D. If you are using a Windows PC, please turn to Pavtube ByteCopy

Convert DVD VIDEO_TS folder to playable MP4 file with subtitle? 

Step 1. Run the best VIDEO_TS Converter, click "Load from folder" and load DVD VIDEO_TS folder. Tip: All titles of the original Blu-ray movies could be seen on program left panel. And in every title, you can see various chapters. Just check the titles or chapters you want to rip. 

To convert DVD VIDEO_TS with subtitles contained, just simply click “Subtitles” and select the one you prefer. (And you can also choose the audio track as you like.) 

Tip: You can also choose to rip Video_TS with forced subtitles if you don’t want to have extra subtitles on screen for your native language. 


Step 2. Clicking the "Format" menu, here you are suggested to choose "Common Video > H.264 Video(*.mp4)". 


Step 3. If you like, modify profile settings such as video size, bitrate, frame rate, etc to get optimized video and audio playback. 


Step 4. Return back to VIDEO_TS video converter main interface, and hit the "Convert" button to start encoding VIDEO_TS to MP4 format. Once it finishes, open output folder, locate the created MP4 file and you can transfer DVD VIDEO_TS folder to your Android, Windows and iOS devices for watching. 

Related Articles: 
Source: http://formatplayable.jimdo.com/2014/10/18/convert-video-ts-folder-to-mp4/