Showing posts with label backup DVD. Show all posts

Monday, April 17, 2017

Backup Hundreds of Blu-ray and DVD Movies to Cloud Storage

As Internet lines become faster and servers more affordable, online cloud storage is not a sweet concept any more but a modern service you can really count on when backing up your hundreds of Blu-ray and DVD movies. So, this article will show how to backup hundreds of Blu-ray and DVD movies to cloud storage.

Part One: Best Cloud Storage in 2017 to Store Blu-ray and DVD Movies

Online storage is an integral part of life now, but with so many available it's hard to decide which one to use. So, firstly I want to recommend you the top 3 cloud storage for you to choose.


1. JustCloud

JustCloud use a small desktop application where customers can backup all of their files onto the cloud. They also have free apps for iPhone, iPad, Android, Blackberry, Kindle and Windows so you can backup and access files from any device. If you have rare family photos which you would not want to be accidentally deleted or a music library which took you years to collect and organize, then you should definitely think about getting the services of JustCloud.


2. ZipCloud

ZipCloud is just one of the many online backup services providers available on the Internet today. When you take advantage of their service, you will have a simple, safe and secure way of backing up your data. The founders of ZipCloud are Dan Richards and Brooke Bryan. Since the company’s inception, they have consistently been included among the top ten lists of the best online backup sites. Read on to find out more about the features, security, support and overall rating of ZipCloud as an online backup site.

3. SugarSync

SugarSync has their headquarters based in San Mateo, California and they currently have millions of subscribers around the world. The thrust of their campaign is to allow you to use a service which helps you “sync your life”. By simply downloading the software on your computer and mobile devices, you can gain access to everything that the cloud has to offer.


Part Two: How to Backup Hundreds of Blu-ray and DVD Movies to Cloud Storage

So, after knowing which cloud storage to choose, the next important thing you should know is how to backup hundreds of Blu-ray and DVD movies to cloud storage.

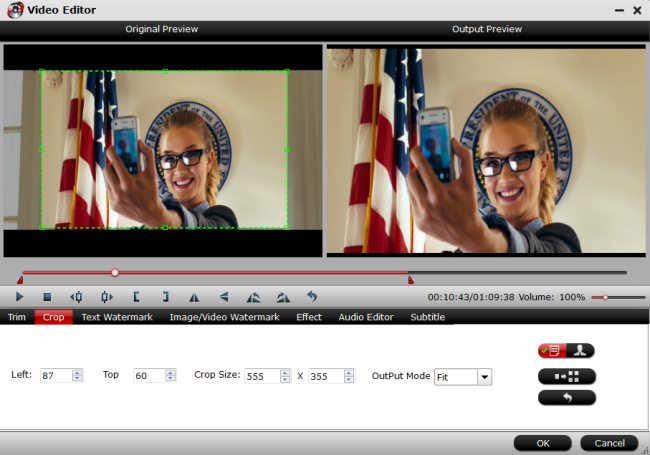
Here, I suggest you to use Pavtube BDMagic to rip and convert Blu-ray and DVD to regular video formats for storage on Cloud Storage,  like MP4, MOV, MKV, FLV, WMV, AVI format etc. Considering the limited space of normal cloud storage, the program allows you to lower converted video size by adjusting video parameters. Also considering to the final usage of your converted Blu-ray and DVD movies, the app provides optimized video presets formats for mainstream devices to let your get videos with the best settings to fit your device. Furthermore, the built-in video editor allows you to easily get desired video part and effects. (Review)

For Mac user, you can turn to Pavtube BDMagic for Mac for downloading. The program has updated to support the newest Mac OS X El Capitan.

Free download and install: 


Other Download:
- Pavtube old official address: http://www.pavtube.cn/blu-ray-ripper/
- Cnet Download: http://download.cnet.com/Pavtube-BDMagic/3000-7970_4-75922877.html

Steps to Backup Hundreds of Blu-ray and DVD Movies to Cloud Storage

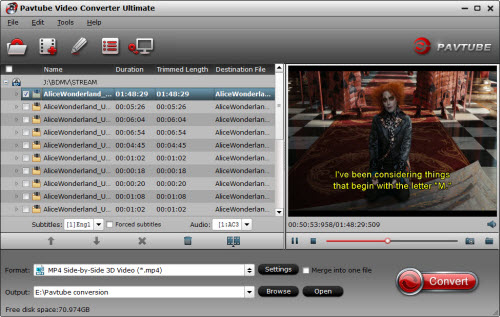
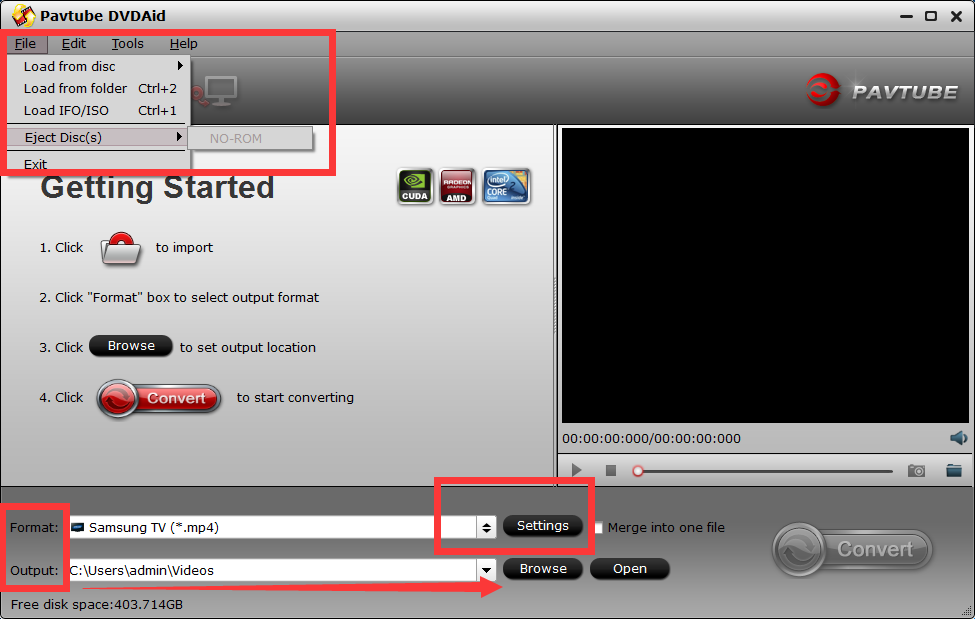
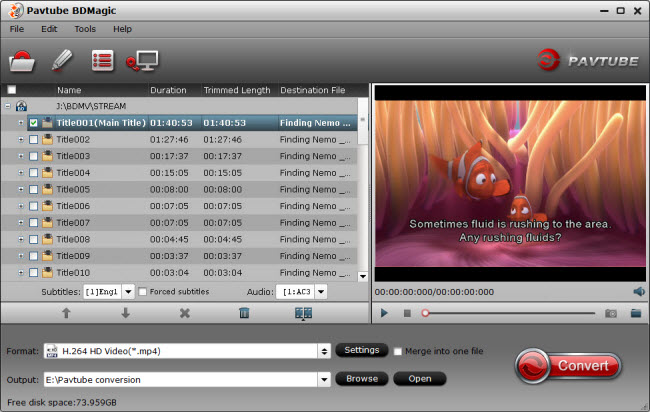
Step 1. Load DVD/Blu-ray movies

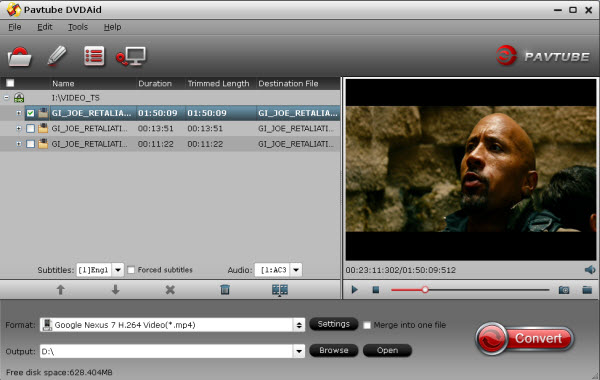
Click “File” to load your Blu-ray/DVD movie to this program. It will automatically choose the main content to convert. If there are several language subtitles in your Blu-ray/DVD movies, you can select the language subtitle you want to show in your movie by “Subtitle”.


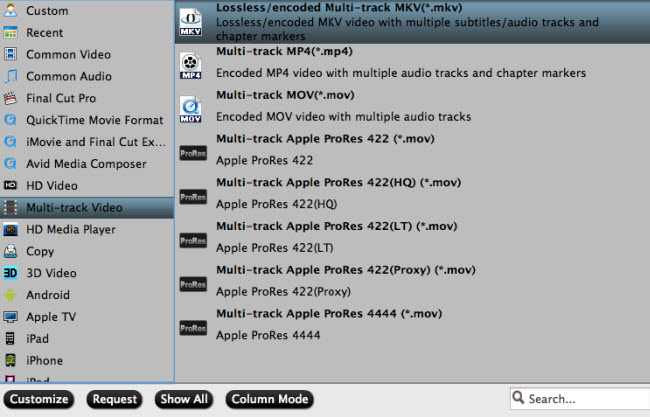
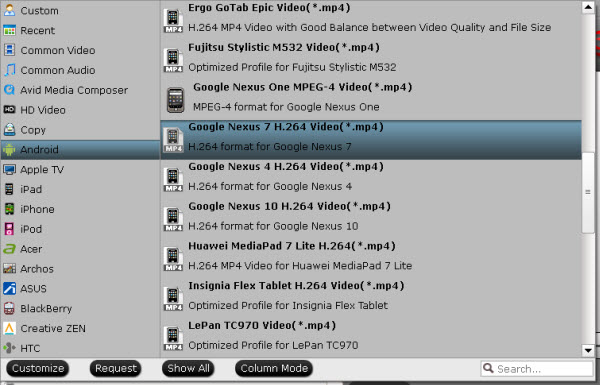
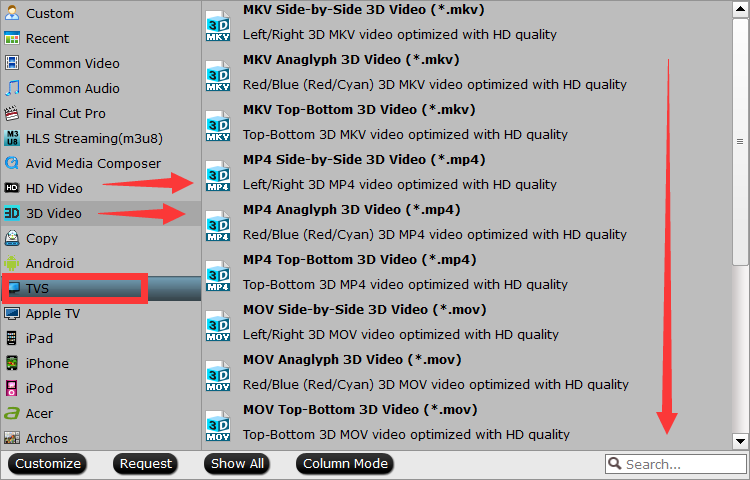
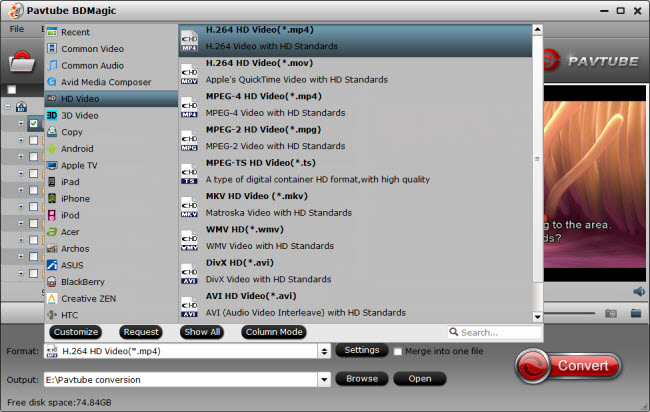
Step 2: Set output format

In drop-down format list, you can choose the optimized preset format for your final device. If you have not decided the final usage of your converted video, you can choose “HD Video” > “H.264 HD Video(*.mp4)” as output format for playing on laptops, tablets, mobile phones etc. 


Tips:

1. If you just want to digital your Blu-ray/DVD for more convenient organization and management, you also can choose tofull disc copy Blu-ray/DVD or main title copy.

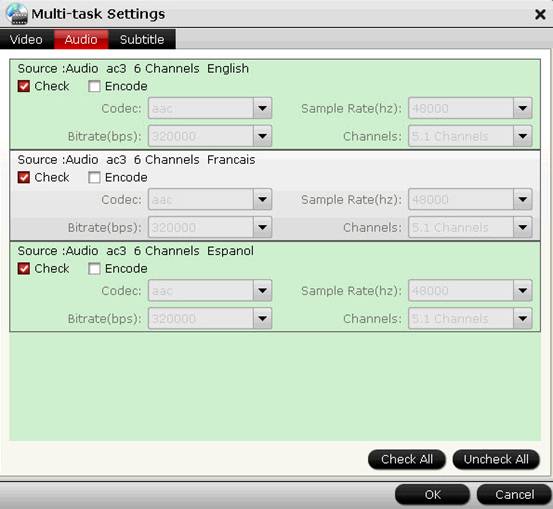
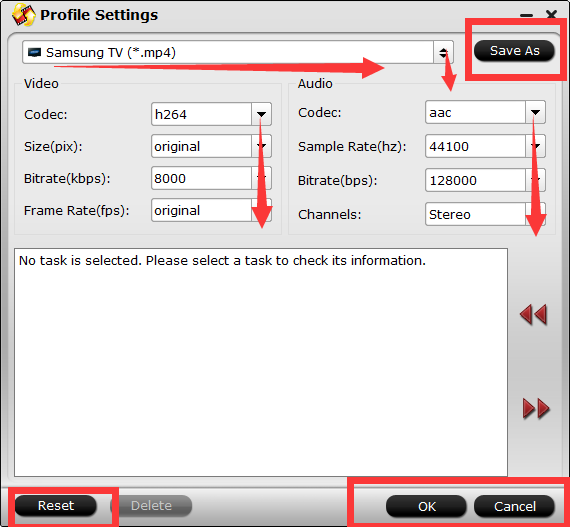
2. Click “Settings” on the interface and you can adjust the parameters including size, bitrate, frame rate, etc. to get a high quality of output files or a smaller files size. Keep in mind the file size and video quality is based more on bitrate than resolution which means bitrate higher results in big file size, and lower visible quality loss, and vice versa. You can preview the size at the below chart.

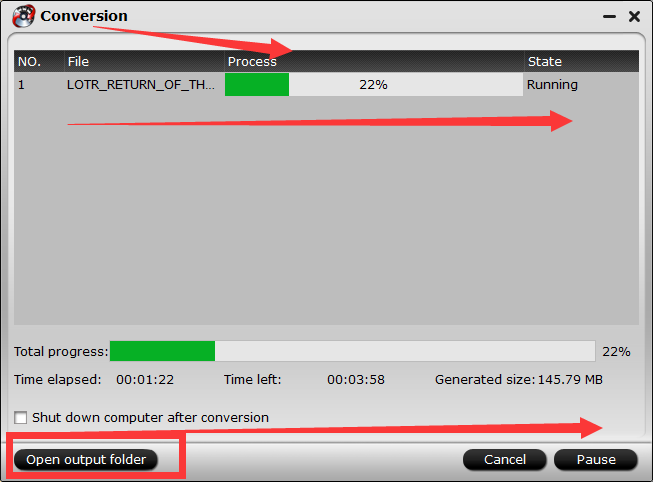
Step 3: Start to convert

After all settings done, hit on the “Convert” button and Blu-ray/DVD to cloud storage conversion will start. After the conversion completes, open output folder and you will find the converted movies.

Now, you can backup your hundred of converted Blu-ray and DVD movies to cloud storage now. In addition to Cloud Storage, you can also backup Blu-ray and DVD to Media PlayeriTunes library or External Hard Drive/Thumb Drive etc.

Related Articles:

Backup Blu-ray/DVD for Amazon Cloud Drive

Backup DVD and Blu-ray collections to home server

 Backup 2D/3D Blu-ray Movies on Mac El Capitan

Backup Blu-ray/DVD for My Passport Wireless Storage

Backup Blu-ray to H.265 HEVC MP4 on Mac OS X

Backup Blu-ray/DVD/ISO to Surface Book

Back Up DVD Collection with Mac

Lossless Blu-ray to MKV Backup

Sunday, November 6, 2016

Tips for Ripping DVD Quickly

Summary: Do you often copy DVDs? Do you think your DVD copy speed is too low? Do you want to copy DVD quickly? Here is the tips for quick DVD copies. 

Most of us have very busy and fast-paced lives andwe get impatient when the world is not moving at our speed. One thing that easily makes us upset is the slow DVD copying, which may take you 3 hours and it is impossible for you to wait all the time in front of the computer. So how can you quickly copy DVD while maintaining optimal quality? Here are some tips to help you create a quick DVD copy so you can move on to the rest of your day. Tips for Copying DVD Quickly 

Computer Hardware 

Having updated computer hardware will greatly increase your overall DVD copy time. The DVD drive installed in your computer tower, along with the processor and the memory are all huge players in speeding up or slowing down your copies. DVD drives play a major role because different DVD drives offer varying speeds. You will want to select a drive that offers the best possible speed for reading DVDs. 

In addition to the DVD drive, the processor also heavily effects the overall copy time because it determines the speed at which your computer can process information. The faster the processor, the quicker your computer can read applications and provide results. The available memory allows your computer to take in information. If the memory is full, your computer will not be able to process any information because it will have nowhere to store it. These are three of the largest aspects to obtaining the quickest DVD copy time. 

Multitasking 

A large part of getting more done in less time is the age-old art of multitasking. Chances are that if you want to copy a DVD quickly, there are additional items on your daily to-do list that need to be done. However, you should not use your computer for other tasks while trying to burn DVD copies in a hurry. 

While computers are capable of running a number of applications at a single time, it doesn't always mean that the applications are running as fast or as well as they could if they were the only application running. Shut down your apps and let your DVD copy software do its job. You will notice a drop in the estimated completion time, and you will have fewer errors in the process. 

Disc Quality 

If you try to copy a DVD that has been scratched or has gotten dirty, expect the overall copy process to take longer. Your will need to bypass error messages to move forward with your copies, and some applications may restart the copy or seize copying because they cannot read the disc. While there is little that you can do for a scratched DVD, some DVD copy applications are designed to mend and copy scratched DVDs. You can and should make sure that your DVDs are clean before inserting them into your computer for a copy. Clean your DVDs carefully so that you don't scratch them in the process. 

DVD Copy Software 

Last but not least, selecting the best DVD copy software is important for faster DVD copies. While the applications do not play as large of a role as the hardware, choosing the right software can assist in or deter from a quicker copy. If you plan to copy a majority of commercial DVDs either to watch in a different format or just to have as a backup make sure that you select the application that has little to no restrictions on copying commercial DVDs. The restrictions could potentially add more time to your copies, and some applications won't allow you to make copies of encrypted DVDs at all. Learn >>DVD Copier Software vs DVD Ripper Software 
Recommended Fast DVD Copy Tool

Pavtube ByteCopy is the right software I've found so far to save you a significant amount of time. Scroll down for more detailed info.

6× faster converting speed, rip DVD titles in batch. With multithreading technology and multi-core processing, the fastest DVD ripper, ByteCopy is fast in loading DVDs, and rips DVDs in a matter of a few minutes with no freezing.

Rip encrypted DVD movies without any hassle. One impressive feature embraced by the fastest DVD ripper program is its ability to rip copy protected DVDs fast from Paramount, Diseny, Pixar, Dreamworks, Warner Bros, etc. It bypasses any DVD protection technology automatically, be it the newest Disney DRM, region code (1-6), CSS, UOPs, RCE, etc. The fastest DVD copy software can handle damaged DVDs without stuttering, as well.

1:1 rip DVDs with unchanged video quality. You'll be always able to get awesome output quality. You don't have to sacrifice any quality with the fastest DVD ripping tool. High Quality Engine embedded into the the best quickest DVD ripper keeps speed and quality in good balance. The interface is clean, making it deadly easy to rip movies on DVDs.


How to Rip DVDs with the Fastest DVD Copier Software?

1: Download and install the DVD Ripper abd run it. Insert DVD to computer drive, click "Load from Disc" icon to load the DVD.

2. Choose output format. The fastest DVD converter enables you to rip and convert DVD to lossless MKV and multi-track MP4, AVI, MOV, etc. digital video format, copy DVD to iPhone, iPad, Samsung, Android etc. Mobile devices, or main title copy, full title copy.

3. Click "Browse" button to select a destination folder to save the DVD copy file. Make sure the space is larger than that of the file.

4 Click "Convert" button to start to copy DVD with the fastest ripper.

By implementing these tips for quick DVD copies, you should find that your DVD copy time has dropped and you are able to get more done in less time. If you find yourself copying DVDs often, we recommend updating your computer hardware and spending the money for a reliable DVD copy application. Don't forget to make sure that your DVDs are clean and unscratched, and you will reach optimum copy times.

Related Articles: 
Source: http://multimediatips.jimdo.com/2016/08/17/tips-for-copy-dvd-quickly/ 

Sunday, October 16, 2016

Ripping Blu-Ray With Custom Crop Settings

Summary:The Pavtube Video Converter Ultimate let’s you crop letterboxed Blu-ray movies and keep original aspect ratio . 

There will undoubtedly be times when you need to crop your videos while ripping Blu-rays. For example, when your Blu-ray movies have some black bars on top and bottom or you want to crop videos with large dimensions to fit the small screen of devices. Here is the best guide. 


VIDEO CROP VIDEO CONVERTER– PAVTUBE VIDEO CONVERTER ULTIMATE

- Backup, rip and convert Blu-ray/DVD movies

- Manually crop your video black area into different size.

- Also support MP4, AVI, FLV, WMV, MKV, etc.

- Apply effects, use filters, add titles, music and logo as you like.

- Mac users please use Pavtube iMedia Converter for Mac.


  Halloween Promotion Save:50% )

HOW TO CROP BLU-RAY MOVIES WHEN RIPPING? 

Step 1: Import Blu-ray to crop 

You can either click "File" on the primary windows and select files from your computer. You can choose "Forced Subtitle" to rip Blu-ray. 


Step 2: Crop Blu-ray 

Let’s see how to get rid of the black edges. First, you select a chapter, and click “Edit” to enter the Video Editor. Here you see the Original Preview and Output Preview area. Get rid of the black edges: simply move your mouse cursor to drag and adjust the green frame to desired position to remove the black bar. 


Step 3: Choose output format 

Click the Format bar, and choose a desired format in “Common Video” group. HD Video formats (1280*720, 1920*1080) are not recommended for common DVD (720*480 for NTSC, 720*576 for PAL). Here I select H.264 Video (*.mp4) in “Common Video” as output format. 


Step 4. Start copying cropped Blu-ray to hard drive. 

When back to the interface, click the “Convert” button to start cropping and converting Blu-ray movie to hard drive. After conversion completes, click “Open” to find converted movie. 

Blu-ray Cropping Tips: 

1. It's always a good idea to preview your video before you export them to your hard drive. Make sure the video has not been cropped too much. 

2. Make sure the aspect ratio of the cropped video is the same with that of the selected output format. 

3. Note that the quality of cropped video depends on the chosen output format to some extent. For example, you have selected small dimensions, but output as large dimensions of the video, the quality would not be good. In such case, smaller output dimensions are preferred. 

Related Articles: 

Wednesday, September 28, 2016

Ripping DVDs to Windows Home Server with Smoothly

Summary:The easiest way to copy DVD to Windows Media Server for devices streaming conveniently.Windows Home Server (WHS) enthusiast. 

Windows Home Server is a central device capable of managing multiple PCs and files across a home network. WHS-specific functionality such as DLNA support and media streaming will be folded into Windows Server Essentials 2012, a product aimed at small businesses and priced starting at $425. Windows Home Server 2011, the current version of WHS, will be available for most most people until 2013, and computer manufacturers can obtain the software to create new devices until 2025. Now, more and more people are getting to use Plex, NAS and other server devices. But there are still many people insisting on Windows Home Server. Many tutorials on Google teach you how to rip DVD to NASDVD to Plex, now, let's instruct you how to copy DVD to Windows Home Server. 


Searching high and low online, I finally got some tips and ticks for getting all DVDs into Windows Home Server. To get DVD collection to Windows Home Server media server, what you need to do is to rip DVD into Windows Home Server Media Server friendly format like MP4, WMV, etc. first. There’s all kinds of different software out there (some free, some not) with a variety of different options. Among them, I found a Pavtube ByteCopy for Windows/Mac and can be taken as a powerful DVD to Windows Home Server converter software to rip copy-protected DVD to Windows Home Server-compatible format with a wink, and even extract MP3, WMA, FLAC, OGG, etc. audio from DVD movies.

What's more, Pavtbe ByteCopy can convert DVD with multiple subtitle and audio tracks in MP4/MOV/AVI format and ripDVD to lossless MKV with all chapter markers.


Other Download:
- Pavtube old official address: http://www.pavtube.cn/bytecopy/
- Cnet Download: http://download.cnet.com/Pavtube-ByteCopy/3000-7970_4-76158512.html How to Copy DVDs to Windows Home Server?

1. Import DVD to Pavtube ByteCopy.

Click "Load file" icon on the top left to load the DVD disc.


Read: Top 5 Reasons to Copy DVDs and Best DVD Copy Software

2. Choose Lossless MKV with chapter markers.

Under "Format" menu, there are lots of video formats. Go to find "Multi-track Video" option and choose "Lossless/encoded multi-track MKV (* mkv)" because it will contain chapter markers in output MKV.Of course, you also can choose multi-track MP4 for WHS.


Tips: 

1. If you want to convert DVD to other video formats or portable devices, just choose the video format you need or select portable devices in the dropdown list.

2. Click "Settings" to enter Multi-track video profile window; switch to "Video" and find the "Encode" box which is unchecked by default, so if you want a lossless MKV copy, do not touch it. The switch to "Audio", check wanted audio track; so does the "Subtitles".


3. Start conversion.

Click big "Convert" button to start DVD to WHS conversion. It won't take much time for conversion and then you will get lossless MKV once completed. Hit "Open" button you will go to location of generated files.

After the conversion, open output folder to locate the files. Then you can transfer the media to WHS for devices streaming. Learn How to Set Up a Home Media Server You Can Access From Any Device

More features in ByteCopy:

* Full Disc Copy can 1:1 backup the whole Blu-ray/DVD disc with original structure including chapter markers.
* Directly Copy will backup 100% intact Blu-ray main movie with all the multiple tracks excluding menu.
* Contain all the features of Blu-ray Ripper: rip and convert latest Blu-ray/DVD to various video formats for playback or editing, edit the video before conversion including trim, crop, effect, etc, add *sst and *ass subtitle into video part and so on.

Good news for you: To save your money, Pavtube Special Offer offers various product bundles, such as:
Related Articles:  Source:http://media-playback.jimdo.com/2016/09/09/copy-dvd-to-windows-home-server/ 

Tuesday, September 20, 2016

Ripping DVD to Nexus 7 to Playback

Summary: Follow this tutorial to learn how to rip and convert DVD to Google new Nexus 7 supported video formats so that you can play DVD movies on new Nexus 7 anytime, anywhere as you like. 

Google NEW Nexus 7 is currently the most popular Android tablet I think, because of its ultra-high configuration and cost-effective. The Nexus 7 (2013) display is the showstopper with a 1920 x 1200 resolution that translates into about 323 pixels per inch. Want to take your favorite DVD movies with this new device for watching on the go? 

However, you can't transfer DVD movies on Google new Nexus 7 directly unless you convert DVD to new Nexus 7 supported video formats. The article here mainly shows you how to download and put DVD movies on Google new Nexus 7 for smooth playing while keeping the best HD video quality. 

It's easy to do this with some help from a third-party DVD to new Nexus 7 Converter. DVD DVD Ripping Software varies. You may confused about choosing a most suitable tool. If so, i highly recommend you try Pavtube DVDAid. It is easy to use for editing and conversion and makes great quality copies of my DVDs. To be honest, the program can help you rip DVD to new Nexus 7 highly supported MP4 video files with high output video quality and fast ripping speed. The audio/video synchronization is very good, the size of the subtitles too. The equivalent Mac version is DVDAid for Mac. Read the Top DVD Ripper for Android. 

Free download and install: 


Other Download:
- Pavtube old official address: http://www.pavtube.cn/dvd_ripper/
- Cnet Download: http://download.cnet.com/Pavtube-DVDAid/3000-7970_4-76158510.html

Just download it now and follow the steps below to copy DVD movies to Google new Nexus 7 for smoothly playing in just a few mouse clicks! 

FYI: If you want to keep all the audio tracks (language) and soft subtitles, here's another choice for you: DVD Converter Pro. 

How to Convert DVD to new Nexus 7 supported video formats 

The quick start guide below uses DVD Ripper Windows (Windows 8.1/8/7 included) screenshots. The way to rip DVD movies to new Nexus 7 on Mac is almost the same. Just make sure you get the right version according to your computer operating system. 

1. Add DVD movies 

Launch the top DVD Ripper for Nexus, add your DVD files from your computer's hard drive by clickinig the "DVD disc" icon. ISO/IFO image files and DVD folders are also supported. 


2. Select the suitable output video format 

Here I recommend you choose "Google Nexus 7 H.264 Video (* mp4)" from "Android" category. The profile is specially designed for new Nexus 7 and supplies full-screen playback. If you like, you can click "Settings" to change the video encoder, resolution, frame rate, etc. as you wish. 


3. Start to rip DVD videos to new Nexus 7 MP4 

The last step is to press the big "Convert" button on the right to start converting DVD to new Nexus 7. The conversion takes a few minutes, if you don't have time to wait, you can choose "Shut down computer after conversion". Then your computer will be turned off automatically after the conversion is finished. 

After conversion, you can click "Open" to locate the output videos. Then you can transfer videos to your tablet through a USB and enjoy DVD movies on Google new Nexus 7 wherever you are. 

Related Articles: 

Wednesday, July 27, 2016

Top reviews - Choice for DVD Copy Software


Summary: One good reason to store copies of your important records on DVDs. The steps of copy DVD to storage. 


DVD has a life span between 20 and 100 years, and that's one good reason to store copies of your important records on DVDs. Some things are priceless: Photos of a smiling college graduate or a homemade video of a tiny kitten, an enormous dog and a parrot with an attitude that collects a million hits on YouTube. Some things stored as digital data that would never go viral may actually be much more valuable than many people realize. Digital copies of important documents–such as financial records and family milestones–are not typically considered premium content in the same way that blockbuster movies are. Yet, if those digital family heirlooms are damaged in a fire or flood, the loss may be irreplaceable. 

All ABC DVDs are currently encoded for region 4 DVD players for copyright and other legal reasons. They will also play on non-region specific DVD players, which allow the owner to view any DVD purchased from anywhere in the world. Before sending family and friends who are overseas any of our DVDs it would be wise to ask them to consult their DVD player manuals for compatibility with region 4 DVDs. 

Region codeArea
0Informal term meaning "playable in all regions"
1Bermuda, Canada, United States and U.S. territories
2The Middle East, Western Europe, Central Europe, Egypt,
French overseas territories, Greenland, Japan, Lesotho, South Africa and Swaziland
3Southeast Asia, Hong Kong, Macau, South Korea and Taiwan
4Australasia, Central America, the Caribbean, Mexico, Oceania, South America
5The rest of Africa, Former Soviet Union, the Indian subcontinent, Mongolia, North Korea
6Mainland China
7Reserved for future use (found in use on protected screener copies of MPAA-related DVDs,
and "media-copies" of pre-releases in Asia)
8International venues such as aircraft, cruise ships, etc.

Although this may not be the most popular reason to use DVD copying software, it is a compelling one. DVDs can outlast their owners, but the physical material will still deteriorate over a period of many years, even if it's stowed safely away. When you do copy DVDs to backup your content, dry and cool storage conditions will lessen the likelihood of deterioration. 

If you copy DVDs using one of the many DVD copy software applications, storing archived backups of that precious content is a good idea. Once duplicated, you can Pavtube DVDAid ( Mactake place the discs in a safety deposit box. Films can be ripped to your hard drive in as little as five minutes, though the average time for a full-length movie hovers between 15 and 25 minutes. It copies DVDs at a 1:1 quality ratio, allows you to add subtitles, contains built-in CSS decryption, allows users to rip to most mobile platforms, and comes with one of the fastest burn speeds available on the market today. Reviews 

Free download and install: 
  

Other Download: 
- Pavtube old official address: http://www.pavtube.cn/dvd_ripper/ 
- Cnet Download: http://download.cnet.com/Pavtube-DVDAid/3000-7970_4-76158510.html 

The Steps Tutorial of DVD Copy 

Step 1. Run Pavtube DVD Ripper and import DVD movie. 

Install Pavtube DVDAid and run the software. To load DVD, DVD-ROM is required. Click on “DVD ROM” and the software will import DVD movie from the optical drive and arrange them as a directory in file list. You can check any of the episodes and view them in the preview window. Taking snapshots can be done by one click on Snapshoot button when previewing. You can load DVD folder or DVD ISO/IFO image file in the same way by clicking on “DVD folder”or “IFO/ISO”. 


Tips: You should choose to copy DVD with forced subtitle.
Step 2. Edit DVD episodes 

Select the episode you would like to edit, and click on “Edit”. Pavtube DVDAid features with the following basic editing functions: trim, crop, watermark, effect and audio replace. In the editor interface you can cut off unwanted edges (refer to the thumbnail below), determine the aspect ratio of output video, crop the movie to any length, add personalized watermark to the video, replace the original audio with whatever you like, adjust the volume, etc. Do not forget to click after settings are done. 


Step 3. Set output format and destination. 

Click on the format bar and there are various output formats for you to choose from. Apart from common video, audio, HD video, Flash video, there are customized formats for portable devices such as iPad, iPhonePSPBlackberry, Nokia, Zune, Creative Zen, Smart TV, VR Headset, Archos and video game consoles. In output path box you can set output destination. To further customize output audio and video parameter, you may click “Settings” button. 

 
Step 4. Copy DVD to specified video format 

Simply click on “Convert” button to start ripping. You can view the progress information and cancel it halfway. You could set auto shutdown as well. 


Key Features of DVDAid 

Function
More information
Trim and Crop
The “Trim” feature allows users to decide where to start and where to end when converting the selected clip, so that unwanted segments will be cut out; the “Crop” feature helps to cut off black edges and unwanted area of the image, and set the aspect ratio.
Split and Merge
Split the selected task into several segments according to file quantity, time length or file size; tick off “merge into one file” box to easily combine several DVD videos into one clip to enjoy movies with natural transition.
Add SRT/SSA/ASS subtitle file
Attach external subtitle file to the source movie, play and watch on media player with understandable language displayed on the screen.
Various output formats supported
Video formats like AVI, WMV, MPG, MKV, and audio types including MP3, M4A, WAV, etc. are included in the software to be compatible with your media players.
6X faster conversion speed
Largely accelerate DVD encoding speed from one format to another by using H.264 codec by fully taking advantage of NVIDIA CUDA technology and AMD ? Accelerated Parallel Processing (APP).
Choose preferred subtitles and audio tracks
Free to select the desired audio stream and subtitle track from source DVD for your best movie enjoyment.
Customize profile parameters at will
You are allowed set video/audio codec, video display ratio, bitrate, frame rate and more to extend great DVD experience at home or on the move.
Watch DVD movies before conversion
With the built-in player you could preview the DVD video to make sure everything is settled down in the right way.

Summer Sale: DVD burn + DVD Copy 

Video Converter Ultimate($65) + DVD Creater($35) = Only $64.9, Save $35.1 

ByteCopy($42) + DVD Creater($35) = Only $44.9, Save $32.1 

ByteCopy($42) + Video Converter Ultimate($65) = Only $79.9, Save $27.1
DVDAid($35) + ChewTune($29) = Only $49.9, Save $14.1

Disabling DRM

DVD RipperRegionRCEkey2AudioUOPCSSMacrovisionCPRMFluxDVDFortiumProtectARccOSAACSBD+ROM MarkBD-Live
AnyDVD
Yes
Yes
Yes
Yes
Yes
Yes
No
Yes
Yes
Yes
Yes
Yes
Yes
Yes
Partial
CloneDVD
No
No
No
No
No
No
No
No
No
No
No
No
No
No
No
Handbrake
No
No
No
No
No
No
No
No
No
No
No
No
No
No
No
Pavtube ByteCopy
Yes
Yes
Yes
Yes
Yes
Yes
Yes
Yes
Yes
Yes
Yes
Yes
Yes
Yes
Yes
Pavtube BDMagic
Yes
Yes
Yes
Yes
Yes
Yes
Yes
Yes
Yes
Yes
Yes
Yes
Yes
Yes
Yes
DVD Decrypter
Yes
No
No
Yes
Partial
Partial
No
No
No
No
No
No
No
No
No
Pavtube DVDAid
Yes
Yes
Yes
Yes
Yes
Yes
Yes
Yes
Yes
Yes
Yes
No
No
No
No
DVD Shrink
Yes
No
No
Yes
Partial
Partial
No
No
No
No
No
No
No
No
No
FormatFactory
Yes
No
No
Yes
Yes
Yes
No
No
No
No
No
No
No
No
No
MacTheRipper
Yes
Yes
No
Yes
Partial
Partial
No
No
No
No
No
No
No
No
No
RipIt
Yes
No
No
No
Yes
Yes
No
No
Yes
Yes
Partial
Partial
No
No
No
DVD X Copy
Yes
No
No
Yes
Partial
Partial
No
No
No
No
No
No
No
No
No

DVD Ripping Legality in the world

1. United Kingdom - legal for personal use 

In the United Kingdom, it’s now legal to rip/copy DVDs, CDs and ebooks for your own personal use. It was illegal to break the DRM (Digital Rights Management) or TPM (Technical Protection Measures) used on DVD to protect the content from ripping. However, it has been formally permitted to be legal if one makes DVD copies for personal use since 2012. Even more, the UK government has finally changed the law after inspecting DVD/CD copyright legislation and public consultation. It means that since October 2014, all people in UK are allowed to make copies of DVDs and other media freely as long as the copy is for personal use, such as DVD backup, or formats shifting. 

2. Germany – illegal 

Germany is a country with very restrict copyrighted content. According to German law, it dictates that it is illegal to circumvent mechanisms that prevent copying, but it allows the manufacture of copies of copyrighted digital material for personal, non-commercial use. 

3. Norway – not a crime 

It’s not a crime in Norway to make copy of DVD’s as long as it’s one’s own DVD. 

4. Netherlands -legal for personal use 

In Netherlands, all legally bought audio and video including DVD and Blu-Ray are allowed to make copies, which are also called “home copies”. However, those ripped files are only used personally. 

5. Spain – legal 

In Spain, anyone is allowed to make a private copy of a copyrighted DVD for oneself, providing that the copier has accessed the original DVD legally. 

6. USA -require the consent of copyright owner 

In the United States, copyright law has been extended many times over and copyright infringement is sometimes confronted via lawsuits in civil court, against alleged infringers directly, or against providers of services and software that support unauthorized copying. U.S. copyright law (Title 17 of the United States Code) generally says that making a copy of an original work, if conducted without the consent of the copyright owner, is infringement. The law makes no explicit grant or denial of a right to make a “personal use” copy of another’s copyrighted content on one’s own digital media and devices. 

7. Australia or New Zealand -legal 

In Australia and New Zealand, a copy of any legally purchased music may be made by its owner, as long as it is not distributed to others and its use remains personal. In Australia this was extended in 2006 to also include photographs and films. 

8. Japan – illegal 

DVD copy has been outlawed with corresponding amendments on copyright laws being coming out in Japan since October 1, 2012. 

9. China -not clear 

In China, the issue of digital piracy is not merely legal, but social. In most cases, the breach of digital copyright laws might not inquire into the cause.


Source:http://bd-dvd-copying-ripping.blogspot.com/2016/07/top-dvd-copy-software.html