Summary: The guide tells you how to crop out black bars/ edges from Blu-ray movies. The Pavtube Video Converter Ultimate let’s you crop letterboxed Blu-ray movies and keep original aspect ratio.
There will undoubtedly be times when you need to crop your videos while ripping Blu-rays. For example, when your Blu-ray movies have some black bars on top and bottom or you want to crop videos with large dimensions to fit the small screen of devices. Here is the best guide.
There will undoubtedly be times when you need to crop your videos while ripping Blu-rays. For example, when your Blu-ray movies have some black bars on top and bottom or you want to crop videos with large dimensions to fit the small screen of devices. Here is the best guide.
| VIDEO CROP VIDEO CONVERTER– PAVTUBE VIDEO CONVERTER ULTIMATE - Backup, rip and convert Blu-ray/DVD movies - Manually crop your video black area into different size. - Also support MP4, AVI, FLV, WMV, MKV, etc. - Apply effects, use filters, add titles, music and logo as you like. - Mac users please use Pavtube iMedia Converter for Mac.   |
HOW TO CROP BLU-RAY MOVIES WHEN RIPPING?
Step 1: Import Blu-ray to crop
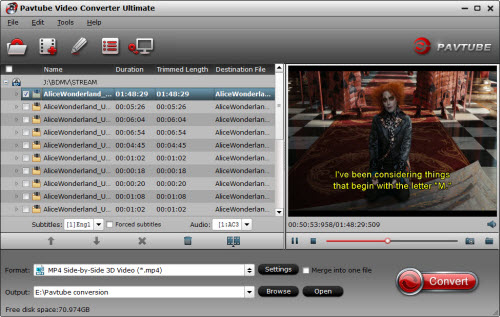
You can either click "File" on the primary windows and select files from your computer. You can choose "Forced Subtitle" to rip Blu-ray.

Import video for Gear VR
Step 2: Crop Blu-ray
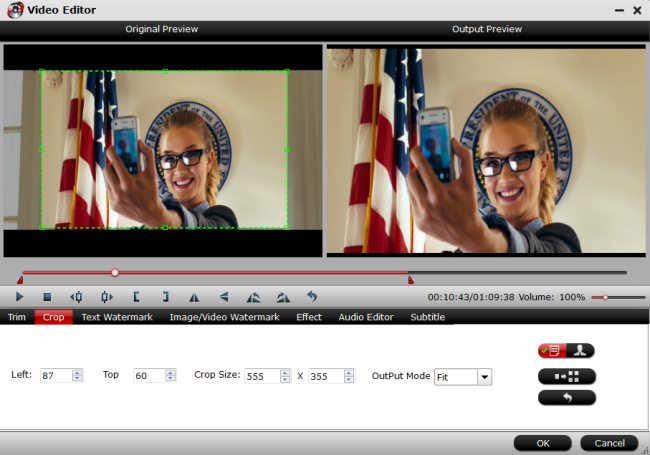
Let’s see how to get rid of the black edges. First, you select a chapter, and click “Edit” to enter the Video Editor. Here you see the Original Preview and Output Preview area. Get rid of the black edges: simply move your mouse cursor to drag and adjust the green frame to desired position to remove the black bar.

Step 3: Choose output format
Click the Format bar, and choose a desired format in “Common Video” group. HD Video formats (1280*720, 1920*1080) are not recommended for common DVD (720*480 for NTSC, 720*576 for PAL). Here I select H.264 Video (*.mp4) in “Common Video” as output format.

Step 4. Start copying cropped Blu-ray to hard drive.
When back to the interface, click the “Convert” button to start cropping and converting Blu-ray movie to hard drive. After conversion completes, click “Open” to find converted movie.
Blu-ray Cropping Tips:
1. It's always a good idea to preview your video before you export them to your hard drive. Make sure the video has not been cropped too much.
2. Make sure the aspect ratio of the cropped video is the same with that of the selected output format.
3. Note that the quality of cropped video depends on the chosen output format to some extent. For example, you have selected small dimensions, but output as large dimensions of the video, the quality would not be good. In such case, smaller output dimensions are preferred.
Related Articles:
- Rip 3D Blu-ray to OnePlus Loop VR for Watching
- Best 5 Free DVD Ripper for Mac including macOS Sierra
- Importing Canon 5D Mark IV 4K to Premiere Pro
- Get Sony Alpha a99 II 4K XAVC S video to Resolve
- Rip All 3D Blu-ray to 3D SBS MP4 for Homido Mini
- Rip All 3D Blu-ray to 3D SBS MP4 for View-master VR
- Rip Blu-ray to Google Pixel XL for watching
- Watch MKV on zeiss vr one
- Upload DVD to Dropbox
- Create 3D SBS video For Gear VR
- Play MKV on Gear VR without sound
- Import Sony Alpha a99 II 4K to Premiere Pro on Mac
- Load Canon EOS 5D Mark IV 4K to iMovie on Mac
- Convert Blu-ray/MKV/MP4 to 3D SBS Video for LG 360 VR