Sunday, January 10, 2016

Best MKV Joiner to Join Multiple MKV Files into One with Excellent Quality

Do you have the situation that a whole MKV movie you downloaded from Internet was split into several separate files, named pl.mkv.001, pl.mkv.002, etc. In fact it is common to see, and obviously it makes the files easier to transport. However, it may trouble you a lot when you want to play the whole movie smoothly.

In this case, join multiple MKV files into one is necessary. Here I recommend you a best MKV Joiner for Mac, This software offers different solutions for users who want to join multiple MKV files on different demands. (Windows user can turn toPavtube Video Converter Ultimate to download the right app, and can follow the below steps.)

Solution one: Merge MKV videos without re-encoding

The software can keep MKV files format for people who are desired to join multiple MKV files without changing the source file format.

Solution two: Combine MKV clips with re-encoding

For people who want to join multiple MKV files into one complete video meanwhile converting the joined MKV file to MP4, so as to upload it to Facebook/Youtube/Vimeo for sharing. The software allows to convert MKV to MP4, MOV, AVI, H.265, H.264, M3U8 etc over 200+ formats to upload to community or transfer to portable devices.

Solution three: Join MKV files while edit MKV in other ways

For people who want to edit MKV video or set video parameters, the software also allows they to trim and crop video, insert subtitles and adjust video bitrate, size etc.

Free download and install
          

Other Download:
- Pavtube old official address: http://www.pavtube.cn/imedia-converter-mac/
- Cnet Download: http://download.cnet.com/Pavtube-iMedia-Converter/3000-2194_4-76177788.html

Steps to Join Multiple MKV Files into One with Excellent Quality on Mac

Step 1. Import Multiple MKV Files and adjust the video file order.

Launch and start the program on your computer, click "File" > "Add Video/Audio" or "Add from Folder" to import Multiple MKV Files to the program. Click the "Move up" or "Move down" arrow under the video file displaying window to adjust your source video file order according to your own needs.
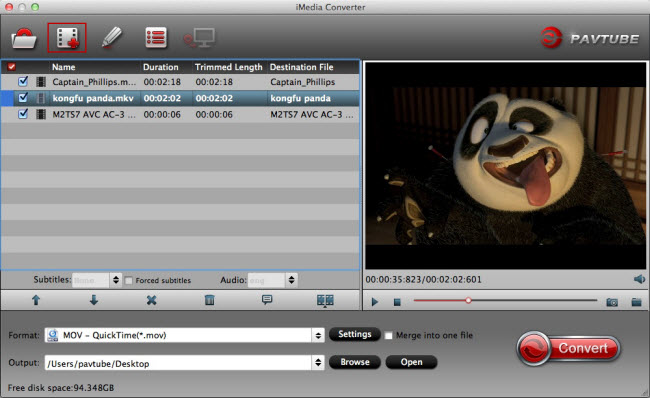


Step 2: Choose output file format/Set output video (optional).

1. Choose output file format

From the "Format" bar, select your desired output file format from "Format" drop-down options on your own need. The app provides you optimized format for mainstream devices. You can also keep your MKV format as your want.

2. Set output video:

Click “Settings” on the interface and you can adjust the parameters including size, bitrate, frame rate, etc. to get a high quality of output files or a smaller files size. 
Click “Edit” on the interface and video editor interface will appear. Inside it, you can crop the black area, trim footage etc.

Step 3: Merge several videos into one.

On the main interface, check  option to combine all your separate video clips into one single file.

Step 4: Start separate video clips joining process.

Press the right-bottom "Convert" button, a window will pop out with the conversion progress.

When the conversion is completed, you can find your complete movie or video by clicking "Open output folder" with all merged files into one. Now, you can enjoy the whole movie/video smoothly.

Related Articles:

Monday, December 28, 2015

Best ISO to MPEG Converter - Convert ISO to MPEG with original video and audio quality

This articles focus on how to convert ISO to MPEG (mpeg 1, mpeg 2, etc) with the original video and audio quality. If you have such confusion, just read on. 

ISO Basics

ISO is a DVD image file that contains all the files to make up a DVD. And it can only be played with virtual driver software or similar tools. If you want an exact copy of a group of files to reproduce for future use, ISO is the way to go. For instance, if you want to burn an exact copy of a DVD of a software program or a movie you could turn the contents of a whole disc into an ISO file and then later use a disc burning program which supports ISO to create a replica of the DVD.

MPEG Basics

MPEG, an acronym for o the Moving Picture Experts Group, has standardized several compression formats, such as MPEG-1, MPEG-2, MPEG-4 (MP4), etc. 

MPEG-1 is the initial video and audio compression standard. It was designed for video with transmission rate of about 1.5 Mbps, and is used as the standard for VCD now. 

MPEG-2 is video and audio standard for broadcast-quality television. It is used for over-the-air digital television ATSC, DVB and ISDB, digital satellite TV services like Dish Network, digital cable television signals, SVCD, and with slight modifications, as the .VOB (Video OBject) files that carry the images on DVDs. 

Learn >> Different compression of MPEG

ISO to MPEG Software Recommended

Converting ISO to MPEG is a straightforward process. It could be done with free software like Pavtube BDMagic. It can easily extract MPEG 1, MPEG 2, MPEG 4 image from ISO with original video and audio quality. In the video conversion process, it can make you adjust video/audio size, bitrate, frame rate, channel.

Its equivalent Mac version is Pavtube BDMagic for Mac which can make you convert ISO to MPEG on Mac El Capitan, Yosemite and other platform.

Free download and install:
          

Other Download:
- Pavtube old official address: http://www.pavtube.cn/blu-ray-ripper/
- Cnet Download: http://download.cnet.com/Pavtube-BDMagic/3000-7970_4-75922877.html

Convert ISO to MPEG with original video/audio quality

Step 1: Load ISO file

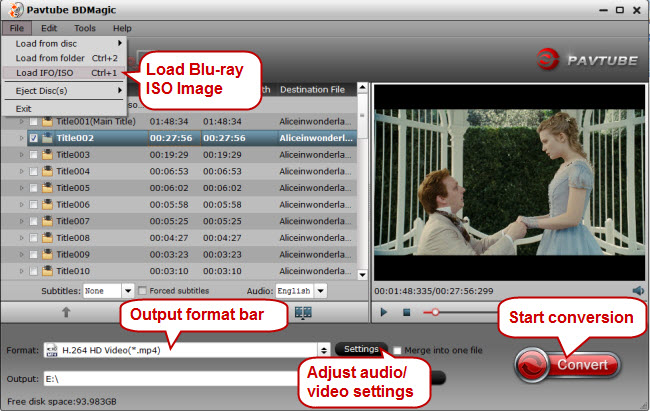
Run ISO Image converter on computer. Click “File” on upper-left corner to follow “Load from IFO/ISO.” It is unnecessary for you to run a virtual drive to mount ISO Image for this ISO converter will help you analyze ISO Image automatically.


Step 2: Choose MPEG format

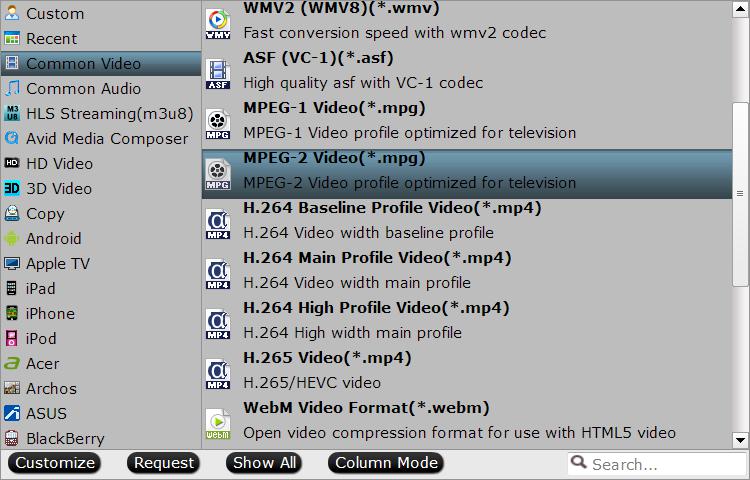
Click "Format" bar, from its drop-down option list, you can select "MPEG-2 Video(*.mpg)", "MPEG-1 Video(*.mpg)" in “Common Video” or MPEG 4 in “HD Video”


Step 3: Convert ISO to MPEG.

Hit right-bottom "Convert" button to start ISO to MPEG conversion process.

You can locate the MPEG image in output folder. You can import MPEG 1 to Windows Movie Maker or edit MPEG 2 with Adobe Premiere Pro or burn to DVD/ as for MPEG-4 video, you can play them on portable devices.

Related Articles:

Thursday, December 24, 2015

Backup Blu-ray to networked WD Media Server for Home Theater

Facing with tons of Blu-ray discs, do you get a headache? Finding the one you want spent too much time and then inserting it to heavy Blu-ray Player. Finally, you can enjoy it. There is a way to make your Blu-ray collection easy to organization, management and playback - rip and backup Blu-ray to WD Media Server to build up your home theater.

When you connect a WD TV to your network using the ethernet port on the back, and then plug a HDMI cable in from your HD TV and power it on and it will instantly find Western Digital Media Server on the network, making your media collection instantly available. So if you backed up Blu-ray to MP4 and other WD supported format, you can enjoy your Blu-ray movie via networked WD Media Server onyour wide screen TV instantly without wasting time to look for the disc. 

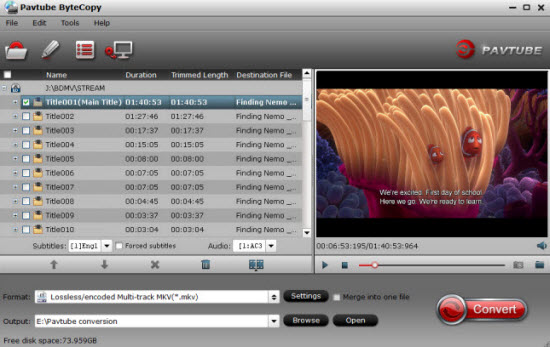
Having tested several Blu-ray Rippers in the market, I recommend you Pavtube ByteCopy


Key Features of Pavtube ByteCopy:

1. Rip the latest Blu-ray to Western Digital Media Server compatible format with original video quality.

2. On Windows, you can get 6X times Blu-ray ripping speed by H.264 codec so you don’t need to cost too much time on Blu-ray to WD Media Server conversion.

3. Output AVI (Xvid, AVC, MPEG1/2/4), MPG/MPEG, VOB, MKV (h.264, x.264, AVC, MPEG1/2/4, VC-1), TS/TP/M2T (MPEG1/2/4, AVC, VC-1), MP4/MOV (MPEG4, h.264), M2TS, WMV9, FLV (h.264) video.

4. It also allows you edit the Blu-ray video to produce a good-looking file.

5. It's professional in ripping and converting Blu-ray discs, Blu-ray ISO image, Blu-ray folders and more.

6. Has the equivalent Mac version, supporting Mac El Capitan system.

Free download and install:
          

Other Download:
- Pavtube old official address: http://www.pavtube.cn/bytecopy/
- Cnet Download: http://download.cnet.com/Pavtube-ByteCopy/3000-7970_4-76158512.html

How to Rip Blu-ray to networked WD Media Server for Home Theater?

Step 1: Add Blu-ray movies

Click "file" button to choose the Blu-ray files you want to convert. Blu-ray Folders, Blu-ray ISO are supported as well.


Step 2: Choose Output Video Format

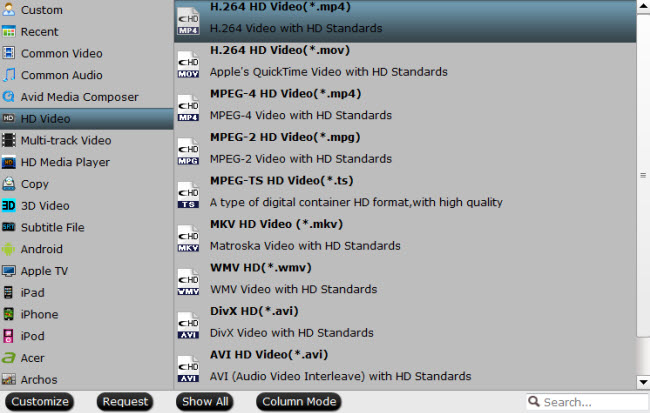
Click the "Format" option, and choose "H.264 HD MP4" format.


Step 3: Get DVD ripped onto Western Digital Media Server

Click the "Convert" button under the preview window, and the Blu-ray ripper will start the conversion from Blu-ray to Western Digital Media Server.

Once the conversion finished, stream Blu-ray movies through Western Digital Media Server to HD TV for great enjoyment.

Related Articles:

Monday, December 21, 2015

How to Extract FLAC from CDs Freely?

When you are considering extracting the audio from your >400, even >1000 CDs,the first format you take into account maybe MP3, which is supported by many devices from portables to car audio systems. But no matter how high the bit rate of an MP3 file, it's still a lossy format, meaning some of the sound quality is lost during the conversion from a CD.


FLAC is a lossless audio codec that doesn't lose any sound quality during conversion, but is much bigger in size than MP3 files. It's also not as widely supported in devices as compared with MP3s, but there are many more of them than just a few years ago. If sound quality is your highest priority, then converting CDs to a lossless codec like FLAC might be worth considering.

What you need

This process still uses Pavtube Video Converter Ultimate. It helps you extract lossless FLAC from CDs without any quality loss at fast speed. Surprisingly, it also can extract FLAC from Blu-ray/DVD disc. In settings window, it allows you to adjust audio bitrate, size, codec, channel,etc to get better audio output.(review)

Free download and install
          

Other Download:
- Pavtube old official address: http://www.pavtube.cn/blu-ray-video-converter-ultimate/
- Cnet Download: http://download.cnet.com/Pavtube-Video-Converter-Ultimate/3000-2194_4-75938564.html

How to Extract FLAC from CDs fastly?

Step 1: Import CDs

Download and install FLAC Exactor, which includes the FLAC codec. You'll need to have an audio CD in your optical drive in order for EAC to configure the drive for use. Click “File” to add the source audio.


Step 2. Choose Lossless FLAC audio format

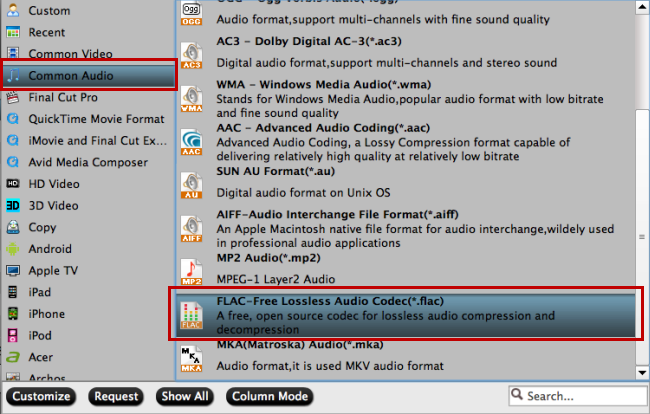
Here click the format bar to follow “Common Audio” and “FLAC-Free Lossless Audio Codec (*.flac).”


Tip: If you are not satisfied with the default audio quality, just click the "Settings" icon and choose wanted audio settings including sample rate, bitrate and audio channel.

Step 3. Start extracting FLAC from CDs

Back to the main interface and hit "Convert" to start to extract lossless FLAC from CDs. Once the process ends, open the output folder to locate the generated FLAC audio.

Tips & Tricks: How to Play FLAC Files?

By default, your PC won't know how to play the FLAC files, so you'll need a compatible media player. A few media players worth taking a look at are foobar2000, Winamp and VLC.

1. VLC Player: this media player is available for Windows, Macintosh and Linux operating systems. The VLC Player installation includes the VideoLAN client that supports FLAC files as well as Flash Video (FLV) and many other file formats.

2. Foobar 2000: the Foobar 2000 media player also supports the FLAC format as a native feature, which means you don't have to go through any additional installations to play a FLAC file through the Foobar 2000 player.

3. Winamp: Winamp was born as a very basic media player and has slowly but consistently improving for many years. Its main purpose was to be completely customizable and through the years, many people have contributed to a library that now consists of over 20,000 skinsand loads of plug-ins.

Note:

Although the Free Lossless Audio Codec offers better sound quality compared to MP3 compression, files compressed using the FLAC codec are considerably larger in size. As a general comparison, an audio file with FLAC compression is approximately 10 times larger than when the same file is compressed using MP3 compression.

Related Articles:

Wednesday, December 16, 2015

How to Backup 4K Blu-ray to Sony VPLVW350ES 4K Projector?

Want a fantastic Home Theater effect, a projector is the need. Sony VPLVW350ES 4K Projector provides an astonishingly immersive home theater experience with 4096 x 2160 pixels. That’s more than 4 times 1080p. Add 1,500 ANSI lumen brightness, and Deep Color support and the VPL-VW350ES pulls you into your favorite TV, sports and movies like no HD home theater projector you’ve ever experienced. And Sony will release its first 4K Blu-ray in the near future. So how to play your 4K Blu-ray by the Sony 4K Projector? Via HDMI or by an USB External Hard Drive? Here, the article shows you the way to rip 4K Blu-ray to USB so that you can play the 4K Blu-ray on Sony VPLVW350ES 4K Projector by USB port.


The Blu-ray Ripper you chose to rip 4K Blu-ray has to equip with the capacity of removing Blu-ray complex copy protection and working in 4K resolution. I suggest you Pavtube Video Converter Ultimate. It can convert 4K video in any format, including Blu-ray, MP4, MKV, AVI, etc to another 4K format. It can rip 4K Blu-ray for your Sony VPLVW350ES 4K Projector with original video quality. If your projector supports 3D playback, it even can rip 3D Blu-ray to 3D Projector. (review

Free download and install
          

Other Download:
- Pavtube old official address: http://www.pavtube.cn/blu-ray-video-converter-ultimate/
- Cnet Download: http://download.cnet.com/Pavtube-Video-Converter-Ultimate/3000-2194_4-75938564.html

How to backup 4K Blu-ray to Sony VPLVW350ES 4K Projector?

Step 1: Load 4K Blu-ray from optical drive.

Click the "File" icon on the top menu bar to load your 4k Blu-ray disc to the program.


Step 2: Choose output file format.

From "Format" bar drop-down list, choose the formats that you want to output for later use. For compatibility consideration, it is idea for you to choose "HD Video" > "H.264 HD Video (*.mp4)" as output file format.

Actually, many 4K video is encrypted by H.265 codec. So if your 4K devices, including 4K Projector and 4K TV, support H.265 codec, you can choose “H.265 MP4


Step 3: Rip 4K Blu-ray to 4K Projector

Start 4K Blu-ray to 4K MP4 conversion process by hitting the right-bottom conversion button.

Transfer ripped 4K Blu-ray to external hard drive and plug the USB stick to USB port in Sony 4K Projector. Just enjoy now!

Related Articles:

Monday, December 14, 2015

How to Change Video Frame Rate Easily on Windows/Mac?

Many people don’t know clearly the definition of the video frame rate so when they need to change frame rate of video files but do not know how. This guide just aims to offer a simple way and step by step guide to change video frame rate.


What is Frame Rate?

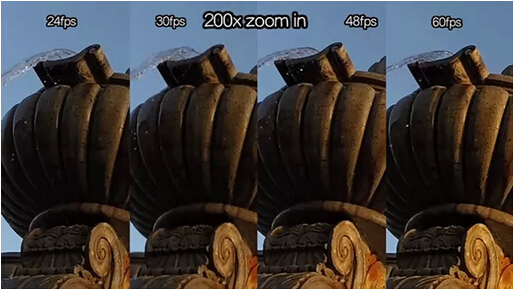
In motion pictures, television, and in computer video displays, the frame rate is the number of frames or images that are projected or displayed per second. Frame rates are used in synchronizing audio and pictures, whether film, television, or video. In motion pictures and television, the frame rates are standardized by the Society of Motion Picture and Television Editors (SMPTE). SMPTE Time Code frame rates of 24, 25 and 30 frames per second are common, each having uses in different portions of the industry. The professional frame rate for motion pictures is 24 frames per second and, for television, 30 frames per second (in the U.S.).

The Best Frame Rate Changer

Pavtube Video Converter Ultimate is a top-selling frame rate changer on the market. It can change video frame rate from 1 to 60 especially among 23.97fps, 24fps, 25fps, 29.97fps, 30fps, 50i/p, 60i/p, 72p, 120p, 300p and etc. And it also can change frame rate of video files of all variety like change AVI frame rate, change MP4 frame rate, change frame rate of MOV, Apple ProRes, R3D, AVCHD, WMV, MKV, VOB, DV, WTV, FLV, SWF, MXF, RMVB and more. It can keep the same video format while changing the video frame rate.(review)

Free download and install
          

Other Download:
- Pavtube old official address: http://www.pavtube.cn/blu-ray-video-converter-ultimate/
- Cnet Download: http://download.cnet.com/Pavtube-Video-Converter-Ultimate/3000-2194_4-75938564.html

How to change video frame rate?

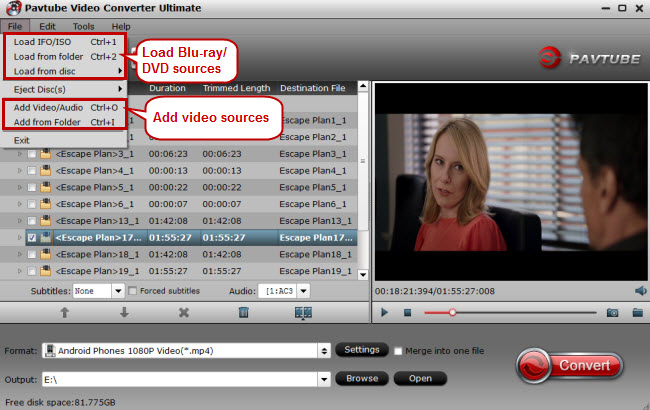
Step 1: After launching the program, click "File" > "Add Video/Audio" to import movies. For loading Blu-ray or DVD disc, tap "File" > "Load from disc" to add Blu-ray/DVD disc to the program. 


Step 2: Click "Setting" button to open the "Settings Profile" windows, then switch to the "Frame Rate" tab; click the small triangle on the right side of the drop down menu. Here, you can choose your desired video frame rate. 

Step 3: Press the "Format" drop-down button to select desired video format as output format. Click the "Browse" button to specify which folder which stores the frame rate changed video files.

Step 4: Click the red big"Convert" button to start and finish changing frame rate. 

After the process, just open the output folder where you can find your frame rate changed video. If you are a Mac user, you should use the equivalent Mac video frame rate changer. And since Pavtube Studio is holding on Christmas Coupon, you can get a big discount here

Related Articles:

The Lowest Price for 50% OFF Multi-track Blu-ray/DVD Ripper/Copier on Christmas

Pavtube today announces an official start of ByteCopy for Windows/Mac in the  Round 1 phase of its Christmas promotion for All Facebook Fans50% Discount Coupon! Only 3 Day! Time-Limited! Rush to Buy! Reportedly 5 to 6 times faster as well as multi-track MKV/MP4/MOV output than a boatload of its competitors, this Windows-based program is eating up a bigger market share.


"According to our statistics, 40% more users have installed Pavtube ByteCopy in 2015 than in 2014." "This is radically because we have made a greater dent in speed boosting and performance improving." From most users' feedback, for an hour and half movie, it takes roughly 5-10 minutes to make the 2D/3D Blu-ray/DVD 1:1 backup. On the flip side, ByteCopy was updated with the supports for new movies and output profiles including popular portable Apple, Android, Microsoft, Google and Sony devices, smart TVs, VR Headsets, Game Consoles, Media Player & Box Streamer, Storage & Server, Non-linear editing system and more.

      (Only $21)

      (Only $21)

What can Pavtube ByteCopy give you?

Top 5 reasons to pick Pavtube ByteCopy on PC/Mac

1. Rip and copy any commercial and region-locked Blu-ray/DVD to nearly all popular video/audio format, like M3U8, H.265, MP4, MKV, AVI, Apple ProRes, DivX, etc.

2. Lossless Blu-ray/DVD to MKV backup with multiple audio/subtitle tracks and all chapter markers and convert Blu-ray/DVD to Multi-track MP4, MOV, AVI. 

3. 1:1 backup original Blu-ray and DVD to computer hard drive with all languages, subtitle tracks and chapter info.

4. Unique feature to perfectly extract a single .srt subtitle file with chosen subtitle track from original movie.

5. Optimized preset for mainstream multimedia players: portable Apple, Android, Microsoft, Google and Sony devices, smart TVs, VR Headsets, Game Consoles, Media Player & Box Streamer, Storage & Server and more.

6. Specially designed formats included to be compatible with Mac video editing software: Apple ProRes, AIC, Avid DNxHD, MPEG-2, MOV, AVI, etc. for FCP X, iMovie, Avid Media Composer, Adobe Premiere Pro CC and more Non-linear editing system.

7. Full Compatible with Windows 10Windows 8.1, Windows 8, Windows 7, Windows 2003/XP/Vista

8. Full Compatible with Mac OS X 10.11 El Capitan, Mac OS X 10.10 Yosemite, 10.9 Mavericks, 10.8 Mountain Lion, 10.7 Lion, 10.6 Snow Leopard, 10.5 Leopard 

Expire on Dec 19, 2015

Tip 1. To reach out to Pavtube's more Christmas Coupons, please go to http://www.multipelife.com/pavtube-2015-christmas-great-promotions

Tip 2. There are four main Pavtube products: BDMagicByteCopyDVDAidVideo Converter Ultimate. As their names suggest, they are designed for different purposes. Here is a brief form for you to make the right purchasing choice:Pavtube Softwares Comparison

Tip 3. To go deeper in user experience, Pavtube Facebook will offer more coupons with different softwares in future. The list are as follows:

Pavtube Facebook Round 2: 60% OFF DVD Ripper & Copier on Dec 21, 2015, Only 2 Day

Pavtube Facebook Round 3: 50% OFF 50% OFF Video Converter Ultimate/iMedia Converter for Mac on Dec 23, 2015, Only 4 Day

Pavtube Facebook Round 4: Only $9.9 Video Converter, HD Video Converter, MTS/M2TS Converter, MXF Converter, ChewTune, MKV Converter, FLV/F4V Converter, DVD Creator or MXF MultiMixer for Mac/Windows, on Dec 28, 2015, Only 3 Day

Pavtube Facebook Round 5: 60% OFF BDMagic for Windows, 55% OFF BDMagic for Mac on Dec 31, 2015, Only 1 Day

Constantly surprises, quickly order your favorite software to backup, edit and share your favorite Christmas movies, music, and videos. Time-Limited! Action!

If you have any problem to buy or use Pavtube, pls feel free to contact dvdwinsupport@pavtube.com (for Windows BD/DVD rippers user), videowinsupport@pavtube.com (for Windows video converters user),dvdmacsupport@pavtube.com (for Mac BD/DVD ripper user), or videomacsupport@pavtube.com (for Mac video converter user).

Learn more at https://www.facebook.com/pavtubefans/app/201742856511228/

Source site: http://i-loveshare.com/pavtube-bytecopy-christmas-promotion/