Friday, July 24, 2015

Best 2015 Summer Movies for Kids to Watch

The naughty kids, immersing in the excitement of enjoying summer vacation, make you going crazy. Yes or no? I guess mostly parents will say yes. How to make these excited kids sit quietly in the hot summer, even if only for a little while? Maybe only movies can help you. These kids, that don’t allowed to watch too much TV, movies during school day, can freely enjoy the top movies they have missed before. If you want some quiet space, why not add some kids movies to your kids tablet, iPad to make your kids enjoy? Don’t know what movies you can make your kids watch? Ok,, let me introduce the best 2015 summer movies for kids.

1.Inside Out


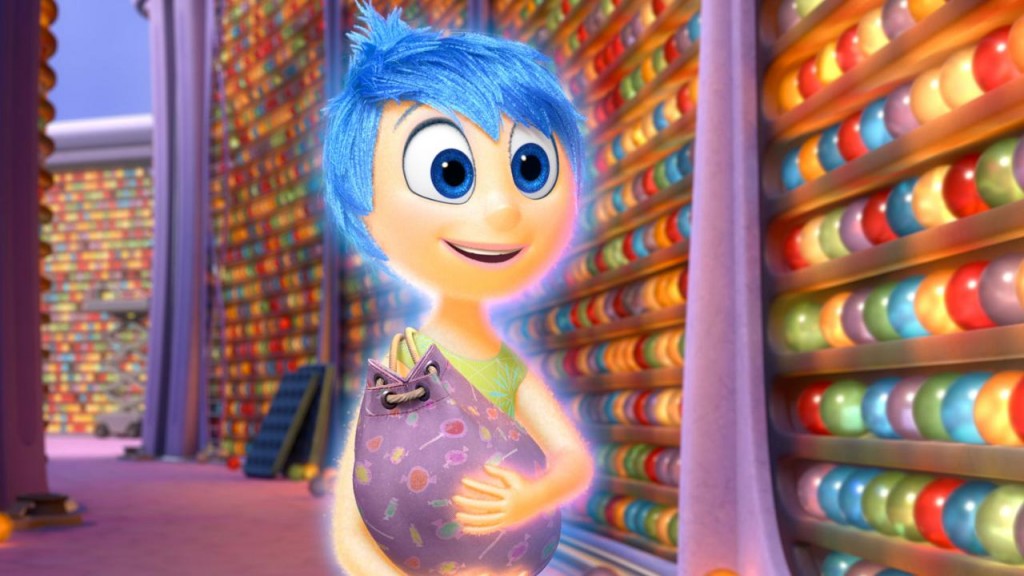
One of the best things a film can do is make you cry. Inside out can make you cry and laugh. Just like people says, Pixar is at the peak of its heartstring-tugging powers with this poignant, joyful coming-of-age story. This film maps out an 11-year-old girl’s inner turmoil on a unique, fantastical canvas and then tell you the bliss of childhood can’t last forever, but that’s no bad thing. 

2.Shaun the Sheep


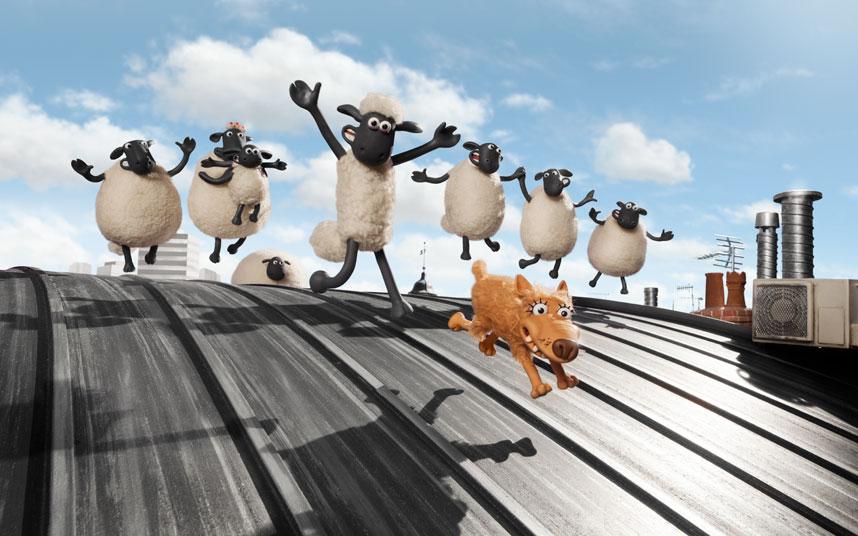
In its positive review of the film, the UK Telegraph called the film "charming" and boasted, "There can't be a child in the world who won't adore this." Bozdech said she hasn't yet seen the film, but she expects it will please young children and their parents given the studio's long run of clean fun.

3.Minions


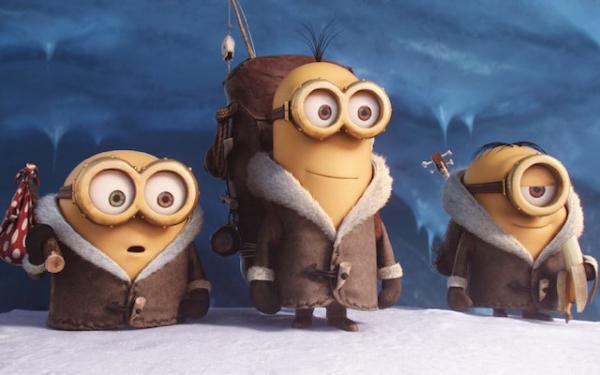
Parents need to know that Minions is the highly anticipated prequel to the Despicable Me franchise, focusing on Gru's beloved yellow sidekicks. Although no children are in peril in this installment of the franchise, the appeal of villains/bad guys is a central theme, and there are several scenes of cartoon violence that are played lightly/for laughs

4.Jurassic World


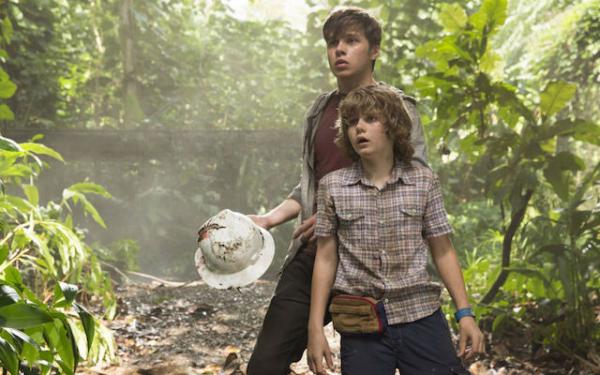
Since the titular theme park is actually open and filled with visitors, the ensuing body count when the dinos run amok is much higher than in the previous films (including some major supporting characters), and there are many intense scenes of sustained terror, suspense, and peril (including kids in danger).  Mature tweens and teens who are fans of suspense/action (and still fond of dinosaurs) will be thrilled -- just make sure they can handle the truly jump-worthy scares.

5.The Man from U.N.C.L.E.


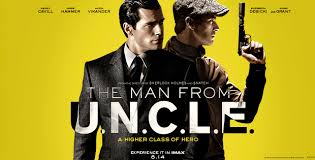
In the film, spies from the CIA and the KGB team up to stop a section of the criminal underworld from obtaining nuclear weapons. But there are a few red flags parents need to consider, including the film's director, Guy Ritchie, who is known primarily for violent, adult action films like "Snatch" and the Robert Downey Jr. "Sherlock Holmes" reboot films.

There are still many other summer movies for kids but I don’t have enough time to list them here one by one. 

Tricks of the trade

Some of the movies can downloaded from website, but some of them only can come from commercial Blu-ray/DVD disc. If you want to add these movies to some portable devices for your kids, maybe you will need some extra operations. For example, some kids Blu-ray/DVD movies can’t be put into Kids tablet, iPad directly for their copy protection and the lack of Blu-ray/DVD drive of the portable devices. Moreover, if the movie you downloaded from the site is 4k, you still maybe have some trouble because many portable devices still can’t play 4K videos. If you encounter this situation, don’t worry, I will show you the solution in the following.

Convert Blu-ray/DVD/4K summer kid movies with video software

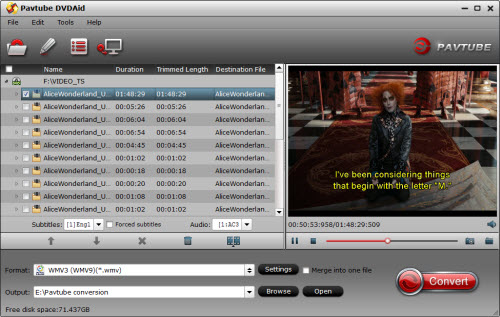
Get a Pavtube DVDAid to solve all the above problems. Pavtube DVDAid can deal with DVD videos. Even though the DVD discs are the latest, it still can rip them. And it provides various video and audio formats including H.265, M3U8, MP4, MKV, MOV, AVI, WMV, MP3, AAC, etc to let you enjoy movies on any portable device like InnoTab 3, iPhone 6/ 6 Plus, iPad Air 2, iPad Mini 3, Galaxy S6/S6 Edge, PS4, Surface 3, and more. 

Pavtube Video Converter Ultimate has the equal power the same as DVDAid. But it has exra features,  that is except Blu-ray/DVD, it also can deal with 4K/HD/SD videos and TV Shows, Music Drama, etc. Learn more about them, read DVDAid review and Video Converter Ultimate review

A simple tutorial about DVDAid

Step 1: Download and install


Other Download:
- Pavtube old official address: http://www.pavtube.cn/dvd_ripper/
- Cnet Download: http://download.cnet.com/Pavtube-DVDAid/3000-7970_4-76158510.html

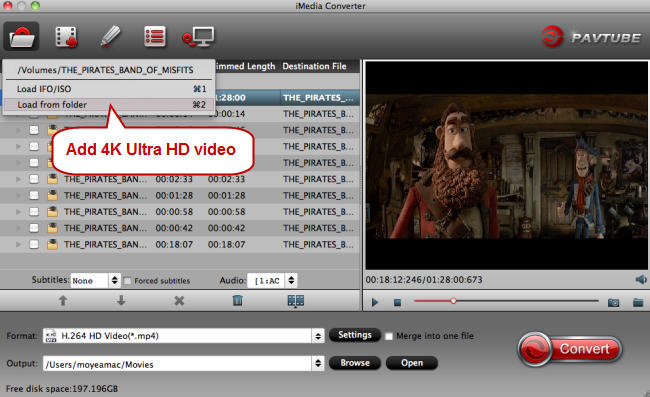
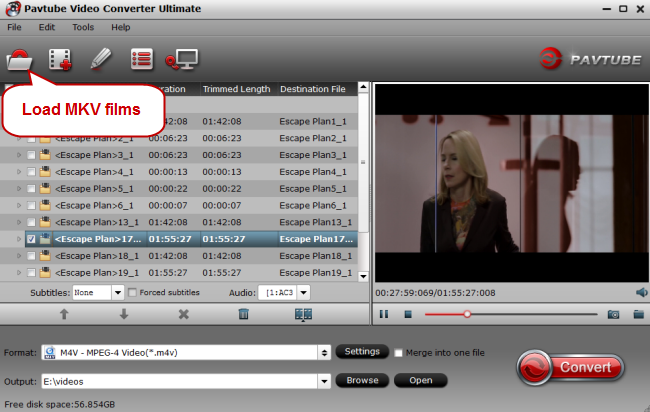
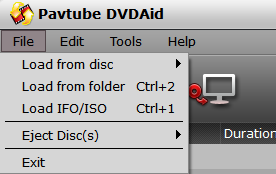
Step 2: Add videos to the app

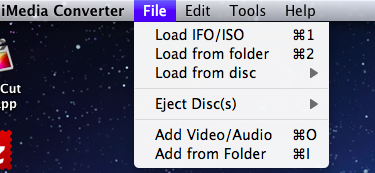
Click “File” menu, and select “Load from disc”, Load from folder”, “Load IFO/ISO” to import source files.


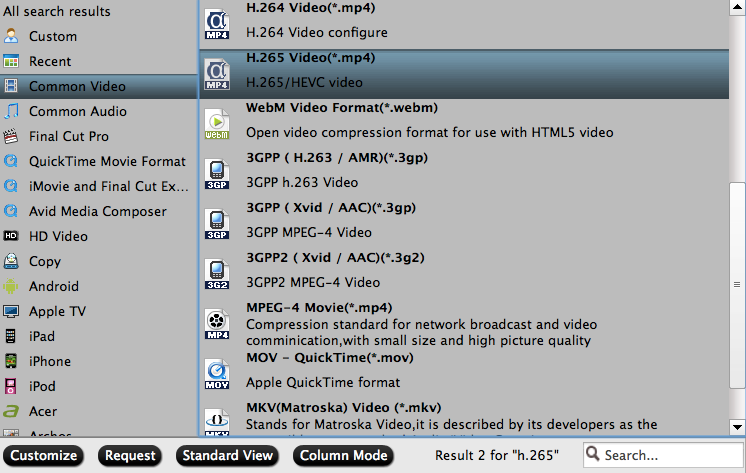
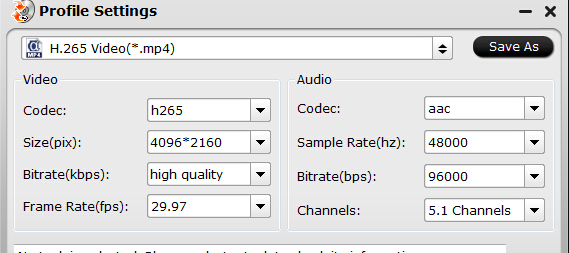
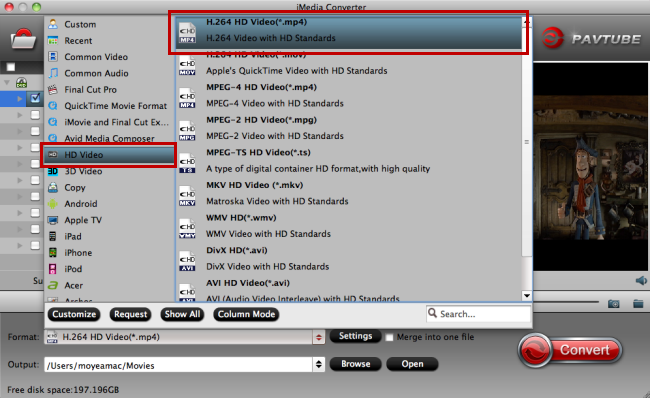
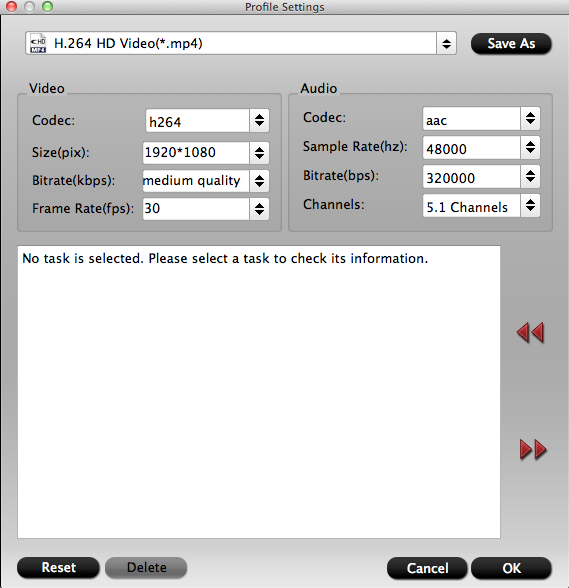
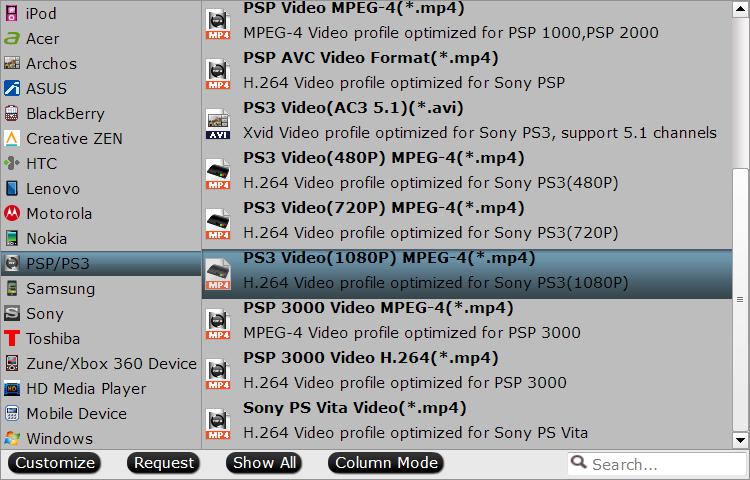
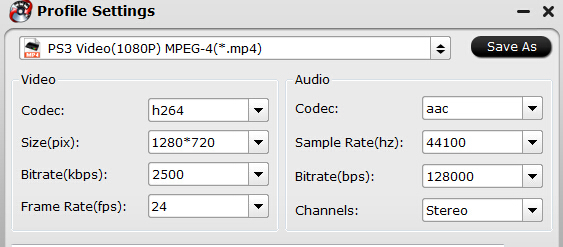
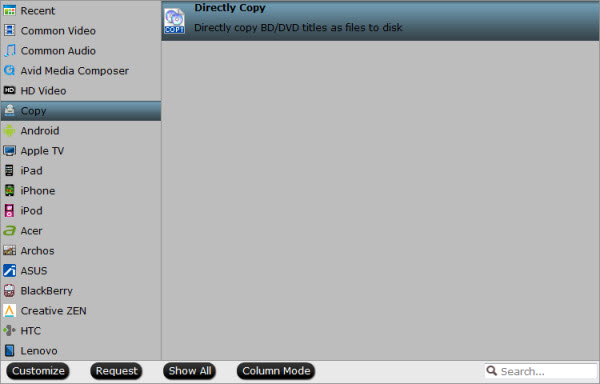
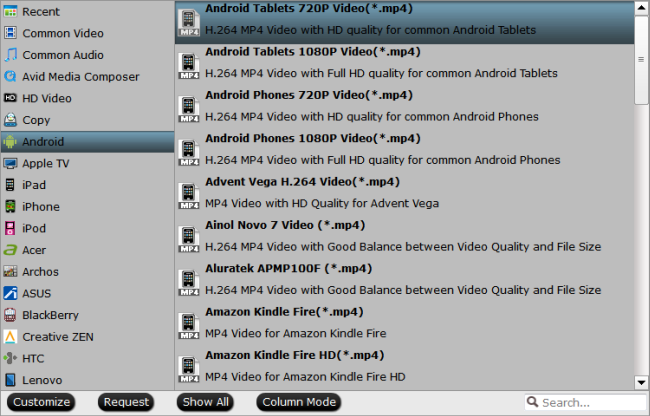
Step 3: Choose output format

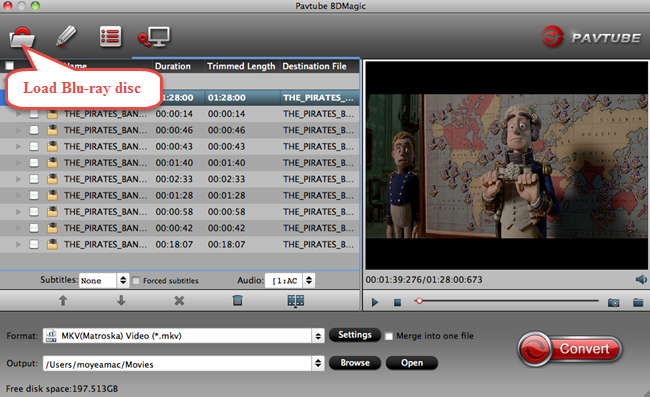
Clicking the Format bar, you can choose output format from the format list or customize which formats to be shown on the list. 


Step 4: Start conversion

Clicking the Convert button on main interface, you can go to Conversion window to start conversion.

It is easy to use DVDAid to rip your Blu-ray/DVD kids movies. If you need Pavtube Video Converter Ultimate tutorial to convert 4K/HD/SD videos and TV Shows, Music Drama, please click here.

After deal with the summer movies for kids, you can let your kids watch the best kids movies and meanwhile, you can enjoy some space time. 

Related Article:

Wednesday, July 22, 2015

How to Add SRT Subtitles to MP4 Videos on Mac?

Whether you come across these situations: download many MP4 films and TV films on Mac but find there is no subtitle; or your MP4 movies contain subtitles in foreign languages? Both of these break your dream to enjoy the MP4 movies on your Mac. Don’t worry. You can add right and suitable SRT subtitles to your MP4 moves on Mac. SRT subtitle maybe is the most basic subtitle formats. SRT format is supported by most video players and subtitle creation programs. It is a text file not an image file that you can edit it and merge it with desired movie file so that you can display subtitles when you play video file on Mac. Add SRT subtitles to MP4 video on Mac is very easy. You even don’t need to re-encode the video if you don’t need to change MP4 to other video formats. 

When you add SRT subtitle to MP4 video on Mac, you should prepare:

1: The right SRT subtitles matching up with your MP4 movies. 

You can download it from Moviesubtitles.org or create it on your own on Mac. If you decide to make SRT subtitle, here is the steps:
a. Open Notepad, WordPad or other text editor.
b. Edit subtitles shown as below:


c. Save subtitles to SRT format. In Notepad, please click menu File->Save As, change file name to “xxx.srt”, set “Save as type” to “All Files”, and then set “Encoding” to "ANSI" or “UTF-8”.( "ANSI" means English subtitles while “UTF-8” stands for non-English )


Tip: SRT subtitle should contain four parts:
a.A number indicating which subtitle it is in the sequence.
b. The time that the subtitle should appear on the screen, and then disappear.
c. The subtitle itself.
d. A blank line indicating the start of a new subtitle.

2. A SRT to MP4 merger for Mac

Pavtube iMedia Converter for Mac is recommended to you. This SRT to MP4 merger for Mac not only helps to merge SRT subtitle with MP4 file on Mac but also supports adding external subtitles (SRT/ASS/SSA) to h.265, M3U8, AVI, FLV, MKV, WMV, MOV, MP4 and any other mainstream video formats within a few clicks. (Read review)

Free download and install
          

Other Download:
- Pavtube old official address: http://www.pavtube.cn/imedia-converter-mac/
- Cnet Download: http://download.cnet.com/Pavtube-iMedia-Converter/3000-2194_4-76177788.html

If you are a Windows user, you can read this: How to add SRT subtitles to video on Windows.

How to add SRT subtitles to MP4 with SRT to MP4 merger on Mac?

Step 1: Load video files to the software

Click “File” menu, and select "Add Video/Audio" to import source MP4 videos.


Step 2: Set video format

If you don’t need to change your MP4 video to other video format, you can click “Format” > “Common Video” to choose MP4 format your films originally are.

Step 3: Add SRT subtitle to MP4 video

Click the “Edit” icon on the tool bar of main interface. On the “Video Editor” Window, you can play and preview the original video and output effects. Click “Subtitle” icon. In this tab, you can add SRT subtitle files to the MP4 video as hard subtitles. Tick “Enable” and click “Browse”. Choose your SRT file on your Mac computer.


Note: Please make sure that the names of the MP4 videos and the SRT file are matched. For instance, if the movie file is saved as "Jurassic World.mp4" , you must ensure the name of the subtitle file to be saved in "Jurassic World.srt".

Step 4: Start converting

Before start converting, you can preview the video on the preview window. Then click “Convert” to  start merging SRT file with MP4 videos.

Finally, you merged SRT subtitle to MP4 videos n Mac. Now you can enjoy your movie with subtitles. Please notice, adding external subtitles to video on Mac is just one function of iMedia Converter for Mac.

Related Article:

Monday, July 20, 2015

Insert downloaded YouTube Video into WPS Office Presentation

As a lecturer or reporter, slide show is necessary. And from time to time, to attract people’ interests, adding some video to slide is a good idea. So many people choose to link some videos in popular video sharing site, like YouTube, Vimeo, and Facebook with their WPS Office Presentation. 

      Hot search: YouTube to Windows Media Player | YouTube to iPhone 6 | YouTube to TV 

When there is internet connection, linking YouTube video to WPS Office Presentation is easy but you maybe suffer slow buffering and you can’t guarantee the YouTube video will always be there. Moreover, not all YouTube videos are supported by WPS Office Presentation in that YouTube video formats includes H.265, MOV, MP4, MPEG4, AVI, WMV, FLV and WPS Office Presentation supports ASF, AVI, WMX, XW, MPEG, MPA, WMV, WVX video. So for making your presentation perfect as you expected, you will need to avoid any unexpected issues while you are inserting YouTube video into WPS Office Presentation.


A recommended solution is to download Youtube video and transcode it to WPS Office Presentation suitable format.Pavtube Video Converter Ultimate can accept nearly all video format, including the newest H.265 codec, and then transcode them to other format, like WPS Office Presentation supported ASF, AVI, WMX, XW, MPEG, etc. It not only can transcode videos downloaded from YouTube, but also can rip Blu-ray/DVD and convert SD/HD, iMovie video to YouTube, Vimeo, Google Videos, Facebook and other popular video sharing websites. (Review)

Free download and install
          

Other Download:
- Pavtube old official address: http://www.pavtube.cn/blu-ray-video-converter-ultimate/
- Cnet Download: http://download.cnet.com/Pavtube-Video-Converter-Ultimate/3000-2194_4-75938564.html

Good news: Pavtube Video Converter Ultimate Summer Sale - giveaway & up to 50% off discount.

How to insert YouTube video to WPS Office Presentation?

Step 1: Input downloaded YouTube video

Launch YouTube to WPS software, and click the "File" to choose “Add the Video/Audio” to input downloaded YouTube video to the app. 


Step 2: Convert YouTube video to WPS Presentation supported video 

In “Format” bar, you can choose any format supported by WPS Presentation. The recommended format is MPEG-1 which gives more compatibility on different Windows PCs.


Step 3: Start convert YouTube video to WPS

When specified the output format, go back to the main interface and carry out the YouTube to WPS process by hitting right-bottom “convert” button. When the process is finished, click the "Open" icon on the main interface to pop out the created files. 

Step 4: Embed and insert YouTube video to WPS Presentation

1. Before embedding YouTube to WPS Presentation, create a folder, then put both the converted YouTube video and your presentation in this folder.
2. Open your Presentation in this folder. Select the slide that you want to insert the YouTube video.
3. Click on the “Insert” tab in the main menu. Click on “Movie” icon. This will bring up the Insert Movie dialog box, as seen below.


4. In the Insert Movie dialog box, navigate to the video file in the folder you just created and left click on it, then click Open.
5. When you choose Open button, a dialog box will bring up. You are given two ways to start the movie,“Automatically” or “When Click”, as seen below. Choose the option that best suits your needs. The sketch map is shown as follow:


6. After adding the video, right click the movie you have inserted and select “Play Movie” on the quick access menu. You can also change the video settings by right clicking the movie and selecting “Play Movie” on the quick access menu. After it starts to play right click the movie and select “Edit Movie Object”. A Movie Options dialog box will appear as shown below:
      a. Select Loop until stopped to play the movie in a continuous loop.
      b. Click the Sound volume button and slide the bar to adjust the volume of the movie. Select Zoom to full screen to play the movie in full screen.

By this way, you can play YouTube video in WPS Office Presentation without suffering buffering and don’t worry the internet connection or the lost of source YouTube video.

Related Article:

Friday, July 17, 2015

Rip and Backup 4K Blu-ray Movies on Mac OS X El Capitan


Good news for picture-quality fans, Ultra HD "4K" Blu-rays should be out by the end of 2015 with enhanced resolution, expanded color and more. But you maybe go out on a limb and assume your current BD players on Mac will play 4K Blu-ray disc as well. Unfortunately, it's doubtful the new 4K Blu-ray discs will work at all in your currentBlu-ray players for the H.265 codec and big size. So for streaming 4K Blu-ray, 4K Blu-ray players is released. But due to 4K Blu-ray’s amazing specs, like 60 Hz, High Dynamic Range, 10-bit, H.265/HEVC, Greater capacity disc in 66GB or 100GB, all of which will kill us in streaming, even 4K Blu-ray player maybe get slack when streaming 4K Blu-ray. 

So if you are eager to enjoy your 4K Blu-ray via 4K Blu-ray player on Mac or watch 4K Blu-ray movies on 4K TV, 4K Projector and 4K players, ripping and backing up 4K Blu-ray on Mac OS X El Capitan to 4K MP4/MKV will be a nice idea. Or copying 4K Blu-ray on Mac OS X El Capitan to other video formats with smaller size to put into portable devices for viewing .


So, Pavtube BDMagic for Mac is recommended here. This 4K Blu-ray Ripper enables you to rip 4K Blu-ray to 4K MP4/MOV/M4V/AVI, etc to adapt to your 4K players 4K Projector, 4K TV and so on. What’s more, it can convert H.265Blu-ray to H.265 MP4 and downscale H.265 to H.264 codec if your player doesn’t support H.265. Not just 4K Blu-ray, this 4K Blu-ray ripper also is the best Blu-ray ripper to rip and backup 2D/3D Blu-ray on Mac OS X El Capitan.

Free download and install:
          

Other Download:
- Pavtube old official address: http://www.pavtube.cn/blu-ray-ripper-mac/
- Cnet Download: http://download.cnet.com/Pavtube-BDMagic/3000-7970_4-76177782.html


How to rip 4K Blu-ray on Mac OS X El Capitan?

Step 1: Load 4K Blu-ray from optical drive.
Click the "Folder" icon on the top menu bar to load your 4k Blu-ray disc to the program.


Step 2: Select output file format.
From the "Format" bar extended lists, define the output format from "Common Video > H.265 Video (*.mp4)" as the output file format which can preserve higher resolution. Or if your devices can’t support H.254 codec, you also can choose H.264 MP4.


Step 3: Set 4K video format(Optional)
If your devices, like 4K TV, 4K Projector, can play 4K video, you can set 4K format. In “Settings”, under video size column, change “1920*1280” to “ 4096*2160” to get 4K MP4 video. And you can adjust the output video and audio codec, bit rate, frame rate, sample rate, channels according to your own needs and preference.


Step 4: Rip 4K Blu-ray on Mac OS X El Capitan
Start 4K Blu-ray to H.265 MP4 conversion process by hitting the right-bottom conversion button.

After ripped 4K Blu-ray on Mac OS X El Capitan, now you can enjoy your 4K movie on 4K TV, 4K Projector smoothly.

Related Article:

Wednesday, July 15, 2015

Play 4K Videos on Mac OS X El Capitan

9to5mac reveals another breaking news about Apple: the latest release of the Mac OS X El Capitan beta for developers hides references to the new system: 4K resolution supporting is under the plan. With  currently no Retina display, the new Mac OS X El Capitan beta references Mac support for a new 4096 X 2304 resolution Apple-made display panel, which is not present in any version of Yosemite. This could make sense for Mac users who are fond of watching 4K videos on Mac OS X. Before the 4K resolution plan is reached, how can we play 4K videos on Mac OS X El Capitan?

4K video is the resolution range from 3840 × 2160 to 4096 × 2160. With 4K resolution, you can see every single detail and close-up in the video wherever you sit in the cinema. At present, 4K videos come from mainly camcorder recording, YouTube and Vimeo downloads, Amazon Prime subscription and other source. These 4K videos can’t played by QuickTime natively on Mac OS X 10.11 El Capitan. So for playing 4K videos on Mac OS X 10.11 El Capitan, you should convert 4K 2160p videos to 1080p videos on El Capitan.

A cheap and convenient way of playing 4K videos on Mac OS X 10.11 El Capitan is to adopt a 4K videos converter for Mac. Pavtube iMedia Converter for Mac is designed to play 4K videos on your Mac OS X El Capitan by saving much storage space as well as converting them to almost any video format for free playback on those popular devices such as UHD TV, Apple series, Android smart phones and tablets, game consoles, etc.(Read Top 5 free Mac video converters.)

Free download and install
          

Other Download:
- Pavtube old official address: http://www.pavtube.cn/imedia-converter-mac/
- Cnet Download: http://download.cnet.com/Pavtube-iMedia-Converter/3000-2194_4-76177788.html

How to play 4K videos on Mac OS X El Capitan?

Step 1. Add 4K videos

Run a 4K video converter for Mac on Mac OS X El Capitan and import 4K videos
to it.


Step 2. Choose video format supported by Mac OS X El Capitan

Click the format bar to follow "HD Video" and "H.264 HD Video (*.mp4)."


Step 3: Downscale 4K video to 1080p 

Open "Profile Settings" window, from Size(pix) drop-down list, select "1920x1080" which is close to 4K resolution as the resolution for output file.


Step 4. Convert 4K videos on Mac OS X El Capitan

Hit the big red button “Convert” on bottom-right corner of the main UI to convert your 4K videos on Mac OS X El Capitan.

After conversion, you can play the converted 4K videos on Mac OS X El Capitan via a media player for Mac. With iMedia Converter for Mac, you still can enjoy a free playback of various 4K  videos on your Mac OS X 10.9.3 and 5k iMac.

Related Article:

Monday, July 13, 2015

Does Sony PS4 support MKV video format files via USB

Source: How to Play MKV Movies on PS4

Sony PlayStation 4 can be regarded as the most exciting game console with the configurations of 4K resolution, HDMI (1080p and 4K), Blu-ray drive, streaming function. And if you watched its E3 press conference pre-show in 16 Jun 2015, you probably heard the good news – Media Player for the PS4 will be available to download from PlayStation Store from that evening. And the media player can support MKV file with H.264/MPEG-4 AVC High Profile Level4.2 visual and MP3, AAC LC, AC-3 (Dolby Digital) audio. But for those MKV files which don’t meet the criterion, what can we do to play MKV movies on PS4? 

Thanks to the third-party MKV to PS4 Converter software, now we could convert MKV to PS4 playable format. As the best MKV to PS4 Converter, Pavtube Video Converter Ultimate is recommended here, which is professional on transcoding MKV files to PS4 with fast speed and best quality. What’s more, this software can deal with all most video formats, like MTS, MXF, MOV, H.265, etc besides MKV to PS4 compatible MP4, H.264, WMV or MPEG-2 files. It even helps to convert PS4 unsupported audio like FLAC, OGG, M4R, M4B, AIFF, DTS etc to PS4 supported MP3, WAV or WMA. (Read Review

Free download and install 


Other Download: 
– Pavtube old official address: http://www.pavtube.cn/blu-ray-video-converter-ultimate/ 
– Cnet Download: http://download.cnet.com/Pavtube-Video-Converter-Ultimate/3000-2194_4-75938564.html 

How to play MKV to PS4 with Pavtube MKV to PS4 Converter? 

Step 1: Import MKV files 

Click “File” button on the top of the main interface to import the MKV videos to the program. You also can drag the files to the App directly. 

 
Step 2: Select compatible format 

From “Format” drop-down list, go to choose “PSP/PS3″ > “PS3 Video(1080P) MPEG-4 (*.mp4)” as the final output file format for playing on PS4. 


Tip: If you need, you can go to “Settings” to select the video parameters like Video&Audio Bitrate, Video Size, Frame rate, Audio Channels .etc to meet your personal demands. 


Step 3: Start MKV to PS4 conversion. 

When all the settings is done, go back to the main interface and carry out the conversion by hitting right-bottom convert button. When the MKV to PS4 conversion is finished, click the “Open” icon on the main interface to pop out the converted files. 

In addition, with Pavtube Video Converter Ultimate, you also could convert MKV to iTunes libraryApple TVWindows Media Player

How to play MKV movies on PS4 from a USB device? 

1. Connect the USB drive to PS4. Turn on your PS4, plug your USB device into the PS4 USB port. 
2. Go to the category (Music, Video, Photo, etc) on your PS4 home menu, select the USB device icon and then tap the “up triangular arrow” button. 
3. Highlight “Display All” and the press the “x” button. A list of all folders and playable content for that category will be displayed. 
4. To view or play a file, highlight the file and press the “x” icon.

Also learn how to stream movies to my PS4 via local networkFollowing above all steps, now you can enjoy all your MKV movies on your PS4. 

Related Article:

Friday, July 10, 2015

Solutions of Backup DVD to WD My Cloud for Streaming and Playing

Summary: Have you loss your head about backup DVD files to WD My Cloud for streaming to other portable device for watching? This tutorial will give you some useful ideas and helps.

Hot searchMKV Video on WD | H.265 Encoded 1080p Video on WD TV | 3D Blu-ray Movie on WD TV

With WD My Cloud, you can watching videos on your TV with your families at home. If you get WD media player APP installed on your PC, Mac,or other portable devices such as smart phone, tablet, xbox, ps4, etc. You can also watching movies and videos with your WD My Cloud in Wi-Fi environment. 

As for DVD lovers, can they backup DVD to WD My Cloud this way? Although, WD My Cloud supported many video formats such as AVI (Xvid, AVC, MPEG1/2/4), MPG/MPEG, VOB (unprotected or unencrypted), MKV (h.264, x.264, AVC, MPEG1/2/4, VC-1), TS/TP/M2T (MPEG1/2/4, AVC, VC-1) MP4/MOV (MPEG4, h.264), M2TS, WMV9. All I can say is, impossible directly. Most of the DVD disc are protected and encrypted. Moreover, WD Cloud has no ability of backup DVD since it’s original box lack of a DVD drive. Even if you have the external DVD drive, WD original box can not identify it yet. 

Have you loss your head at this moment? Just take it easy, Pavtube DVDAid for Windows ( Mac version ) could give you a helping hand to copy DVD to WD My Cloud! This powerful program can remove protection and strip off encryption of DVD connections easily. In addition, you can makes 1:1 copy of original DVD Disc without quality loss with all audio streams, subtitle tracks, extras, etc for saving DVD to WD My Could. Besides, it’s approval directly copy DVD main movie content and leave out extras, commentary, etc for backup DVD to WD My Cloud. Let’s get this powerful DVD backup program and start to backup DVD on WD Cloud by the steps below.


Other Download:
- Pavtube old official address: http://www.pavtube.cn/dvd_ripper/
- Cnet Download: http://download.cnet.com/Pavtube-DVDAid/3000-7970_4-76158510.html

How to Backup DVD to WD My Cloud for Streaming and Watching?

Step 1. Load DVD source.

First of all, connect DVD drive with your Mac and insert your DVD, then import DVD into the software after launching it. Click “Load files” icon to choose DVD source for importing.


Step 2. Choose output format.

By choosing Copy > Directly Copy, you are able to copy the selected movie file in its original format without quality loss. When directly copy a DVD movie, you will get .vob as output. It can stream to TV for watching directly.


Tips: you can also choose another format such as mp4 for IOS devices, android devices, xbox, ps4, etc.

Step 3. Start conversion.

Hitting the right-bottom convert and starts directly copy DVD conversion.

After the conversion, you can click “Open” output folder to popup output directory with the converted files. Then transfer this converted files to your external hard drive and connect with WD original box, select the files and confirm to stream it to WD Cloud, after all,you can watch it on other portable devices with WD media player log in.

More Guides: