Thursday, August 13, 2015

Playing 3D SBS Videos as 3D Anaglyph with Media Player Classic

If you have some 3D DVD movies (in SBS format) and a pairs of Red-Cyan 3D Anaglyph glasses, how do you enjoy 3D movies? With a stereoscopic player or Cyberlink PowerDVD 10? But you should know both of the two stereoscopic movie players are should be paid. Any free way to watch these 3D SBS video? of course, there is.

A free way to play 3D SBS stereoscopic video is using Avisynth script on ffdshow to do SBS to Anaglyph conversion in realtime through Media Player Classic. This will then turn Media Player Classic into a simple 3D media player or a 3D SBS player. Below are the detailed steps for media player classic 3D trick.

What you should prepare before the tutorial:

1. Download and install Avisynth
2. Download and install Pantarheon 3D AviSynth Toolbox Installer
3. Download and install K-Lite Codec Pack full version.

Part one: Configuring ffdshow

1. Navigate to Start menu, Program Files, K-Lite Codec Pack, Configuration and choose “ffdshow video decoder”.
2. On the Codecs menu, scroll down and find “Raw Video” and change the decoder to “all supported”.
3. Now on the left menu, scroll down to Avisynth, check the box and add the following code in to the Avisynth script form
      c = ConvertToRGB32()
      w = c.width()/2
      h = c.height()/2
      LeftRight3DToRCAnaglyph(c).Lanczos4Resize(w, h)
4. Save and close.


Part two: Configuring Media Player Classic:

1. Open Media Player Classic and press “O” to open Option menu
2. On “Internal Filter” unchecked all Filters
3. On “External Filter” unchecked all Filters and click Add Filter to add another filters
4. Find “ffdshow Video Decoder” and change from “Set Merit” to “Prefer”
5. Repeat the steps to add “ffdshow Audio Processor” and “ffdshow Raw Filter”
6. Apply and restart Media Player Classic.


Now, play the DVD with Media Player Classic and the SBS should be played as Anaglyph now. If you think these steps are too complex, you can simply convert 3D SBS video to 3D Anaglyph for Media Player Classic with a video software.

Free Download and Install Pavtube Video Converter Ultimate on Windows:


Other Download:
- Pavtube old official address: http://www.pavtube.cn/blu-ray-video-converter-ultimate/
- Cnet Download: http://download.cnet.com/Pavtube-Video-Converter-Ultimate/3000-2194_4-75938564.html

This video software can change 3D SBS to 3D Anaglyph for Media Player Classic, freely and fast. And it allows you adjust 3D depth in profile settings to get better 3D effect. (Read Review).

If you are a Mac user, the equivalence program is iMedia Converter for Mac.

How to change 3D SBS to 3D Anaglyph for Media Player Classic with video software?

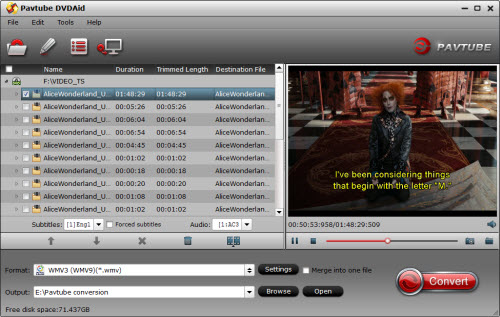
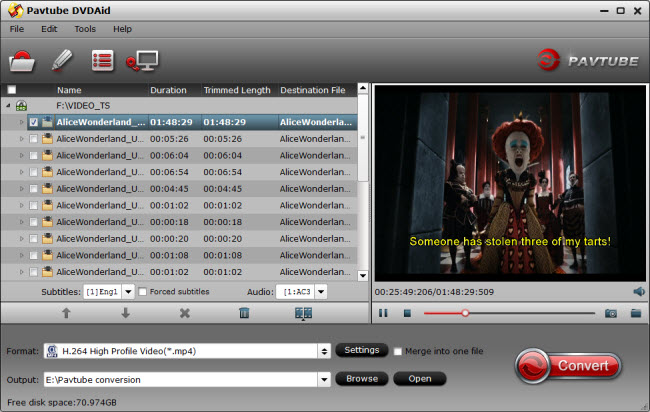
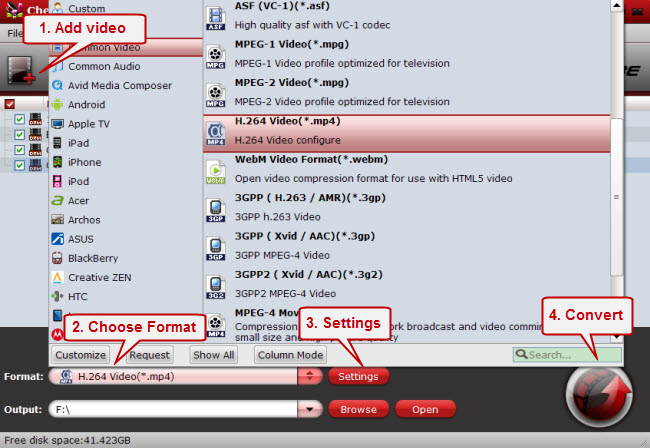
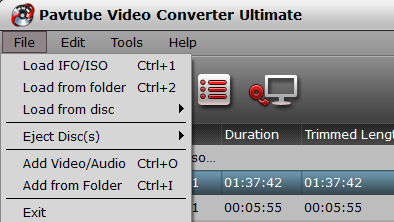
Step 1: Import source 3D SBS video

From "File" drop-down list, select "Add Video/Audio" to add the 3D SBS videos that you wish to change to 3D Anaglyph.


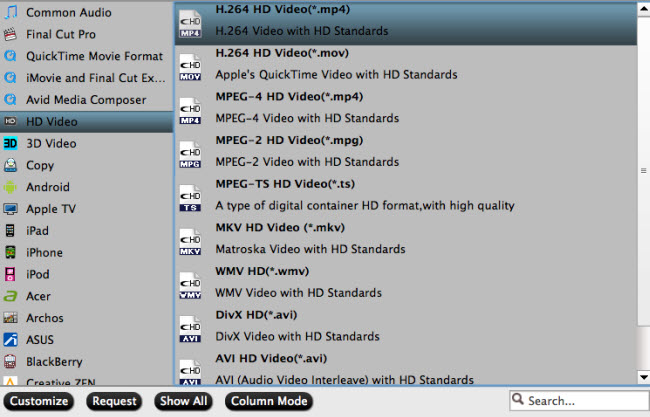
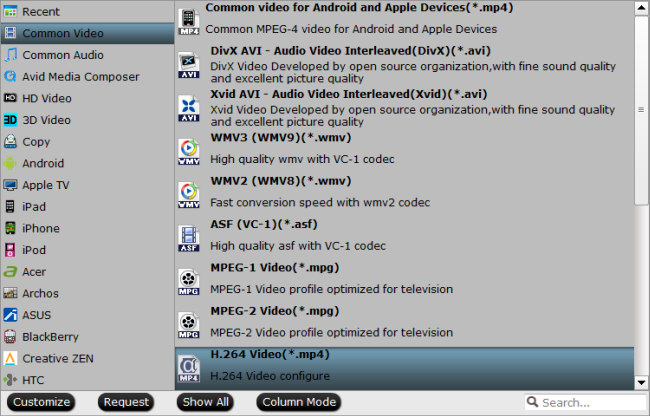
Step 2: Select 3D Anaglyph format

Click “Format” bar to navigate to “3D Video”. Here, you can find all 3D format, including “MP4 Anaglyph 3D Video(*.MP4)”.


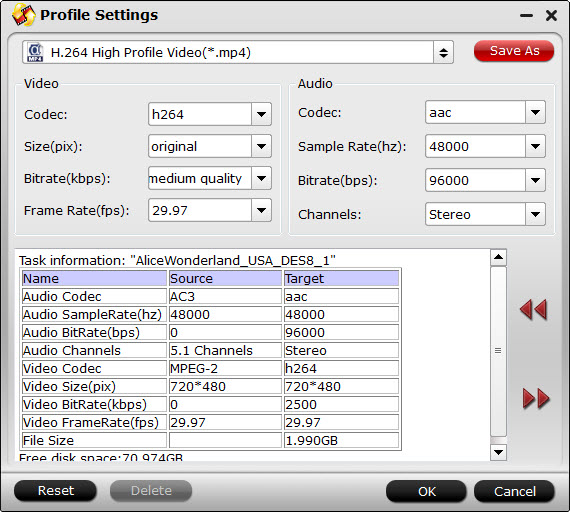
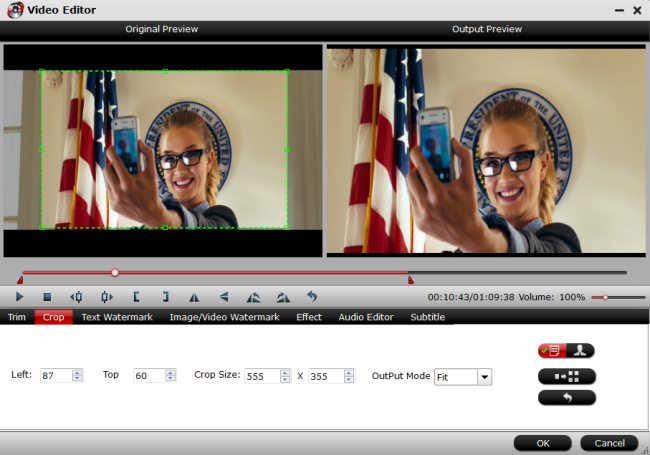
Step 3: Adjust the 3D depth

Open profile settings, here, you can adjust video and audio codec, bitrate, size, framerate, etc. If you don’t want to change anything, you can choose original in all boxes. You also can adjust 3D depth in the below of interface to get better 3D movie playback in Media Player Classic.


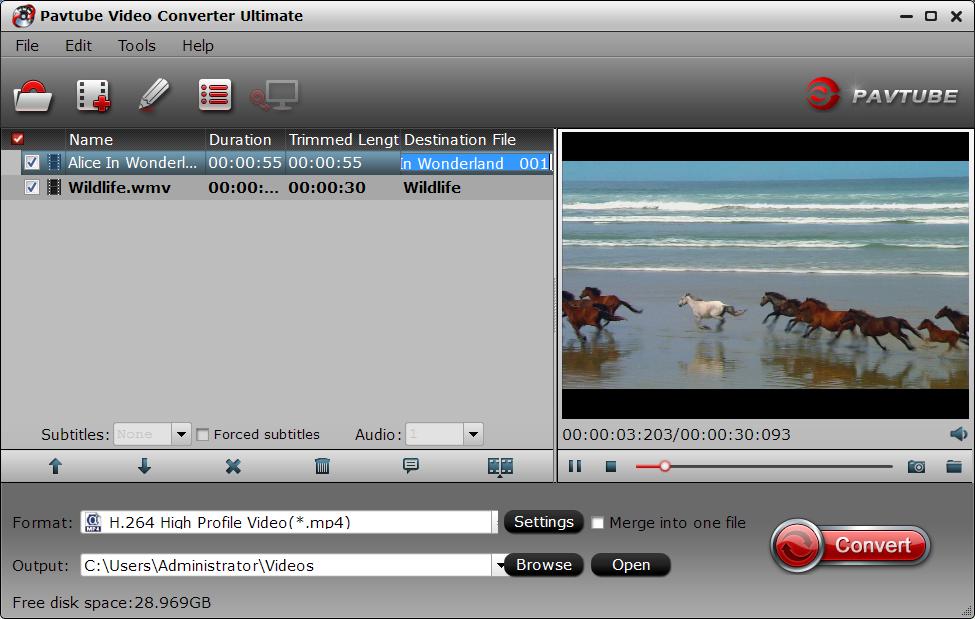
Step 4: Start to change 3D SBS to 3D Anaglyph

Now, you can hit the red big “Convert” button to start to change 3D SBS to 3D Anaglyph for Media Player Classic. After the process, open output folder to locate the generated 3D Anaglyph movie.

Through this way, you also can free enjoy 3D SBS video with Media Player Classic in 3D Anaglyph format. You can download the free trial version and try.

More Functions of Pavtube Video Converter Ultimate:

  • Almost all video/audio formats supported: A large number of file formats are accepted by this package, Blu-ray, DVD, TV Shows, Music Dramas, MP4, TiVo, JPEG, BMP, etc. More than 200 formats are listed under Format pane for output. 
  • Backup BD/DVD with high quality: Copy the entire BD/DVD disc content to computer hard drive with original structure and all audio/subtitle tracks and chapter markers preserved.
  • Create 3D movies out of 2D/3D sources: Assist users to convert both 2D/3D Blu-ray/DVD to 3D MKV, 3D MP4, 3D WMV and 3D AVI which enables to watch movies on your 3D devices with HD quality. 
  •  Freely select subtitle and audio tracks: Choose the desired language and subtitles from original BD/DVD and source video to display on your media devices. Or attach SRT/ASS/SSA subtitles for source video.
  • Edit video and create personal movie: Customize output files with provided practical video editing features, including: trim video length, crop video size, split large video into segments, add watermarks, adjust video effect and remove audio from video.

Related Articles:

Wednesday, August 12, 2015

Backup DVD to MKV/HD MKV on Windows 10

MKV format can hold unlimited and any type of audio, video and subtitle streams. It can make you put a complete movie into a single file including various audio, video and subtitle streams as well as menus and chapter structure. You can find everything in a MKV file when ripping and backing up DVD movie to MKV file.

MKV movie can be played on PC and HDD media players. After finishing DVD backup, you can play the MKV file via VLC media player on computer which can fully support MKV playback. Players like Media Player Classic and MplayerX are also great MKV-compatible media players. External HDD media players like WD TV series, Porpcorn Hour, and Seagate Free Agent can also realize MKV playback, too. So ripping DVD to MKV/HD MKV can make you enjoy DVD movie on above multiple players. 

Pavtube DVDAid is a grand helping hand to achieve this. It can rip and backup the newest and region-locked DVD disc to MKV/HD MKV with high definition and ultra fast speed. It supports many Windows systems like Windows 10/8.1/8/7 and Vista. So you can rip DVD to MKV/HD MKV on the newest Windows 10. With powerful video editing features included, you could trim, crop, insert subtitles, add watermarks, adjust video effects, etc. to create your own movie for playback. You could adjust video codec, video display ratio, bitrate, frame rate and more presets to get great DVD experience.

Of course, as a DVD ripping tool, it has wide range of output formats supported. Both standard and HD formats like H.265, M3U8, MP4, AVI, MKV, WMV, M4V, MP3, M4A, WAV, etc. can be created out of source DVD movies with fast conversion speed. With these rich output formats, you could freely convert source DVD to watchable movies for your device, mobile phones, tablets based on iOS/Android/Windows, Game Consoles, and other media players.(ReadReview)

Free download and install:
          

Other Download:
- Pavtube old official address: http://www.pavtube.cn/dvd_ripper/
- Cnet Download: http://download.cnet.com/Pavtube-DVDAid/3000-7970_4-76158510.html

How to rip DVD to MKV/HD MKV on Windows 10?

Step 1: Load DVD disc to the software.

Insert your DVD disc into your computer DVD drive, then launch the program, from "File" menu drop-down list, select "Load from disc" to import source DVD disc movies to the program.


Step 2: Choose MKV/HD MKV format

You can click “Format” bar and you will find Common Video and HD Video. In their drop-down list, you can find “MKV(Matroska) Video(*.mkv)” and “ MKV HD Video(*.mkv)”


Tip: Open "Profile Settings" window, here you can adjust the output video codec, size, bit rate, frame rate, audio codec, sample rate, bit rate, channels to make the ripped DVD movie to play perfect.


Step 3: Backup DVD to MKV

Carry out the conversion process by hitting the right-bottom convert button to start to rip DVD to MKV/HD MKV video for streaming.

After ripped DVD to MKV/ HD MKV, you can enjoy this movie on your Popcorn Hour A-400, VLC, etc.

In addition, if you want to rip DVD to lossless MKV with original video quality, you can use Pavtube ByteCopy. It can rip and copy commercial DVD/Blu-ray to lossless MKV with multiple video, subtitle streams and chapter markers at fast speed.

Related Articles:

Monday, August 10, 2015

How to Watch Blu-ray on Sony 4K Ultra HD TV via USB?

Television's latest upgrade, 4K Ultra High Definition, is both awesome and increasingly affordable. Sony 4K Ultra HD TV is one of these brilliant products. Many people bought this TV and can’t wait enjoying ultra high definition movies on it. If you have plenty of Blu-ray collection, you can streaming them on Sony 4K Ultra HD TV with a external Blu-ray drive by HDMI port. But if you get rid of keeping changing Blu-ray disc when you are enjoying movies or don’t want to use a cable, backing up your Blu-ray movies to USB flash drive will be a good idea. 

Copying Blu-ray to USB for Sony 4K Ultra HD TV, on the one hand, can make you enjoy Blu-ray movies without needing heavy external Blu-ray drive and cable. And on the other hand, it offers you convenience carriage and safe storage. And this process will be easy under the help of Pavtube BDMagic(Review). It can easily rip and backup the latest and region-locked Blu-ray to Sony UHD 4K TV supported MPEG1, MP4 formats. In profile settings, it allows you to adjust video codec, size, frame rate, bitrate and audio channel, codec, size, sample rate to get better video quality for Sony UHD 4K TV. Actually, it not only can backup Blu-ray to Sony 4K TV supported formats, it also can change Blu-ray to H.265, M3U8, MKV, AVI, MOV, M4V, etc to play on iPad, Android tablet and so on. 

You can Free download and install BDMagic here: 
          

Other Download:
- Pavtube old official address: http://www.pavtube.cn/blu-ray-ripper/
- Cnet Download: http://download.cnet.com/Pavtube-BDMagic/3000-7970_4-75922877.html

How to watch Blu-ray on Sony 4K Ultra HD TV via USB?

Step 1: Load Blu-ray movie.

Insert Blu-ray disc into your computer Blu-ray drive, click "File" to load Blu-ray disc.
Tips: Click "Subtitle" and "Audio" drop-down box to select your preferred subtitle track and audio stream.


Step 2: Define output file format.

Click "Format" bar, from its drop-down option list, you can select "TVs" profile. Here, it has optimized MP4 format for Sony 4K Ultra HD TV.


Step 3: Set video parameters

When Sony 4K Ultra HD TV plays videos via USB, it will not support 4K resolution. If your Blu-ray is 4K, you need to downscale 4K to 1080p video in “Settings”.


Step 4: Backup Blu-ray to Sony 4K Utra HD TV

After all the settings is done, hit right-bottom "Convert" button to start copying Blu-ray to Sony 4K Utra HD TV. When the process finishes, you can locate the generated MPEG 1 videos in output folder.

When you put the ripped Blu-ray movies to USB flash drive, insert it into USB port on TV, then you can watch Blu-ray on Sony 4K Ultra HD TV via USB.

Related Articles:

Friday, August 7, 2015

Import DVD to Avid Media Composer on Mac

Avid Media Composer is the most preeminent film and video editing solution for some professionals and hobbyists. However, if you want to import DVD into Avid Media Composer on Mac to manege and edit, you will get disappointed. For Avid Media Composer only accepts QuickTime movie files, DV, TNF, AVI, MP2 +, WAV, and sequential TGA or TIF, 2K, 4K, film formats. Although Avid Media Composer can’t support DVD, we can rip and backup DVD to Avid Media Composer suitable formats, like MP4, AVI, to get the access to edit DVD in Avid Media Composer on Mac. 


To change DVD to MP4/WAV/AVI for Avid Media Composer, you can choose to use Pavtube BDMagic for Mac. This software can legally remove DVD copy protection and turn DVD to Avid Media Composer on Mac in MP4, AVI, MOV, WAV, etc with high resolution and rapid speed. It enables you to reset video codec, size, frame and audio channel, size, sample rate to output better video for Avid Media Composer. For windows users, it markets BDMagic for Windows which has the same functions as Mac version. 

Free download and install:
          

Other Download:
- Pavtube old official address: http://www.pavtube.cn/blu-ray-ripper-mac/
- Cnet Download: http://download.cnet.com/Pavtube-BDMagic/3000-7970_4-76177782.html

How to import DVD to Avid Media Composer on Mac?

Step 1. Load DVD to the app

Run the DVD to Avid Media Composer program on Mac and click “File”> “Load from disc” to load DVD to the app.


Step 2. Pick proper format for Avid Media Composer
Choose a proper output format for Avid Media Composer in the format list. You can backup your DVD to HD MP4, HD AVI, etc for edit in Avid Media Composer on Mac.


Step 3: Start rip DVD to MP4 for Avid Media Composer

Hit on the "Convert" button and start ripping DVD to MP4 for Avid Media Composer on Mac. When the progress bar hit 100%, the conversion is finished and you can find the ripped files in output folder.

Now, you can import this ripped DVD video into Avid Media Composer on Mac to manage and edit. Actually, with this DVD to Avid Media Composer program, you still can rip and backup Blu-ray to Avid Media Composer on Mac to recreate.

Related Articles:

Wednesday, August 5, 2015

Copy DVD to NAS for Watching on Smart phones/Computer

Online drivers including NAS have been widely used for storage because of its simplicity, convenience and reasonable price. For people who own lots of DVD movies, NAS drive is a great choice to save space on your shelf, to backup DVD for getting rid of hard discs, or to protect DVD discs from physical damage. Storing DVD to NAS is convenient for you to copy them to smart phones when you needed, or to watch the DVD movies on computer via NAS. 


No matter what goals you want to get as the above mentioned, in order to make copies of DVD movies on NAS drive, you need Pavtube DVDAid(Review), a professional yet easy-to-use DVD tool. It can legally rip and backup the latest and all regions DVD disc to NAS for watching on smart phones and computers with original video quality. It can copy DVD to NAS with wide range of output formats: H.265, M3U8, MP4, MOV, MKV, AVI, FLV, etc. 

What’s more, it also can backup DVD to many other drives and devices, like DropboxWD MyCloudKindle Fire HD,Samsung Galaxy TabletsInnoTab 3, etc. 

Free download and install Pavtube DVDAid:
          

Other Download:
- Pavtube old official address: http://www.pavtube.cn/dvd_ripper/
- Cnet Download: http://download.cnet.com/Pavtube-DVDAid/3000-7970_4-76158510.html

How to Copy DVD to NAS for Watching on Smart phones/Computer?

Step 1: Load DVD movie

Launch Pavtube DVDAid, click the "load from disc" to browse to disc drive and import your DVD into this app. Or add DVD VIDEO_TS folder, DVD ISO or IFO file into DVDAid.


Tip 1: Select subtitle and audio track on the drop-down box of Subtitles/Audio for output, and check the playback on the right side of preview window.

Step 2: Choose format and set profile

Select an optimized video format for output. There are hundreds of profiles under Format menu, you would always find the right one as output format for DVD to NAS.


Tip 2: Meanwhile, profile parameters can be customized in Settings, including video codec, file size, bitrate, frame rate, audio sample rate, audio channels, etc. to get a satisfying video/audio playback on your smart phones and computer.


Step 3: Rip DVD to NAS

Hit on the "Convert" icon and start ripping DVD to NAS for smart phones and computer. After a fast and complete conversion, you will find the ripped movie in output folder.

After ripped DVD to MP4, you can transfer DVD collection to NAS drive and stream them from NAS to your smart phones and computer or other devices you desire.

Related Articles:

Monday, August 3, 2015

Backup iTunes to USB Flash Stick for viewing on HD TV

Have you ever wondered if you can enjoy your iTunes purchased movies on HD TV with a big screen? The answer is yes, you can. Only if you backup your entire iTunes Library on an external USB flash stick, which can provide for a portable media library and make you enjoy iTunes movies on HD TV. And it’s actually pretty easy to offload an entire iTunes collection to a USB flash stick on your computer.


The reason that HD TV can’t play iTunes movies directly is iTunes DRM protection. Except Apple devices, all the other devices can’t natively play iTunes movies. So for realizing viewing iTunes movies on HD TV via USB Flash Stick, you should remove the DRM protection of iTunes movies in advance. Here, you need a professional DRM Removal -Pavtube ChewTune. It can legally remove DRM protection from iTunes movies and backup DRM iTunes movies to USB flash stick for HD TV in MP4, MOV, AVI, etc. Besides iTunes, it also can convert BBC iPlayerAmazon to USB flash stick for viewing on HD TV or other devices. (Read DRM Removal Review)

Free download and install ChewTune:
     

How to backup iTunes movies to USB flash stick for viewing on HD TV?

Step 1. Load iTunes Movie to app

Add video to this iTunes DRM remover and recorder. Drag and drop your videos to it directly, or you can click "File" to load videos as showed blow.


Step 2. Select Output Format

Click the drop-down-list besides "Format" and choose "Common Video > H.264 Video(*.mp4)" as the most compatible format for HD TV.


Tip: Click "Settings" button to enter Profile Settings window, you can adjust video size, codec, bitrate and frame rate and some other audio parameters here.

Step 3. Start convert iTunes to USB flash stick

The last step, hit the big red icon to start backing up DRM iTunes videos to USB flash stick. This app will automatically start to convert. After conversion, click "Open output folder" to quick locate the converted video 

Then you can add the generated movies to USB flash stick. When you insert the USB flash stick to HD TV USB port, you can watch iTunes movies on TV smoothly. 

Related Article:

Friday, July 31, 2015

How to Trim Movies for Taking out Extra Scenes?

Movies bring great entertainment for most people all over the world. A movie has an ability of influencing our lives whether negatively or positively. In some movies, there may be some touching scenes that you want to cut out to upload to YouTube or Vimeo to share with your friends. But to common people, they maybe don’t know how to trim movies to get the video clip they want. Here, I will share my some experience on trimming movies for taking out extra scene.

For a non-IT savvy people like me, a user-friendly video trimming tool is needed to trim movies. Pavtube Video Converter Ultimate is the best choice, I think, after I attempted many video softwares. It can accurately trim video length to take out the extra scenes so as to get desired video clip from Blu-ray/DVD/4K/HD/SD movies. And it can accept MP4, MKV, AVI, FLV, MOV, etc format movie to trim video footage and change the video clip to another popular format if necessary. For better looking, you can crop the black area of the video clip. (Read 5 reasons to choose Video Converter Ultimate). If you also want to try this brilliant app, download it in the below:

Free download and install
          

Other Download:
- Pavtube old official address: http://www.pavtube.cn/blu-ray-video-converter-ultimate/
- Cnet Download: http://download.cnet.com/Pavtube-Video-Converter-Ultimate/3000-2194_4-75938564.html

How to trim movies for taking out extra scenes?

Step 1: Add source movie to the app

Click “File” menu, and select "Add Video/Audio" or "Add from folder" to import source movie files.


Step 2: Select output format

If your source movie is Blu-ray/DVD and other unusual format, you can change it to a popular video format in “Format”


Step 3: Trim movies to take out extra scenes

Click “Edit” to find “Trim” icon. This icon allows you to decide where to start and where to end when converting the selected movie, so that unwanted scenes will be cut out after conversion.


Tip: The "Crop" facility enables you to get rid of the black edges and unwanted area of the image. Crop video by dragging and dropping the crop frame Simply move your mouse cursor to drag and adjust the green frame to desired position.


Step 4:  Start to trim movies 

Clicking the Convert button on main interface, you can go to Conversion window to start to trim movies for taking out extra scenes.

Now, you get a video clip from the source movie. As you seen, it is easy to trim movies to take out extra scenes with this program. Just try!

Related Article: