Thursday, September 17, 2015

Ripping DVD to iPad Pro on Windows/Mac with an Efficient Way

Summary: Maybe, you are looking forward to the coming soon iPad Pro and imagine that wonderful using experience. However, did you have think about the question like how to rip the DVD movies on that legendary iPad Pro. 

Hot searchVideo/Music/Photo files to iPad | GoPro Video to iPad | DVD to iPad Air2

Good news for everybody! Apple has released the new generation of iPad Pro on Sept 16 which has a 12.9-inch Retina touch screen and up to 2,732 x 2,048 resolution.The latest iPad Pro will surely deliver even better movie enjoyment experience than its predecessors. For now, do you get an idea of pursuing the new product?

For those people who love DVD so much, there is still a problem with iPad pro. It has limited storage space like many other portable devices and Apple doesn't seem to load a DVD-ROM on the new iPad Pro, which are still the issues with many DVD collectors since DVDs takes a lot of space and are nit-pick at portable players. What we need is a DVD to iPad Pro Ripper for Windows/Mac to rip DVD to the compatible format for iPad Pro.

Here I strongly recommend you the DVD ripper – Pavtube BDMagic for iPadPro, which can rip copy-protected DVD to iPad Pro friendly format like H.264 MP4 without any third party help. This DVD to iPad Pro software can help you backup DVD, DVD ISO, DVD VIDEO_TS folder to iPad Pro compatible video formats with high quality.(Read review)

BDMagic for Windows:


Other Download:
- Pavtube old official address: http://www.pavtube.cn/blu-ray-ripper/
- Cnet Download: http://download.cnet.com/Pavtube-BDMagic/3000-7970_4-75922877.html

BDMagic for Mac:


Other Download:
- Pavtube old official address: http://www.pavtube.cn/blu-ray-ripper-mac/
- Cnet Download: http://download.cnet.com/Pavtube-BDMagic/3000-7970_4-76177782.html

Just download it and follow the step-by-step guide to copy DVD to iPad Pro.

Ripping DVD to iPad Pro on Windows/Mac with an efficient way.

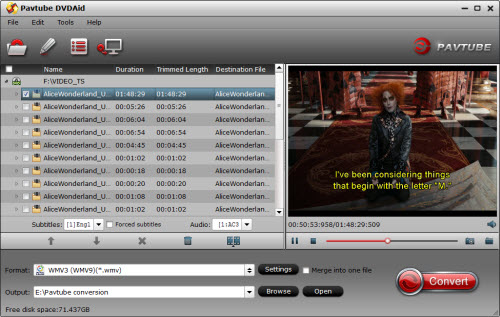
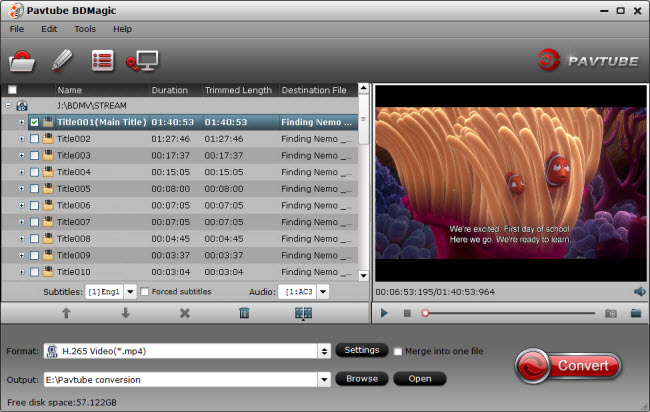
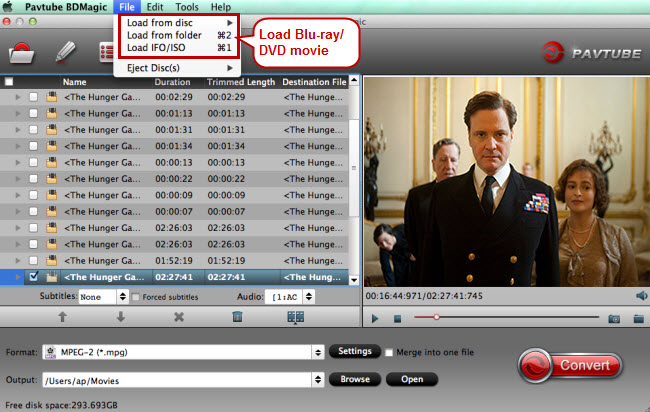
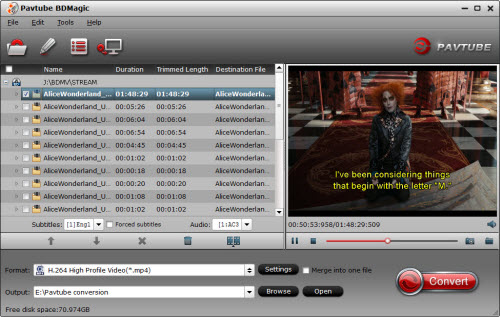
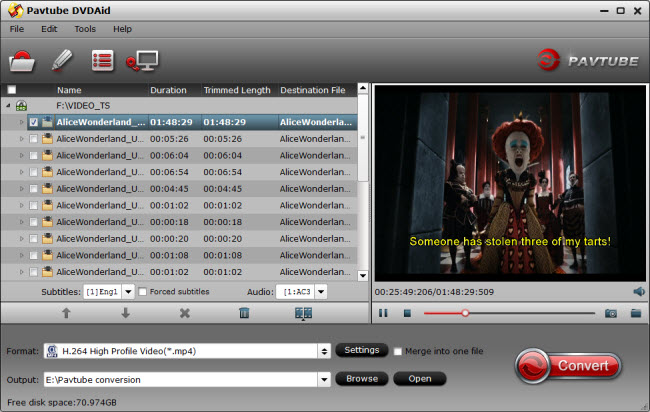
Step 1. Load DVD files.

Put DVD disc into DVD drive on your PC and then click "File", from its drop-down list, select "Load from disc" to import vob files to the program.


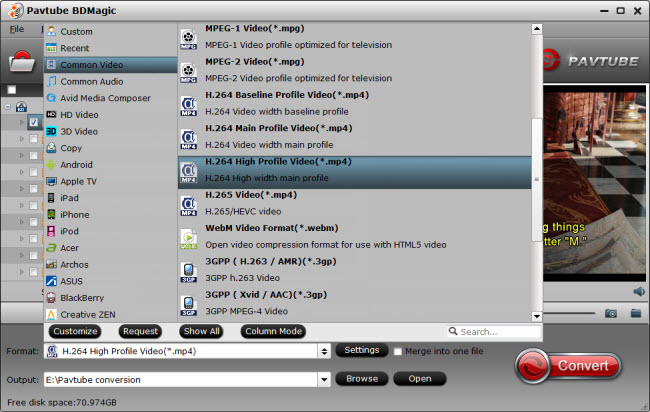
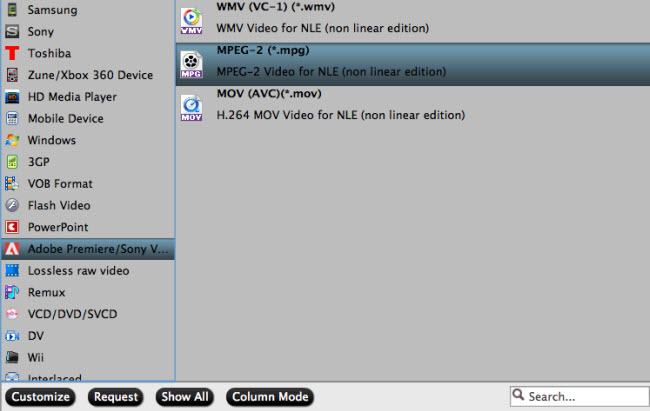
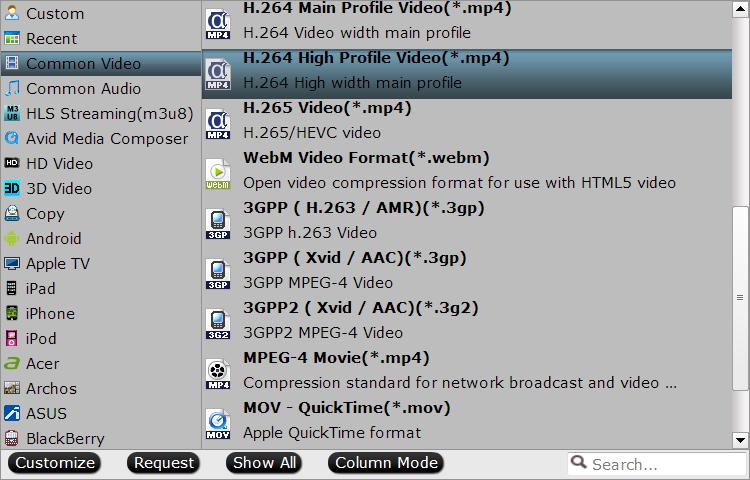
Step 2. Select output profile format.

Click "Format" bar, from its drop-down option, select "H.264 High Profile(*.mp4)" as the output format for watching on iPad Pro.


Step 3. Start conversion

Click “Convert” button and start VOB videos to iPad Pro compatible MP4 format video conversion. After conversion, you can get the converted files by clicking “Open” button. Then connect your iPad Pro to your computer and sync the movie file into the device via iTunes. Now you can enjoying DVD video on your legendary iPad Pro.

More Guides:
Put DVD to Galaxy Tab S2 for Enjoying in Full Screen
Review of Best DVD to Samsung Galaxy A5 Ripper + Guide 
Best 3 DVD to Samsung Galaxy Note 4 Rippers Review
Rip/Copy Escape Plan DVD to Galaxy Tab 2 7.0
Put DVD to Zeiss VR One for Enjoyment via Oculus Cinema

Friday, September 11, 2015

How to Upload DVD to Dropbox?

Dropbox is a storage document that can synchronizes your files online and across computers. Any files,like movies, musics, images, etc, can be placed into Dropbox. No matter where you log in your Dropbox account, the files you already stored are available. That means that if you put your DVD movies to Dropbox, you can play them on your computer, moblie phone and tablet anywhere and anytime only if you have an internet connection.

However, Dropbox support various audio and video formats, as MPEG, 3GP, MOV, MTS, you name it. The only pity thing is DVD are not be read by Dropbox. So if you want to upload DVD into Dropbox, the only way is to rip and copy DVD to Dropbox suitable formats.

To reach the goal, you can use a DVD to Dropbox Converter - Pavtube DVDAid. As a professional video converter, DVDAid can rip DVD to Dropbox with more than 200 video and audio formats including MP4, MKV, M3U8, H.265, AAC. What’s more, with it, you can edit source DVD content with built-in video editor. ( Know more about DVDAid)

Free download and install:


Other Download:
- Pavtube old official address: http://www.pavtube.cn/dvd_ripper/
- Cnet Download: http://download.cnet.com/Pavtube-DVDAid/3000-7970_4-76158510.html

How to Transfer DVD to Dropbox for Sharing and enjoying?

Step 1: Load DVD movies into programme

Launch the DVD Ripper for Dropbox and click "Load from disc" icon to load DVD movies for converting.


Step 2: Choose right output format

Since Dropbox supports numbers of video formats, so we have many choices in the aspect of format. Here, we select H.264 MP4 as the final format for its extensive employment to many multimedia players. Navigate to “Format” > “HD Video” > “H.264 HD Video(*.mp4)”.

Tip: If you want to convert DVD to MOV, here is a guide.


Step 3: To finish the conversion

The last step is to click the big red “Convert” to finish the process. When conversion finished, locate the created video through “Open”.

Drop your files into Dropbox

Switch on your Dropbox and log it in.
In the top menu, find “Upload” button and click it.
When the window appear, select the file you want to add to your Dropbox
After you finished the above three steps, the window will disappear and a progress indicator will shows to you.

When uploading process finishes, it means that the information is updated on your Dropbox account. Then you can access your DVD videos from Dropbox on your mobile phone, computer and tablet.

Related Articles:

Tuesday, September 8, 2015

Watch DVD on Samsung Galaxy Note 5

Samsung Galaxy Note 5 have become a hot topic for its  super AMOLED displays with a 2560 x 1440 QHD resolution. This is really the big appeal to cinephile. It allows them to enjoy the super high definition movies on the phone at home or on the go. It is excited just image that. it is also believed that watching DVD movies on the latest Samsung flagship smartphone will be a great enjoyment. Think about it. If you miss the films for theatrical release, when these films come out on DVD, watching DVD movies on Samsung Galaxy Note 5 time after time is more comfortable, even. 

However, any phone is not big enough to hold any DVD disc. And that's a problem for all of us. But a DVD to Samsung converter, that would be different. With a DVD Ripper, you can remove DVD Playback obstacle on Galaxy Note 5 and you can rip DVD to Galaxy Note 5 supported format on your Windows or Mac computer in advance.   

Pavtube DVDAid (Review) is exactly the right one DVD ripper for you to backup DVD to Galaxy Note 5. It help you rip DVD to Galaxy Note 5 friendly formats at fast ripping speed and original quality. It not only can output the Samsung Note 5 supported format, but also MKV, H.265, M3U8, AVI, MP4, MOV, M4V, etc for other devices, like NASWD MyCloudKindle Fire

Free download and install:


Other Download:
- Pavtube old official address: http://www.pavtube.cn/dvd_ripper/
- Cnet Download: http://download.cnet.com/Pavtube-DVDAid/3000-7970_4-76158510.html

How to rip DVD to Samsung Galaxy Note 5 suitable format?

Step 1. Load DVD movie to the ripper software

First, insert a DVD disc into the computer DVD-ROM drive, back to the software interface and click the upper “Load DVD” button. Then it flashes right to you preloading the DVD content. And you’ll notice that among the several titles there’s a title ticked off. It is the main movie. You wouldn’t have to consider other titles.


Step 2. Chose target format.

Click the drop-down list besides Format, you can find many presets for different devices, editing programs and media player. Let’s choose "Samsung" in left area and select "Samsung Galaxy Note(*.mp4)" as target video format for Galaxy Note 5.


Tip: click the “Settings” button to adjust the output parameters including “resolution”, “bitrate”, “frame rate”, and “encoder” to make the output video play best on your Galaxy Note 5.

Step 3. Start the DVD to Galaxy Note 5 conversion

Click “Convert”, and this program rips DVDs to a Galaxy Note 5 compatible file format. What surprises me is that the DVD copy was without flaw, almost without loss of quality. After the conversion, click “Opent” button and check the output DVD movie on your computer.

Now you can watch DVD movies on Galaxy Note 5, only if you connect your Galaxy Note 5 to computer using the cable and do streaming.

Related Articles:

Monday, August 31, 2015

Upload Blu-ray to Dropbox for Sharing

Dropbox is a storage document that can synchronizes your files online and across computers. Any files,like movies, musics, images, etc, can be placed into Dropbox. Only if you have a Dropbox client portal on your computer, moblie phone and tablet that has an internet connection, you can access the stored files from Dropbox whenever and wherever. But as like uploading DVD to Dropbox, if you want to add Blu-ray to Dropbox for playing and organizing, it will have a little trouble.

Hot search: Blu-ray to Wireless HDD | Blu-ray to WD MyCloud | Blu-ray to NAS | Blu-ray to WD External HDD | 

That’s because although Dropbox can support many kinds of videos like 3GP, AVI, MOV, WMV, M4V, MKV, etc, it can’t put Blu-ray disc online for lacking of Blu-ray drive. So for uploading Blu-ray to Dropbox for sharing and playing, a Blu-ray Ripper is the key point. 

Pavtube BDMagic is a wise choice for you to rip Blu-ray to Dropbox with suitable format. This Blu-ray ripping tool can rip any encrypted Blu-ray and turn the Blu-ray movies to Dropbox in MP4, MOV, AVI, MKV, etc popular formats. For the video size limit of Dropbox site, the built-in editor also allows you to extract Blu-ray clips with the very part you want. Or, you can just choose to rip certain chapters of the Blu-ray as you like. (Review)

You can free download and install BDMagic on Windows computer: 
          

Other Download:
- Pavtube old official address: http://www.pavtube.cn/blu-ray-ripper/
- Cnet Download: http://download.cnet.com/Pavtube-BDMagic/3000-7970_4-75922877.html

How to add Blu-ray to Dropbox with suitable format?

Step 1: Load Blu-ray movies to app

Run the Blu-ray to Dropbox software and click "BD/DVD disc" icon to load Blu-ray movies for converting. You can also import movies files from Blu-ray folder, ISO image files.


Step 2. Choose output format

Click "Format" and through the profile to select Dropbox highly compatible format like MP4, MOV from "Common Video" profile list. For those who wanna upload Blu-ray files to Dropbox and share on tablet or phones, you can choose a certain preset like iPad as target format. 


Tip: You can click settings button to customize the output parameters, such as resolution, bitrate, etc, you can also skip this step.

Step 3: Rip Blu-ray to Dropbox

After all settings, click "Convert" button to rip Blu-ray to Dropbox. When the process finishes, open the output folder to locate the generated file.

Upload ripped Blu-ray to Dropbox

1. Sign in to the Dropbox website.
2. Click the Upload button from the very top of the window. The upload button
3. A window will appear. Click the Choose File button and then select the file on your computer that you'd like to add to your Dropbox.
4. Choose as many files as you like, and then click the Start Upload button.
5. The window will disappear, your files will start uploading, and you'll be shown a progress indicator. That's it, you've added the converted Blu-ray files to your Dropbox!

Once you've added ripped Blu-ray files to Dropbox, now you'll make it available for viewing on other computers, Android, Apple devices anytime, anywhere just with the help of your Dropbox.

Related Articles:

Wednesday, August 26, 2015

How to Put Concerts Blu-ray Disc to iPad For Listening?

Yesterday, I received an e-mail from Quora to ask me how to put concert Blu-ray disc to iPad with only the song: “My sister in Conservatory of Music gave me a Concert Blu-ray disc recently. I want to extract the song from the Blu-ray disc to my iPad so that I can listen them with my momentum headphones. But I don’t know how to do. Do I need to use some software? ”

Of course you need a software. You need a Blu-ray audio extractor, which can bypass the Blu-ray encryption and extract the audio from Blu-ray disc to MP3 for iPad. For me, I like using Pavtube BDMagic to fulfill the task. I like using it to deal with all my affairs about Blu-ray. I have to say that it is really a professional Blu-ray ripper + Blu-ray Audio Extractor. It can easily extract the audio from your Blu-ray disc for iPad with the suitable format. It can output MP3, AAC, FLAC, MKA, OGG, WAV, etc audio and H.265/HEVC, H.264/MPEG-4, DivX, XviD, MKV, MP4, AVI, etc video with high quality. (Review)

Note: Mac users should use BDMagic for Mac

Free download and install BDMagic on Windows: 
          

Other Download:
- Pavtube old official address: http://www.pavtube.cn/blu-ray-ripper/
- Cnet Download: http://download.cnet.com/Pavtube-BDMagic/3000-7970_4-75922877.html

Step 1. Load concert Blu-ray disc

Run the Blu-ray to iPad ripper on computer and click “File” > “Load from disc” to load the concert Blu-ray disc to the app.


Step 2. Choose MP3 as output format

As iPad supports playing MP3 audio files, just click the format bar to follow “Common Audio” option and pick “MP3 - MPEG Layer-3 Audio(*.mp3)” as the output format.


Tip: if you need the certain clip of the Blu-ray audio, you can trim the footage in built-in video editing tool. Hit the pencil like icon “Edit” on the menu and open the video editor window. Here, you can find the trim function. 

Step 3. Rip Blu-ray disc to iPad

Click on the “Convert” button to start ripping concert Blu-ray disc to MP3 for playing songs on iPad. After the process, open the output folder to find the generated audio file.

Then you can transfer the Blu-ray audio to iPad. You should be able to enjoy the audio on iPad with your momentum headphones.

Related Articles:

Monday, August 24, 2015

Put Sony PXW-X70 Pro XDCAM MXF Video to iMovie for Editing

With high definition and delicate image, Sony PXW-X70 camcorder is popular among amateurish lovers and professional photographers. When taking videos, it no doubt is the best choice. But it still brings us some troubles, for example, when we want to put Sony PXW-X70 Video to iMovie to do some video processing:

“I several days ago took some exciting challenge videos with my Sony PXW-X70 XDCAM camcorder. But I was refused to edit my footage in iMovie. How does it go wrong? Appreciate if there’s a big favor”

Frankly speaking, do you ever meet the trouble just like above? And do you get the reason clearly? It is because the output video format of Sony PXW-X70 camcorder is MXF container format, which can’t be accepted by most media players or editing software. Thus, you maybe need the help of Pavtube iMedia Converter for Mac, which can perfectly turn Sony PXW-X70 MXF to iMovie supported formats, like MOV, AVCHD, DV, MPEG-2, etc. 

Free download and install it on Mac:
          

Other Download:
- Pavtube old official address: http://www.pavtube.cn/imedia-converter-mac/
- Cnet Download: http://download.cnet.com/Pavtube-iMedia-Converter/3000-2194_4-76177788.html

How to put Sony PXW-X70 Pro XDCAM MXF Video to iMovie for Editing?

Step 1: Load source MXF file to app

Click “Folder” icon and choose “Add audio/video” to load the Sony PXW-X70 MXF file to this MXF to iMovie software on Mac. 


Step 2: Choose iMoive supported video format

Click the format bar to follow “iMovie and Final Cut Pro…” and choose “Apple InterMediate Codec (AIC) (*.mov).” as the output format. This format is used with all HD workflows in editing software such as iMovie, Final Cut Express, and until Final Cut Pro version 5.


Step 3. Edit MXF file

If your video is too long and you just need a clip of it. You can click the pencil icon to go to the editing interface where you’re allowed to trim your favorite clips. You even can crop unwanted images, add watermarks, and insert subtitles, etc.


Step 4: Convert MXF video to AIC MOV

Go back to the main UI and click “Convert” to start conversion from MXF to the video format AIC MOV for iMovie. In the output folder, you can find the generated file. 

Now, you can run iMovie on your Mac. Then drag the converted Sony PXW-X70 them from the Finder to the even in the Libraries list in iMovie. Now, you can edit the video in iMovie. 

Hot search: DVD to Promiere Pro CC | DVD to FCP X | Blu-ray to FCP X | Blu-ray to Promiere Pro CC

Related Articles:

Friday, August 21, 2015

Import Blu-ray to Premiere Pro CC for Editing

As a professional video editing software, Premiere Pro CC is widely used by professionals and hobbyists for its powerful editing features. You can recreate and reproduce your personal videos by it to show your skills. But when your raw videos is Blu-ray movies, how to import and edit these Blu-ray movies on Premiere Pro CC? After all, you can’t deny that many wonderful and high definition videos exist in Blu-ray discs. 

Hot search: Blu-ray to FCP X | DVD to FCP X | DVD to Avid Media Composer | Blu-ray to Avid Media Composer | MXF to Edius Pro | 

Blu-ray give us better visual enjoyment but the movies mode is really hard to use for its complex protection technology in some non-linear video editing tools like Premiere Pro CC. Fortunately, there are always solutions to remedy the shortage. To import footage on Blu-ray into Premiere Pro CC, you’ll need to rip and convert Blu-ray to a more-editing friendly format like MPG or WMV at first. Here you can try Pavtube BDMagic for Mac, (See other options).

It can rip and backup Blu-ray to MPEG-2, WMV, MPG, MOV format on Mac, which can be easily recognized by Premiere Pro CC, with the original video quality. You can choose to rip one title or entire Blu-ray disc to MPEG-2 format video favored by Premiere Pro CC on Mac OS X El Capitan 10.11, Yosemite 10.10 and Maverick 10.9. It enables you to trim DVD video footage, merge several video clips, crop video black area before outputting. For importing commercial DVD to Premiere Pro CC, it is also a good choice. 

Now, you can download and install BDMagic for Mac freely and follow the next steps to rip Blu-ray to Premiere Pro CC.


Other Download:
- Pavtube old official address: http://www.pavtube.cn/blu-ray-ripper-mac/
- Cnet Download: http://download.cnet.com/Pavtube-BDMagic/3000-7970_4-76177782.html

How to import Blu-ray to Premiere Pro CC on Mac?

Step 1. Load Blu-ray movie

Run the Blu-ray to Premiere ripper for Mac, and click “File” to import Blu-ray movie to the app.


Step 2. Choose Premiere compatible format

Ripping Blu-ray clips to MPG, WMV or MOV - highly compatible with Adobe Premiere will be great. Here you can click the format bar to follow “Adobe Premiere/Sony V…” > “MPEG-2(*.mpg).” for Premiere Pro CC.


Step 3. Cut clips from Blu-ray movie (Optional)

To get the clips from Blu-ray video, open the “Video Editor” by clicking “Edit” and cut the wanted Blu-ray movie clips by tapping on “trim.” Other helpful editing functions are cut off black bars by cropping, adding watermarks, adjusting special effects.


Step 4. Rip Blu-ray to Premiere Pro CC

When back to the main interface, click “Convert” in bottom right screen to realize Blu-ray to Premiere Pro CC conversion for free importing and ingesting by Adobe Premiere Pro CC.

Now, you can import the ripped Blu-ray media file to Premiere Pro CC on Mac for your editing.

Related Articles: